Progressive Delivery with Argo Rollouts
Progressive Delivery with Argo Rollouts
Introduction
Progressive delivery is about the controlled deployment of an application. It is by no means a new concept when it comes to software deployment and delivery. The concept (maybe not in name) has been around for quite a while, and if you’ve done application or system updates prior to kubernetes some of these concepts will sound familiar. The rollout resource is a direct replacement of the kubernetes deployment resource. This allows for very easy conversion of an existing deployment into a rollout resource.
Additionally, Argo Rollouts can use metrics from a number of providers (we’ll be using the default - prometheus) which can be used to abort a rollout if there are issues with the application deployment such as failed health checks, pod restarts ..etc. Using metrics to control the rollout is beyond the scope of this blog, but will be part of a future blog.
OpenShift and OpenShift-GitOps do not officially support argo-rollouts to date, but support should be expected in 2023
Blue/Green is the concept of having two versions of the same application running at the same time so that we can verify that the application updates are behaving the way they are supposed to. The blue (or production) application doesn’t change at all and the green (preview/updated application) is deployed beside it. While this is a tried and true approach it does have some drawbacks. One significant drawback to this strategy is that you will need to have enough capacity to support both applications running simultaneously. This can be a major hurdle in resource-constrained environments, or with applications that require a license to operate.
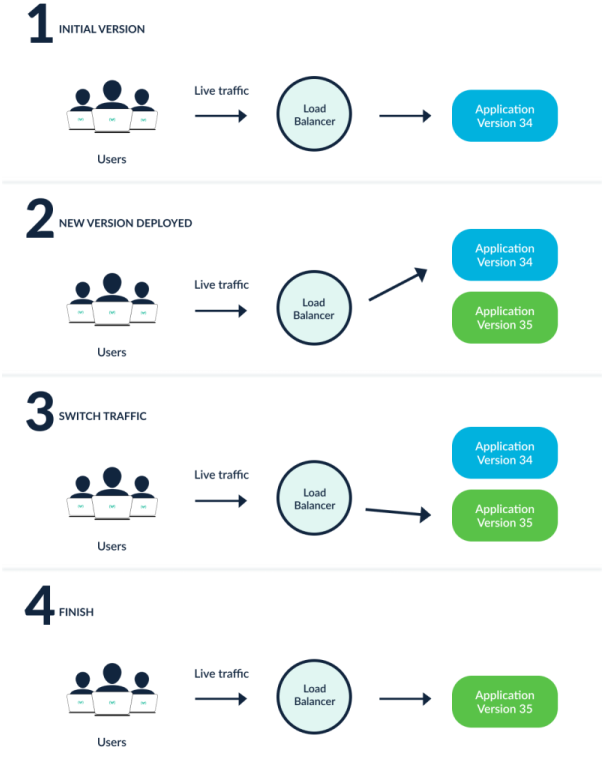 Credits: argoproj.github.io
Canary is the more modern, more advanced approach to blue/green. With a canary deployment we deploy the new version of the application to a subset of our users, while the rest will continue with the original version. If there’s an issue with the new version, only that subset of users will be affected. With canary rollouts we can specify the percentage of traffic that gets allocated to the new application release as well as a timer for how long we want in between steps. This is ideal when you are trying to test a new feature and you want to gather metrics / data from live traffic.
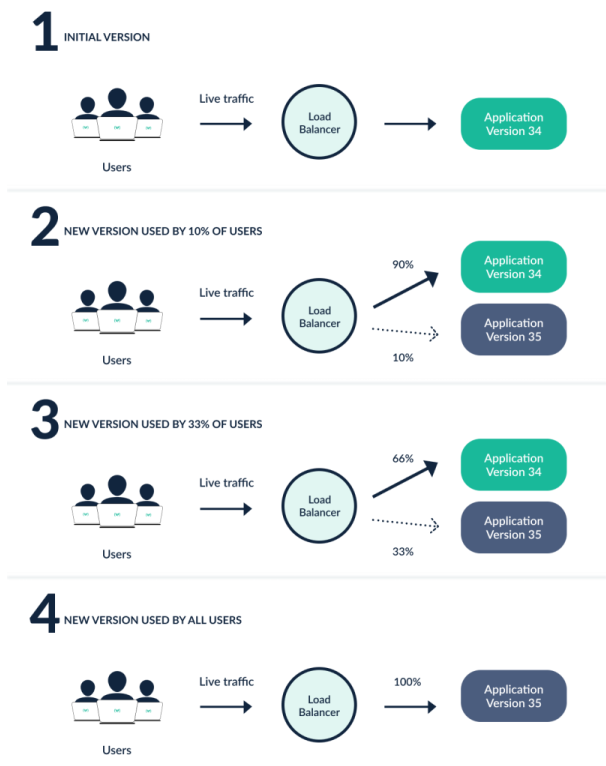 Credits: argoproj.github.io
In this blog, we’re going to use OpenShift Gitops to deploy the Argo Rollouts progressive delivery controller and we’re going to walk through a blue/green deployment as well as a canary deployment.
Preparation
Let’s start by deploying the argo-rollouts pattern from the argo-rollouts. For this demo, I have deployed a 3-Node compact cluster using m5.2xlarge machine types in AWS. This demo will only use rollouts to deploy onto a single cluster.
oc get nodes
NAME                                         STATUS   ROLES           AGE   VERSION
ip-10-0-137-28.us-east-2.compute.internal    Ready    master,worker   13h   v1.24.6+5157800
ip-10-0-165-204.us-east-2.compute.internal   Ready    master,worker   13h   v1.24.6+5157800
ip-10-0-206-142.us-east-2.compute.internal   Ready    master,worker   13h   v1.24.6+5157800
oc get machines -n openshift-machine-api
NAME                               PHASE     TYPE        REGION      ZONE         AGE
argo-rollouts-7d9dd-master-0   Running   m5.2xlarge   us-east-2   us-east-2a   13h
argo-rollouts-7d9dd-master-1   Running   m5.2xlarge   us-east-2   us-east-2b   13h
argo-rollouts-7d9dd-master-2   Running   m5.2xlarge   us-east-2   us-east-2c   13h
If you’ve never deployed OpenShift before, you could try ROSA the pay-as-you-go OpenShift managed service.
Next, you’ll need to create a fork of the argo-rollouts repo. Go there in a browser, make sure you’re logged in to GitHub, click the “Fork” button, and confirm the destination by clicking the big green “Create fork” button.
Next, install the Validated Patterns operator from Operator Hub.
And finally, click through to the installed operator, and select the Create instance button and fill out the Create a Pattern form. Most of the defaults
are fine, but make sure you update the GitSpec URL to point to your fork of
argo-rollouts, rather than https://github.com/hybrid-cloud-patterns/argo-rollouts.
To see what’s going on, click on “Installed Operators” and then change the Project to “All Projects”. After a bit, you will see the following operators installed: Advanced Cluster Manager for Kubernetes multicluster engine for kubernetes Red Hat OpenShift GitOps Package Server Validated Patterns Operator
Once everything is installed we need to clone our fork of the repository to our local machine. Go to your account in github and click the big green “code” button, and then click the “copy” icon to copy the url of the repository.
Switch over to your cli and type: git clone <paste_the_url_just_copied> ; next, change directories into the repository.
Optionally, the argo project provides a plugin for the kubectl which can be used to manage rollouts in our cluster. This is totally optional and not required, however it does make it easy to track progress of the rollout. To install follow the official install procedures.
Argo Rollouts
In your copy of the repository, we can find the manifests that make up argo rollouts in charts/all/argo-rollouts/templates. Now we COULD use oc/kubectl create -f but that defeats the purpose of gitops! So we’re going to use openshift-gitops and the validated pattern framework to deploy the argo rollouts controller for us.
If you are interested in understanding what each of the manifests are for, I encourage you to visit the argo rollouts architecture page which details each resource.
Let’s review how the framework is deploying argo-rollouts for us. Take a look at values-hub.yaml to see how argo rollouts is declared:
First, we tell argocd to create the argo-rollouts namespace
  namespaces:
  - open-cluster-management
  - vault
  - golang-external-secrets
  - argo-rollouts
Next, we define a project, a project is an argocd resource that groups application resources together
  projects:
  - hub
  - argo-rollouts
Finally, we add a map for argo-rollouts where we define our application
  applications:
  <...omitted...>
    argo-rollouts:
      name: argo-rollouts
      namespace: argo-rollouts
      project: argo-rollouts
      path: charts/all/argo-rollouts
To watch the deployment in action, log in to your cluster console, and then select the “squared” drop down box and select “Hub ArgoCD”. After accepting the security warnings for self-signed certificates, in the ArgoCD login screen click “Login with OpenShift”, when prompted select “Allow user permissions”.
You are now in the ArgoCD console and can see the applications deployed (or being deployed). If you don’t see the rollouts application right away don’t fret, by default, ArgoCD’s reconciliation loop runs every 3 minutes.
After a few, you should see the following in your ArgoCD console.

With Argo Rollouts deployed, we can start using progressive delivery! Let’s start with blue/green!
Blue/Green
When you use a blue/green deployment strategy you will have two instances of the application running simultaneously. The “blue” or production instance will continue to receive connections and run without change, the “green” or updated application will start and be available using a different service. You can create a route (or ingress) if you’d like, and then when satisfied promote the “green” application to production.
Once promoted the rollout will update the “blue” replicaset which will then scale the “blue” version of the pods down to zero. After the rollout promotion is completed we can check the rollout status using the argo rollouts plugin.
Let’s add the bluegreen application to our pattern. The first thing we need to do is update the values-hub.yaml file.
- Add
bluegreennamespace to the list of namespaces to be created by openshift-gitops
  namespaces:
  - open-cluster-management
  - vault
  - golang-external-secrets
  - argo-rollouts
  - bluegreen
We’re going to create this application in the
argo-rolloutsproject - this is just for simplicity in the demo.Add ‘bluegreen’ application stanza under
Applications
  applications:
    <... omitted ...>
    bluegreen:
      name: bluegreen
      namespace: bluegreen
      project: argo-rollouts
      path: charts/all/bluegreen
When finished editing make sure that you commit your changes to git!
git commit -am "Added blue-green application to the pattern"

git push -u origin main
Our demo application is an example application that the argo project provides. We declare this image in the values-global.yaml file, and we will modify the tag to trigger the rollout.
values-global.yaml
  rollout:
    image: argoproj/rollouts-demo:blue
Review the snippet below to add bluegreen to the pattern!
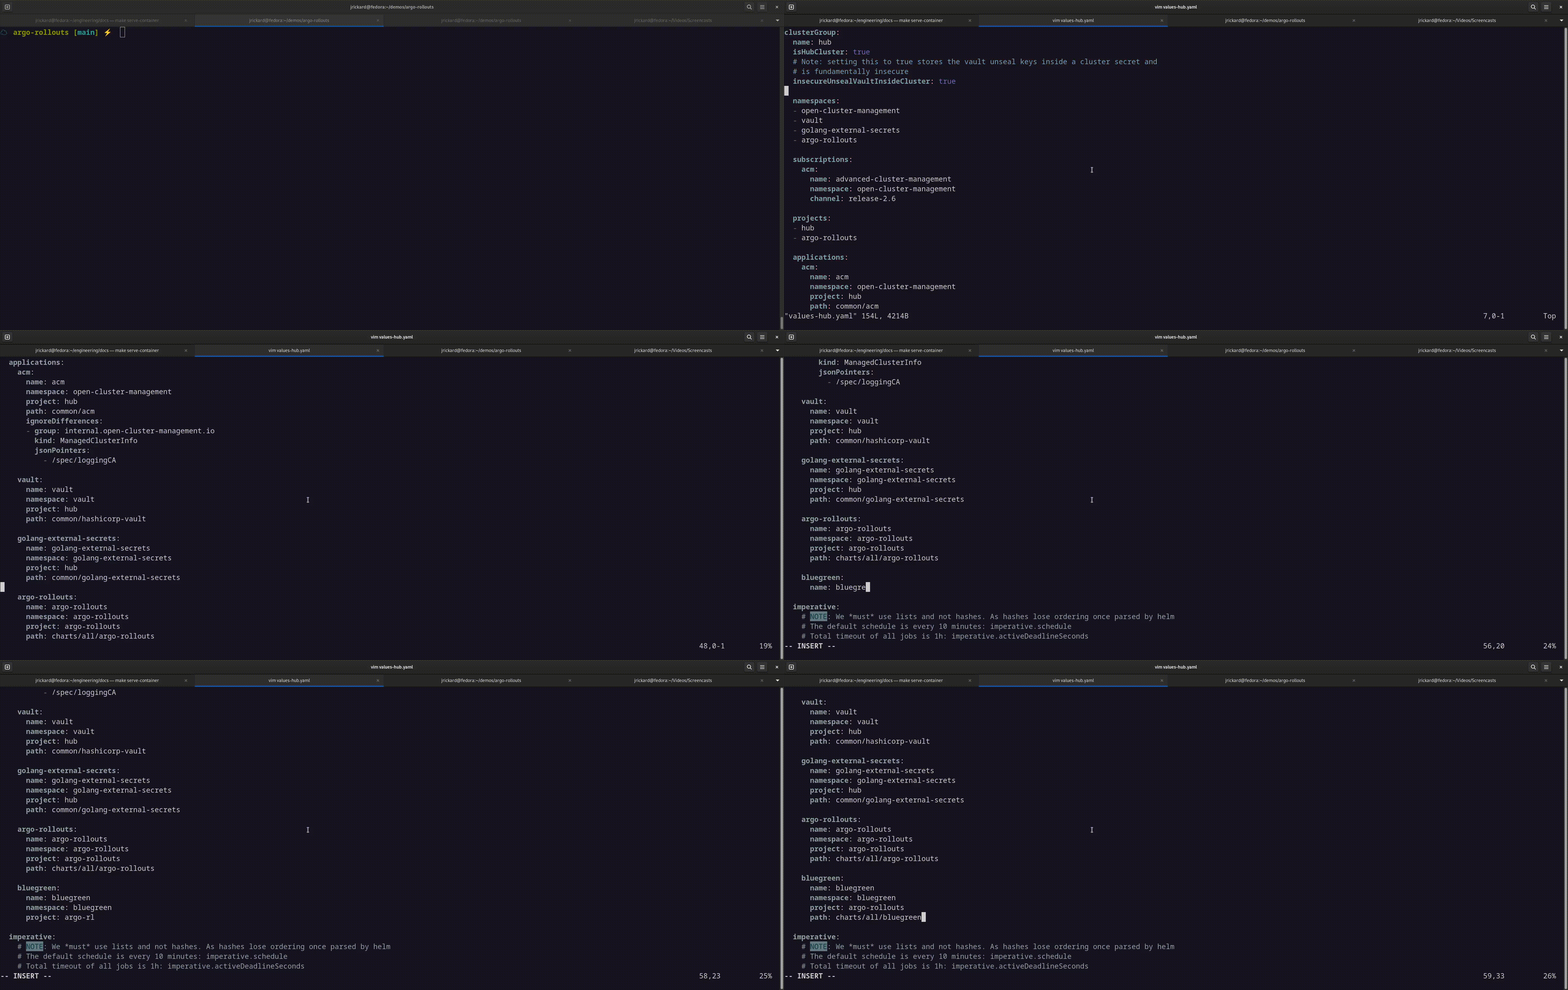
Check that the application deployed successfully in the argocd user interface. If everything went well you should see something like this:

With our demo application deployed, let’s a rollout by changing the image tag in values-global.yaml to green.
Once we’ve made the change we need to commit and push our changes to git
git add values-global.yaml

git commit -m "triggering rollout with image update"

git push -u origin main
Once argocd recognizes the update, the rollout controller will create a replicaset for the green application and will start the desired number of pods. The green application is using its own service and that service is exposed via a route. Once the replicaset has created the pods, the rollout will pause waiting for an action to either promote or abort the rollout.
We have two ways of viewing the rollout. The first is through UI in the argocd interface, and the other is using the argocd rollouts plugin. The UI doesn’t provide as much detail as the plugin, so I’ll show you what both look like for reference.
This is what the plugin shows us before the image tag has been detected:
oc argo rollouts get rollout bluegreen
Name:            bluegreen
Namespace:       bluegreen
Status:          ✔ Healthy
Strategy:        BlueGreen
Images:          argoproj/rollouts-demo:blue (stable, active)
Replicas:
  Desired:       2
  Current:       2
  Updated:       2
  Ready:         2
  Available:     2

NAME                                   KIND        STATUS     AGE  INFO
⟳ bluegreen                            Rollout     ✔ Healthy  11m
└──# revision:1
   └──⧉ bluegreen-5f5746dc47           ReplicaSet  ✔ Healthy  11m  stable,active
      ├──□ bluegreen-5f5746dc47-5wfnt  Pod         ✔ Running  11m  ready:1/1
      └──□ bluegreen-5f5746dc47-q52cl  Pod         ✔ Running  11m  ready:1/1
Once the image tag has been detected and the rollout executed, this is what we see:
oc argo rollouts get rollout bluegreen
Name:            bluegreen
Namespace:       bluegreen
Status:          ॥ Paused
Message:         BlueGreenPause
Strategy:        BlueGreen
Images:          argoproj/rollouts-demo:blue (stable, active)
                 argoproj/rollouts-demo:green (preview)
Replicas:
  Desired:       2
  Current:       4
  Updated:       2
  Ready:         2
  Available:     2

NAME                                   KIND        STATUS     AGE  INFO
⟳ bluegreen                            Rollout     ॥ Paused   13m
├──# revision:2
│  └──⧉ bluegreen-69d5bcb78            ReplicaSet  ✔ Healthy  66s  preview
│     ├──□ bluegreen-69d5bcb78-d5bjp   Pod         ✔ Running  66s  ready:1/1
│     └──□ bluegreen-69d5bcb78-vnw4q   Pod         ✔ Running  66s  ready:1/1
└──# revision:1
   └──⧉ bluegreen-5f5746dc47           ReplicaSet  ✔ Healthy  13m  stable,active
      ├──□ bluegreen-5f5746dc47-5wfnt  Pod         ✔ Running  13m  ready:1/1
      └──□ bluegreen-5f5746dc47-q52cl  Pod         ✔ Running  13m  ready:1/1
In the argoCD interface this what the rollout looks like:
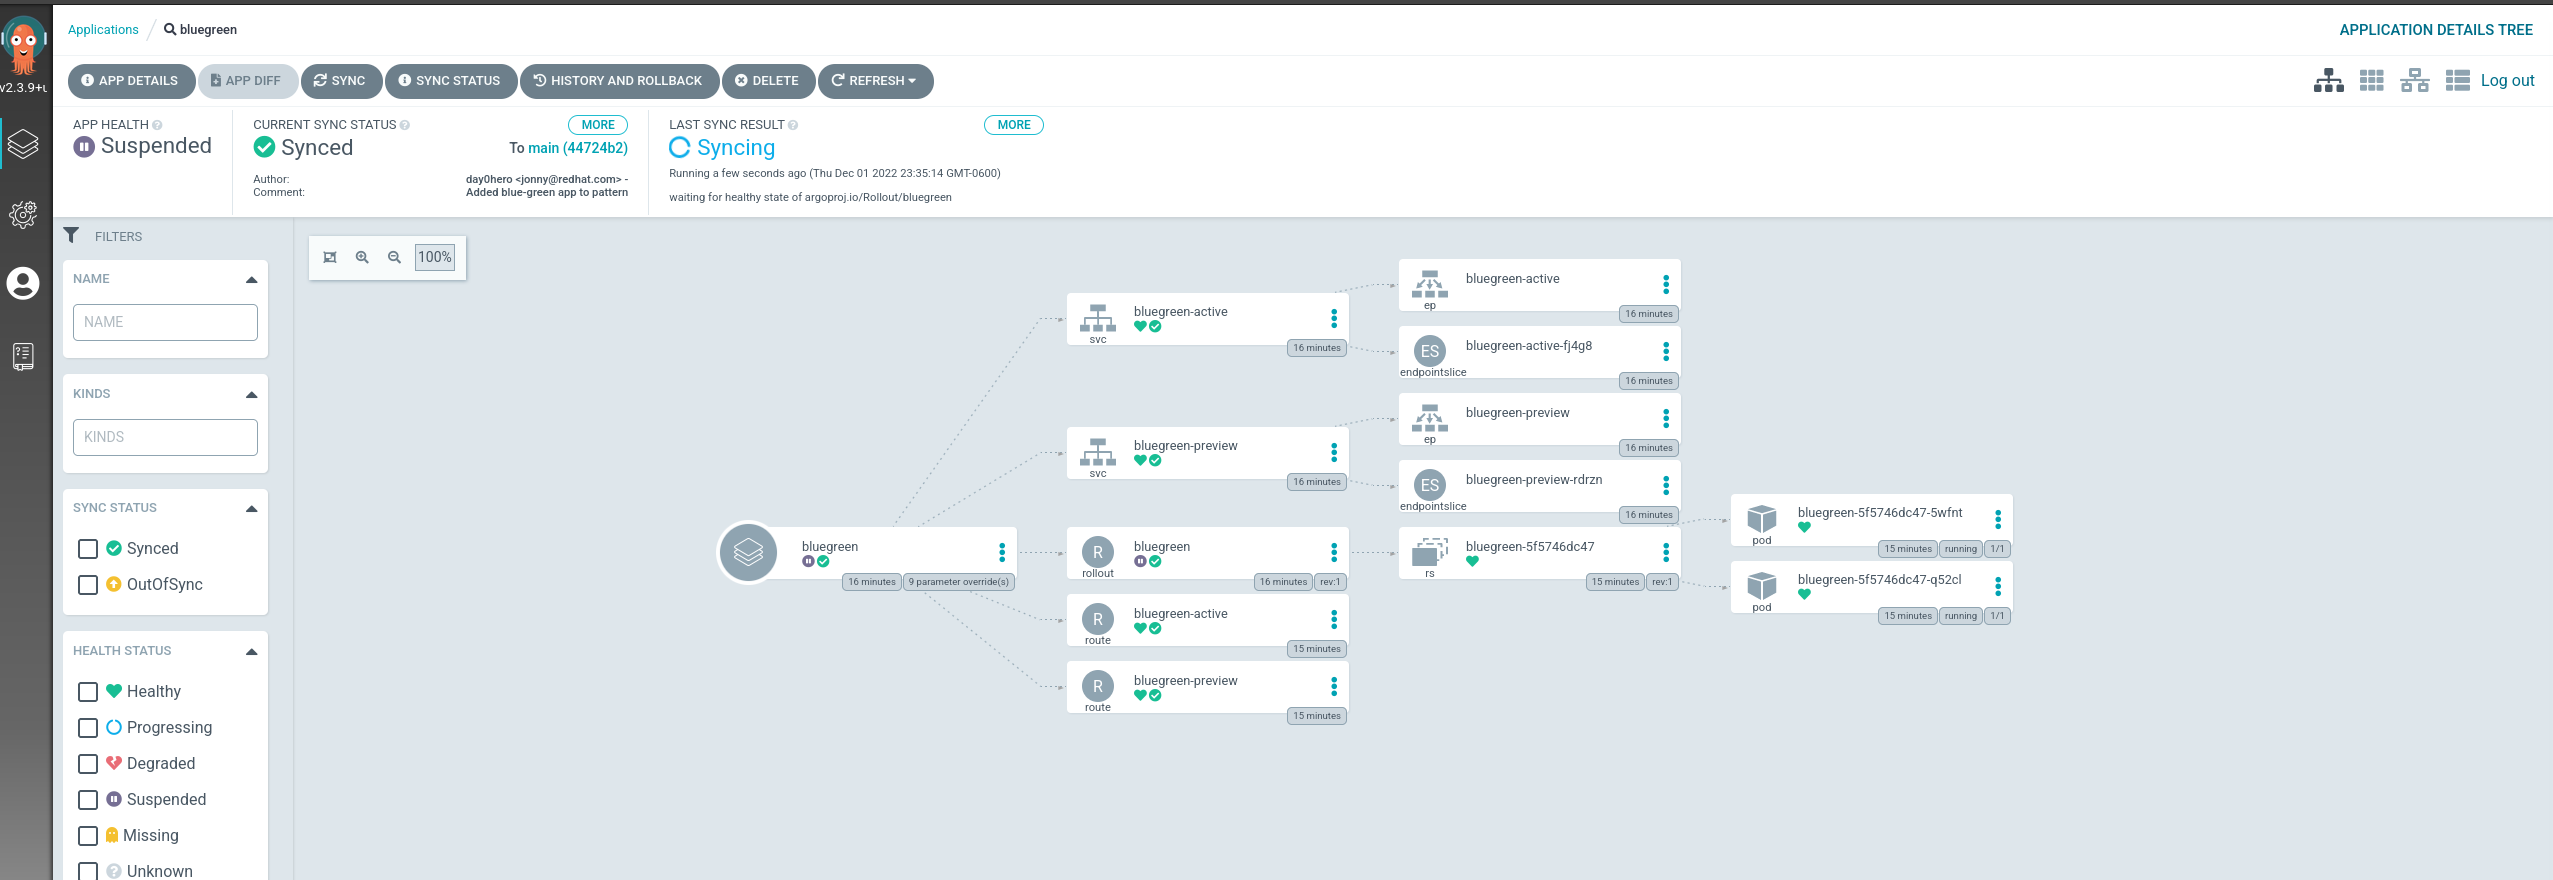
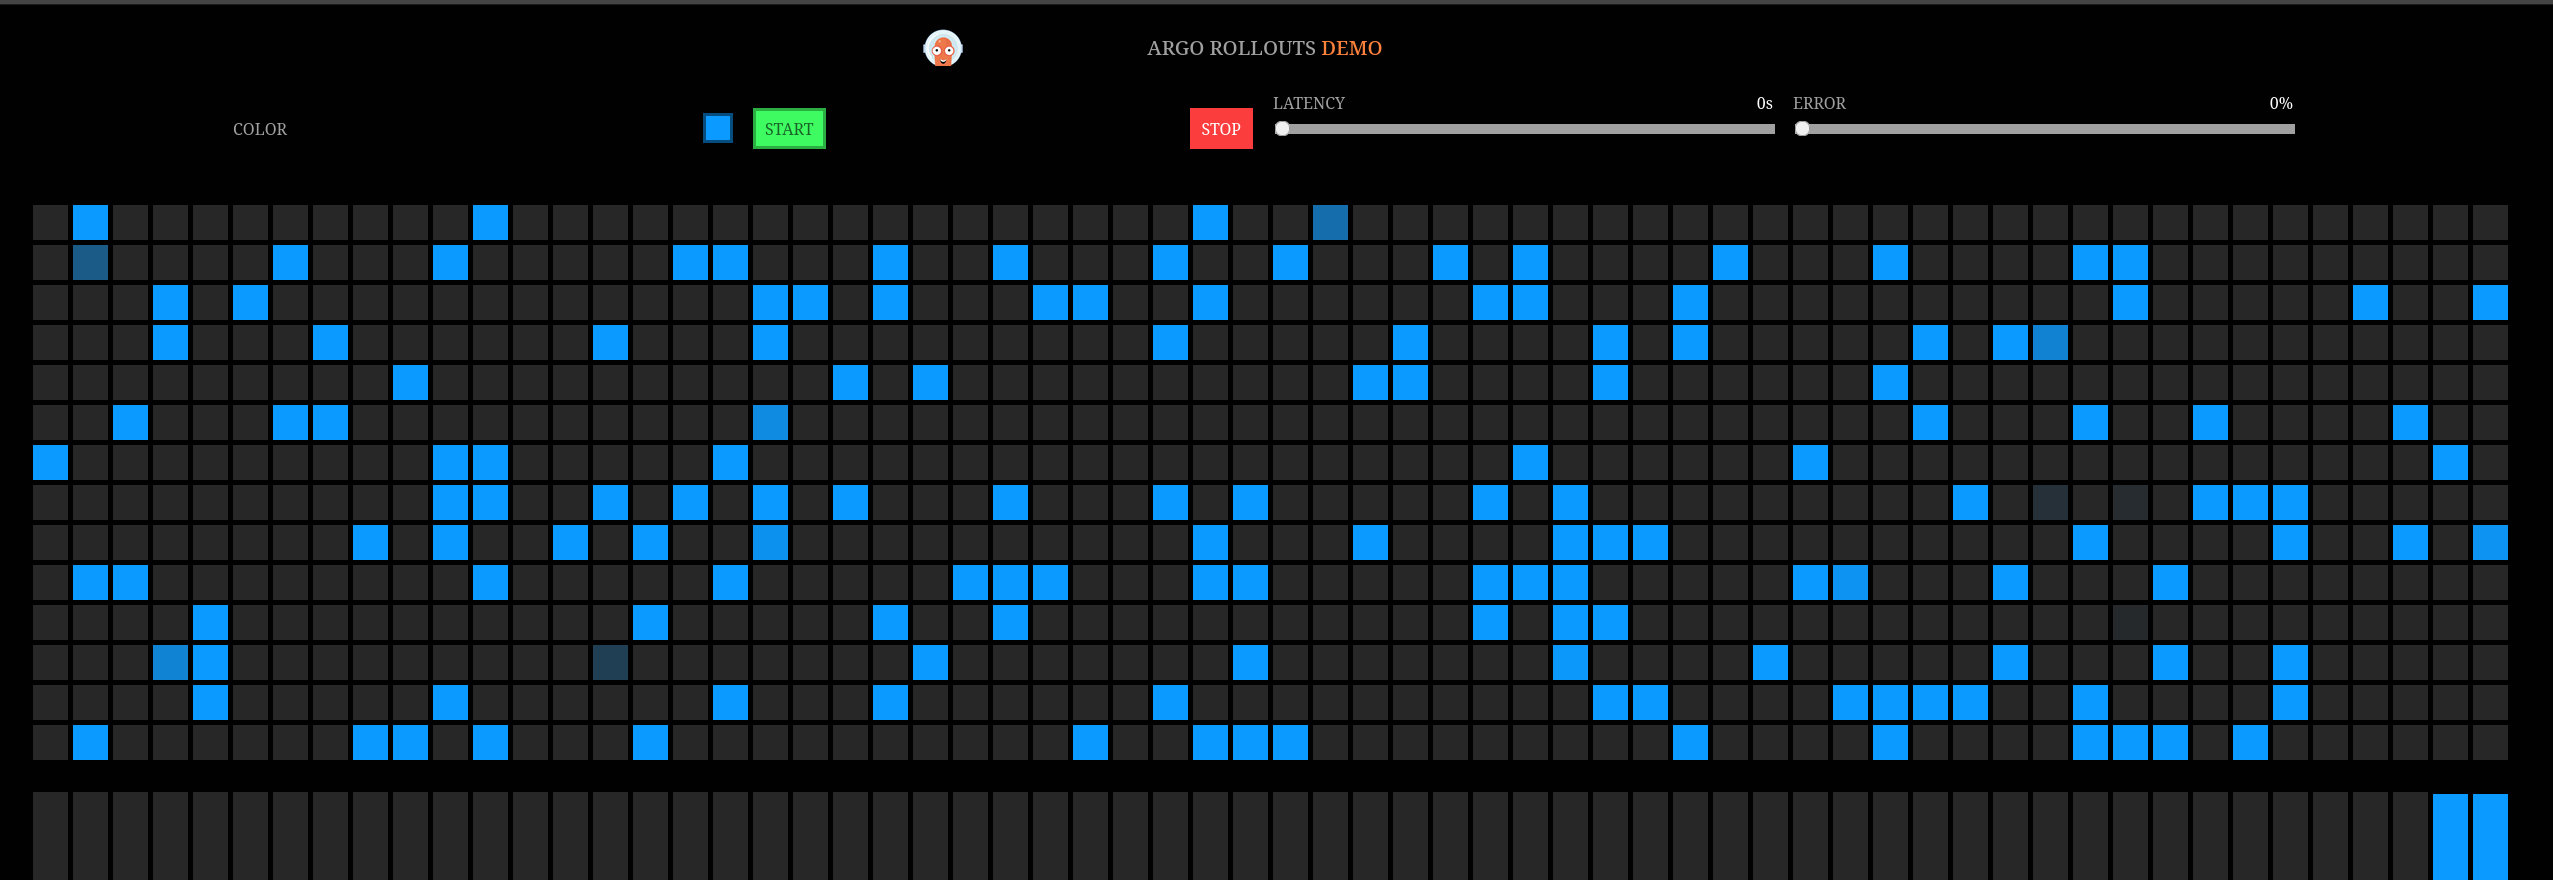
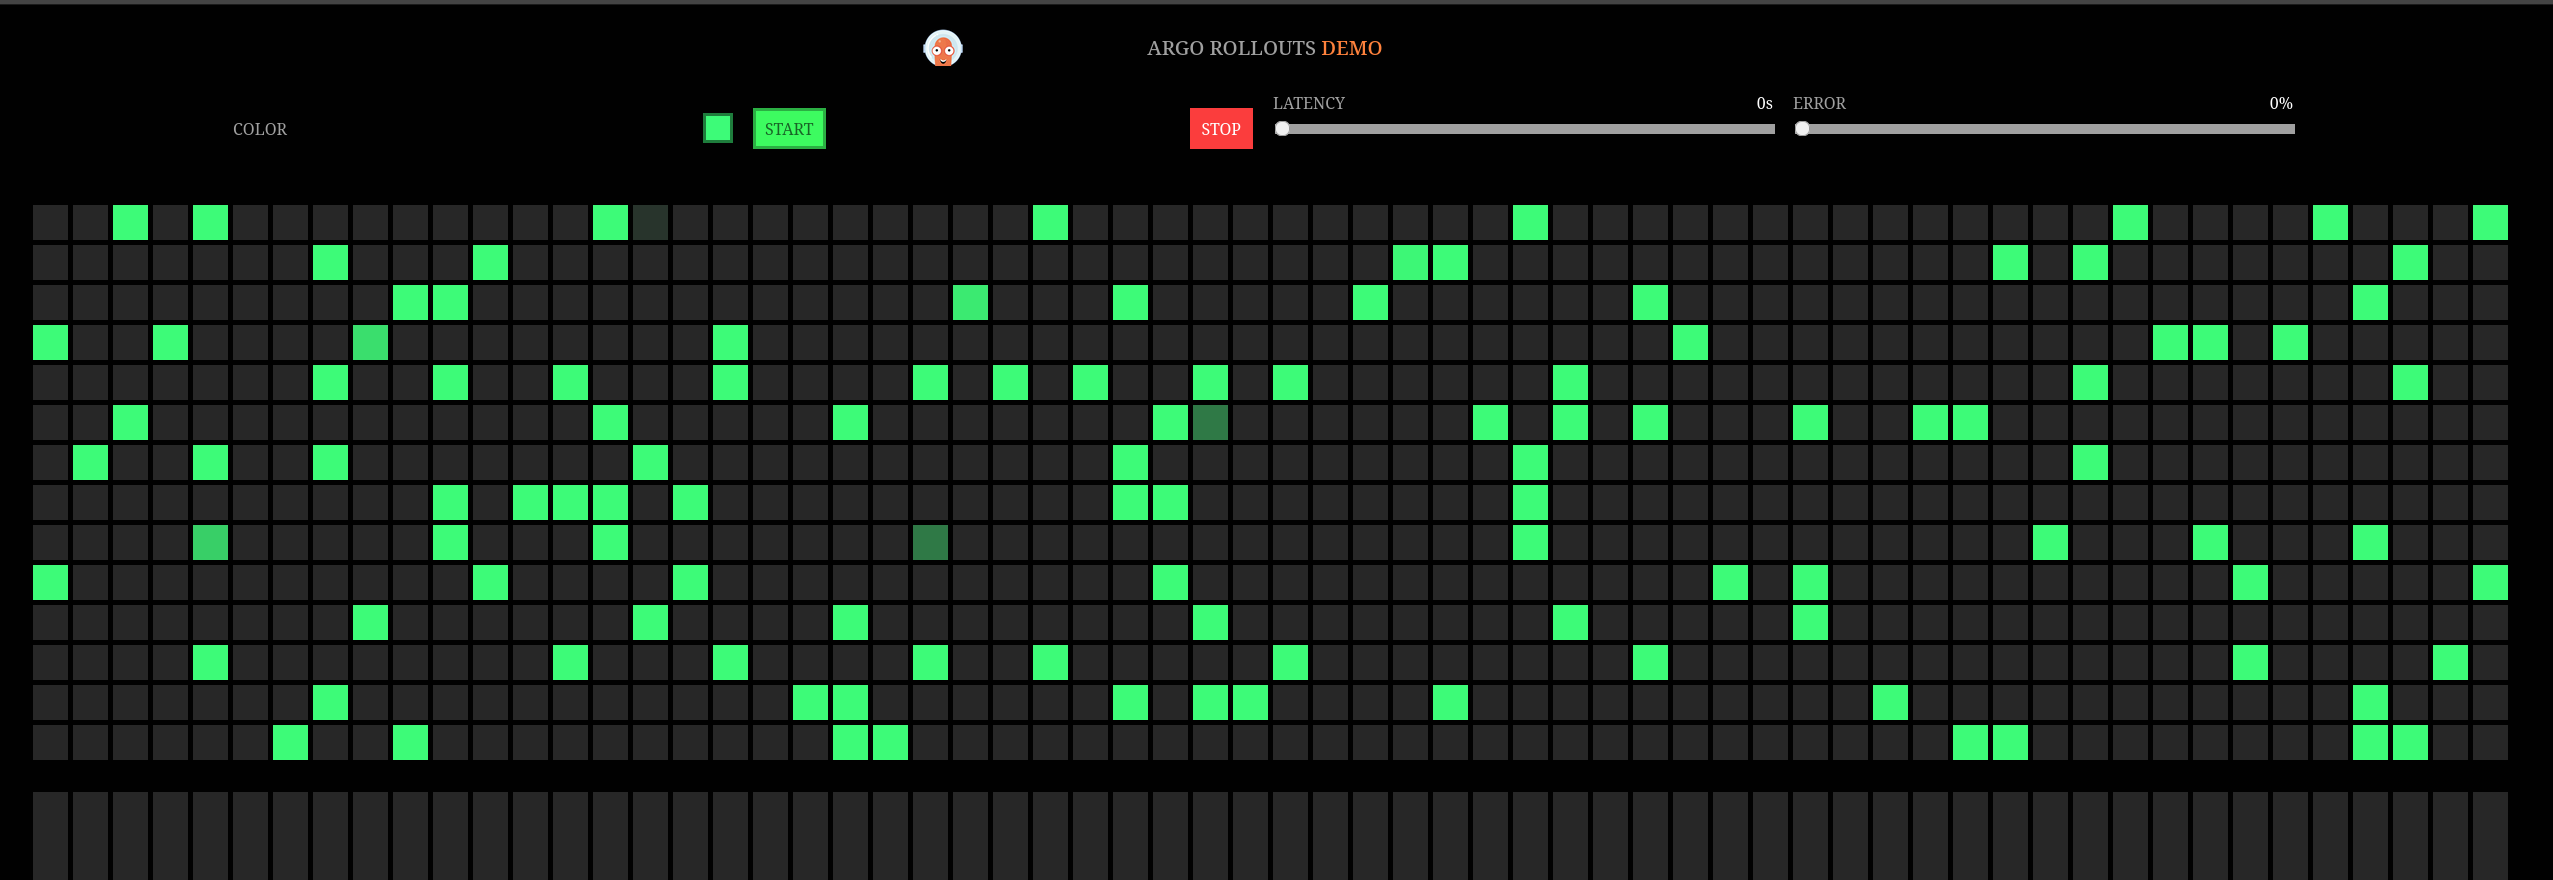
If you look at the rollout resource you can see that it is paused. This is because it’s waiting on an administrator to approve or cancel the deployment. Both applications are running side by side. Let’s take a look at the routes!
The active/blue/production route:
The preview/update/new route:
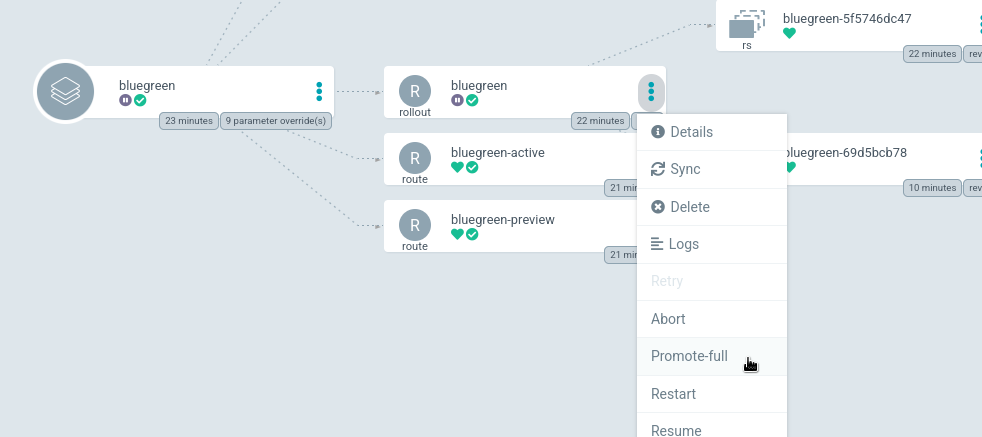
Now if we promote the application, the green application will become the primary.
In the argoCD interface, click on the bluegreen application, in the application context click on the vertical ellipsis next to the bluegreen rollout, then click promote-full or click abortto back out.
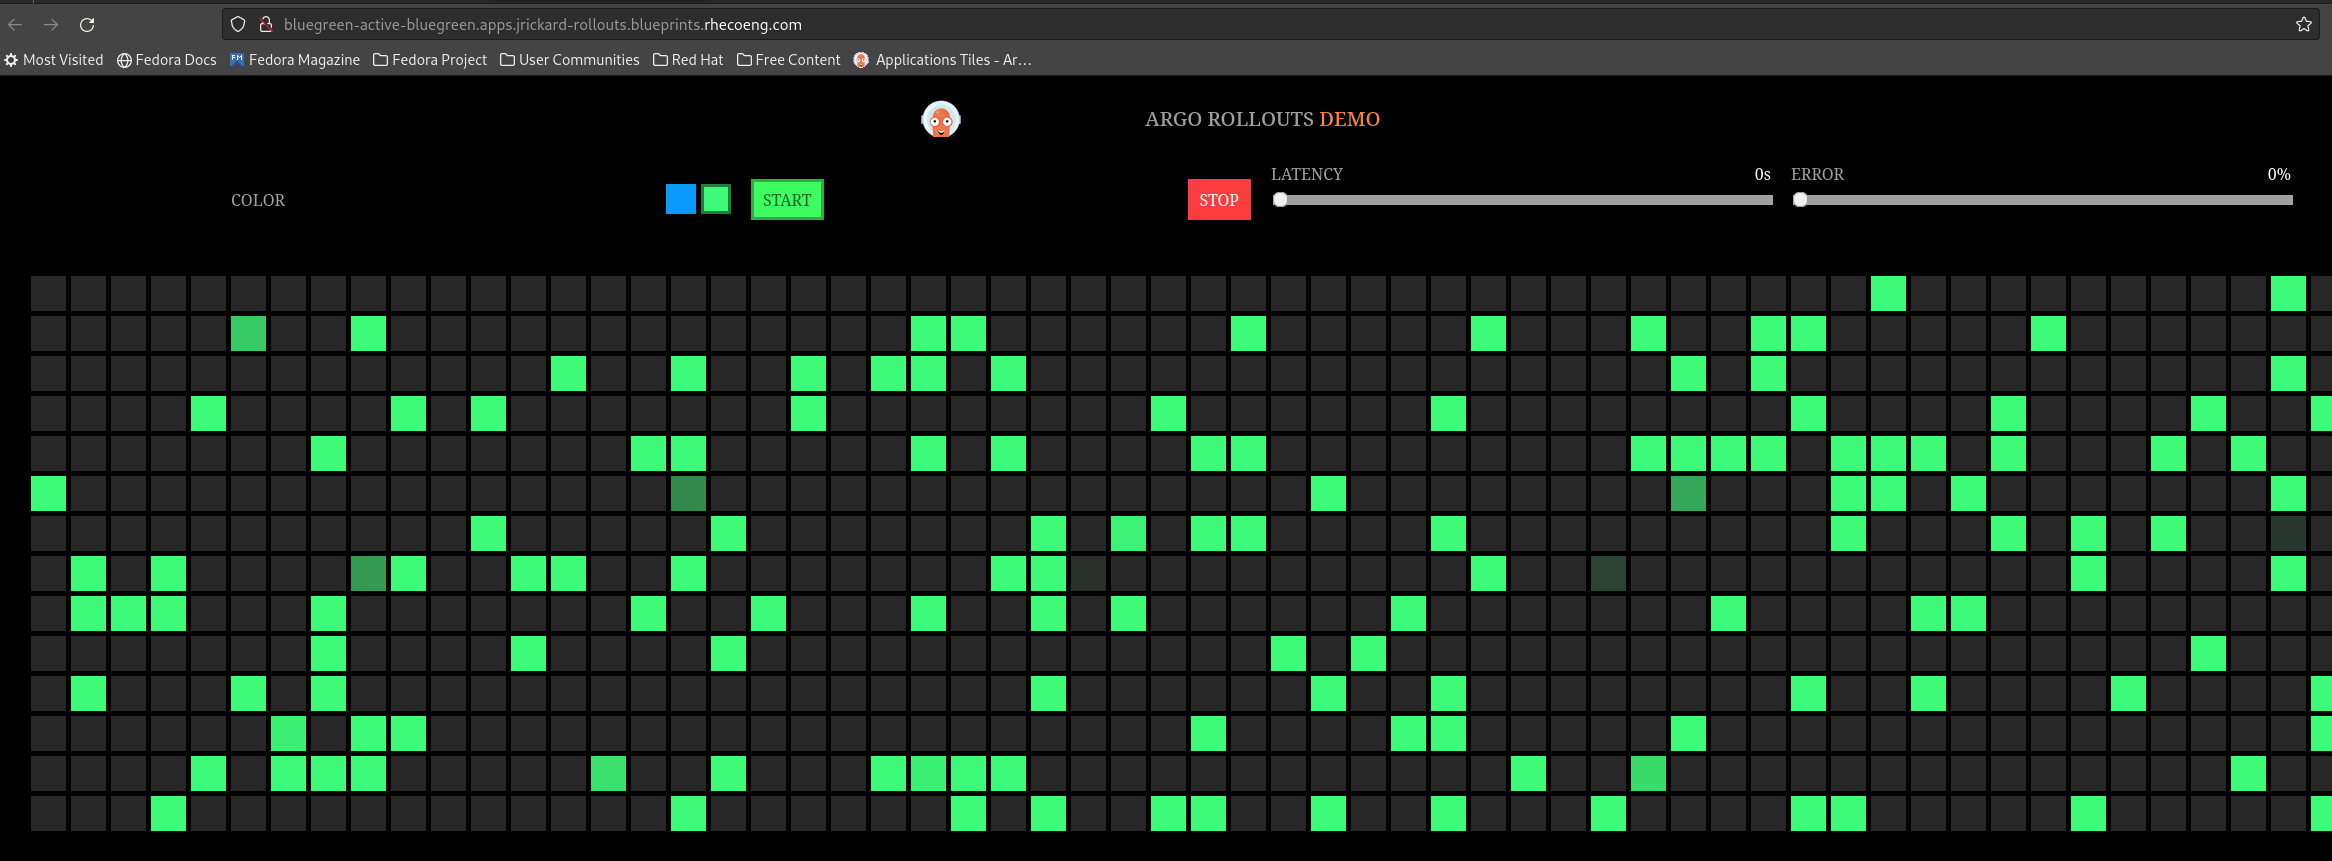
Now if we take a look at our active route we can see that the color changed to green!
You could do the same with the argo rollouts plugin:
kubectl argo rollouts promote bluegreen to back out of the rollout: kubectl argo rollouts abort bluegreen
You can verify that the application has been promoted correctly by using the argo rollouts plugin, checking the route, or by checking the image tag in the rollout resource.
oc argo rollouts get rollout bluegreen
Name:            bluegreen
Namespace:       bluegreen
Status:          ✔ Healthy
Strategy:        BlueGreen
Images:          argoproj/rollouts-demo:green (stable, active)
Replicas:
  Desired:       2
  Current:       2
  Updated:       2
  Ready:         2
  Available:     2

NAME                                  KIND        STATUS        AGE  INFO
⟳ bluegreen                           Rollout     ✔ Healthy     26m
├──# revision:2
│  └──⧉ bluegreen-69d5bcb78           ReplicaSet  ✔ Healthy     13m  stable,active
│     ├──□ bluegreen-69d5bcb78-d5bjp  Pod         ✔ Running     13m  ready:1/1
│     └──□ bluegreen-69d5bcb78-vnw4q  Pod         ✔ Running     13m  ready:1/1
└──# revision:1
   └──⧉ bluegreen-5f5746dc47          ReplicaSet  • ScaledDown  26m
That’s it for the blue-green deployment! Now let’s take a look at a canary deployment.
Canary Rollout
Canary deployments give us a lot of control on how our application is deployed. We can define what percentage of ingress traffic gets the canary or updated application and for how long. Rollouts can use metrics to determine the health of a rollout and make a decision to continue or abort the rollout based on those metrics.
This gives us insight into the health of our application as it is deployed, it gives insights into whether features are being used, and if they’re working correctly. It really does open up all kinds of opportunities to learn a lot more about our applications and how they’re used! Canary deployments are powerful and add flexibility to our application deployments. Either through a full application deployment or just testing a feature.
Let’s get on with the demo!
The canary demo is located in charts/all/canary-demo and similar to how we deployed the bluegreen demo, we need to add the canary-demo application to our pattern for argocd to deploy it.
- Add
canary-demonamespace to the list of namespaces to be created by openshift-gitops
  namespaces:
  - open-cluster-management
  - vault
  - golang-external-secrets
  - argo-rollouts
  - canary-demo
We’re going to create this application in the
argo-rolloutsproject - this is just for simplicity in the demo.Add ‘canary-demo’ application stanza under
Applications
  applications:
    <... omitted ...>
    bluegreen:
      name: canary-demo
      namespace: canary-demo
      project: argo-rollouts
      path: charts/all/canary-demo
When finished editing make sure that you commit your changes to git!
git commit -am "Added canary application to the pattern"

git push -u origin main
We can monitor the argocd interface for the application deployment. When the application has successfully deployed you should see something similar to the image below in the argocd interface:

Let’s take a look at the rollout resource for the canary-demo application.
oc get rollout -o yaml canary-demo -n canary-demo
 strategy:
   canary:
     steps:
       - setWeight: 20
       - pause: {}
       - setWeight: 40
       - pause:
           duration: 10
       - setWeight: 60
       - pause:
           duration: 10
       - setWeight: 80
       - pause:
           duration: 10
In the above snippet, we’re telling the rollout controller that we want 20% of the traffic
setWeight: 20 to go to the canary for an indefinite amount of time pause: {}, in the next step we want 40% of the traffic to go to the canary for 10 seconds, then 60% for 10 seconds, then 80% for 10 seconds until 100% of the traffic is using the canary service.
These values can be modified to whatever makes sense for our deployment, maybe 10 seconds isn’t long enough to collect performance data on our feature canary and we need to run it for a bit longer.
Our active service before the rollout looks like this:

So let’s trigger a rollout by changing the image tag! Edit the values-global.yaml and change the tag from blue to red
Make sure you push your changes to git!
git commit -am "Change canary image tag"

git push -u origin main
When the canary rollout occurs it removes one pod from the existing replicaset to support the canary replicaset. Let’s use the argo rollout plugin to see what this looks like:
oc argo rollouts get rollout canary-demo
Name:            canary-demo
Namespace:       canary-demo
Status:          ॥ Paused
Message:         CanaryPauseStep
Strategy:        Canary
  Step:          1/8
  SetWeight:     20
  ActualWeight:  20
Images:          argoproj/rollouts-demo:blue (stable)
                 argoproj/rollouts-demo:red (canary)
Replicas:
  Desired:       5
  Current:       5
  Updated:       1
  Ready:         5
  Available:     5

NAME                                     KIND        STATUS     AGE    INFO
⟳ canary-demo                            Rollout     ॥ Paused   8m45s
├──# revision:2
│  └──⧉ canary-demo-6ffd7b9658           ReplicaSet  ✔ Healthy  39s    canary
│     └──□ canary-demo-6ffd7b9658-dhhph  Pod         ✔ Running  38s    ready:1/1
└──# revision:1
   └──⧉ canary-demo-7d984ffb4c           ReplicaSet  ✔ Healthy  8m45s  stable
      ├──□ canary-demo-7d984ffb4c-5hdsr  Pod         ✔ Running  8m45s  ready:1/1
      ├──□ canary-demo-7d984ffb4c-6wtjq  Pod         ✔ Running  8m45s  ready:1/1
      ├──□ canary-demo-7d984ffb4c-9vnq9  Pod         ✔ Running  8m45s  ready:1/1
      └──□ canary-demo-7d984ffb4c-zh2bj  Pod         ✔ Running  8m45s  ready:1/1
oc get replicasets
NAME                     DESIRED   CURRENT   READY   AGE
canary-demo-6ffd7b9658   1         1         1       47s
canary-demo-7d984ffb4c   4         4         4       8m53s
In the argoCD interface we see that the rollout is paused just like with blue-green

But what about our application - we said we only want 20% of the traffic to go to the new app:
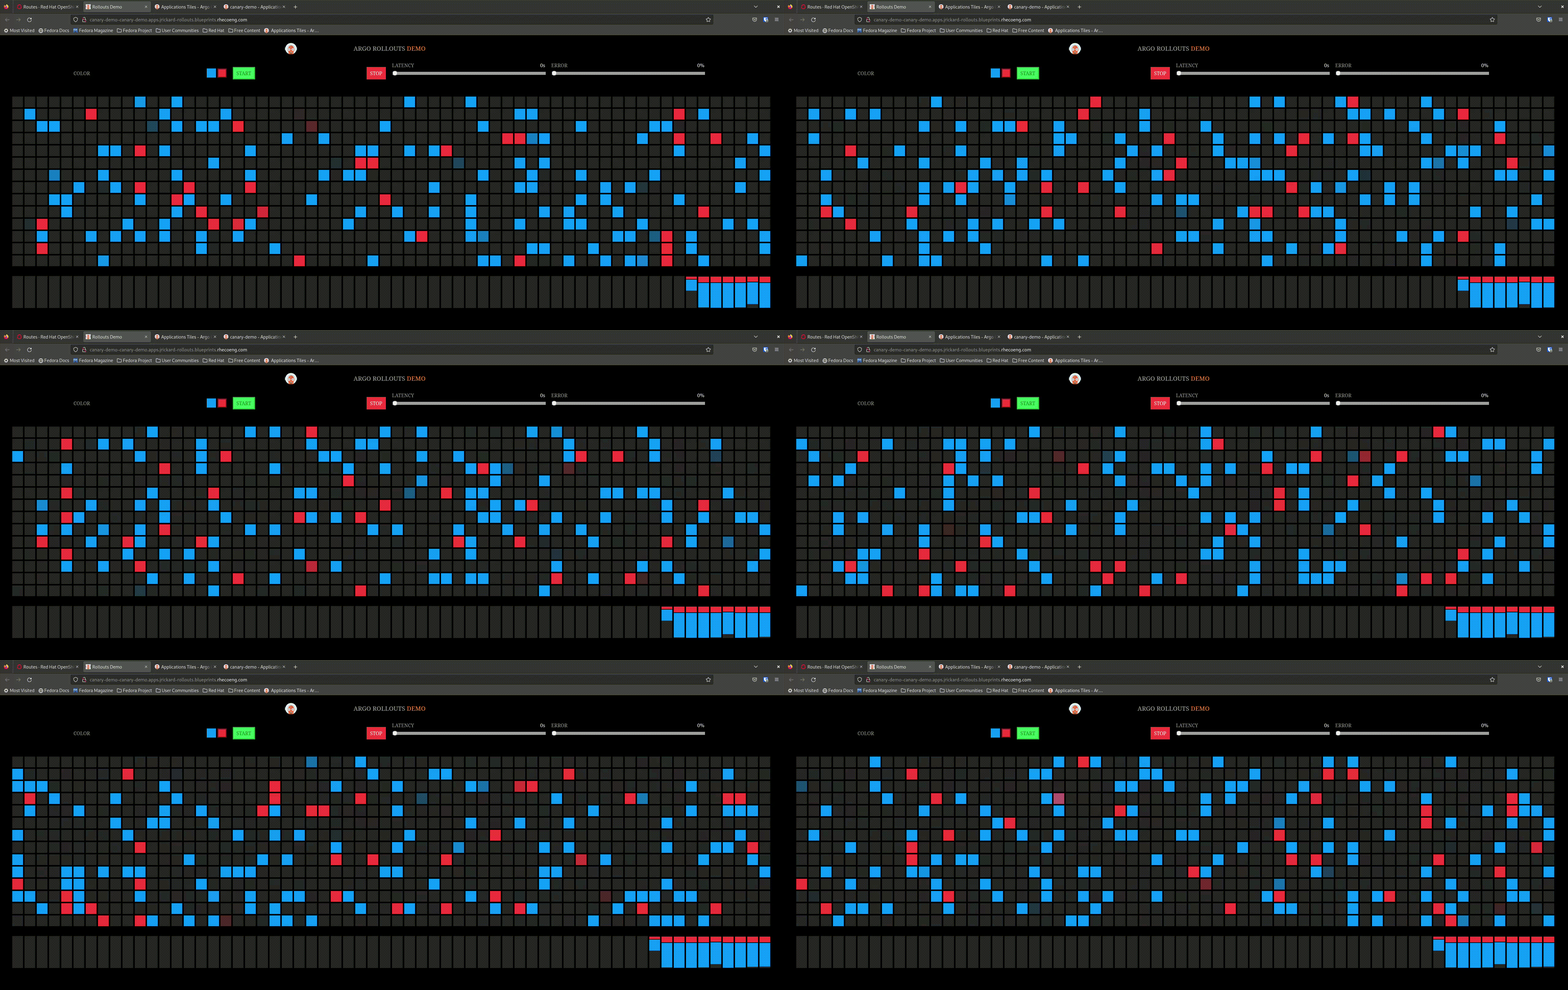
That is awesome! So now let’s promote the application and see what happens - the expectation is that it will incrementally update the percentage of connections to the new application until completely promoted.
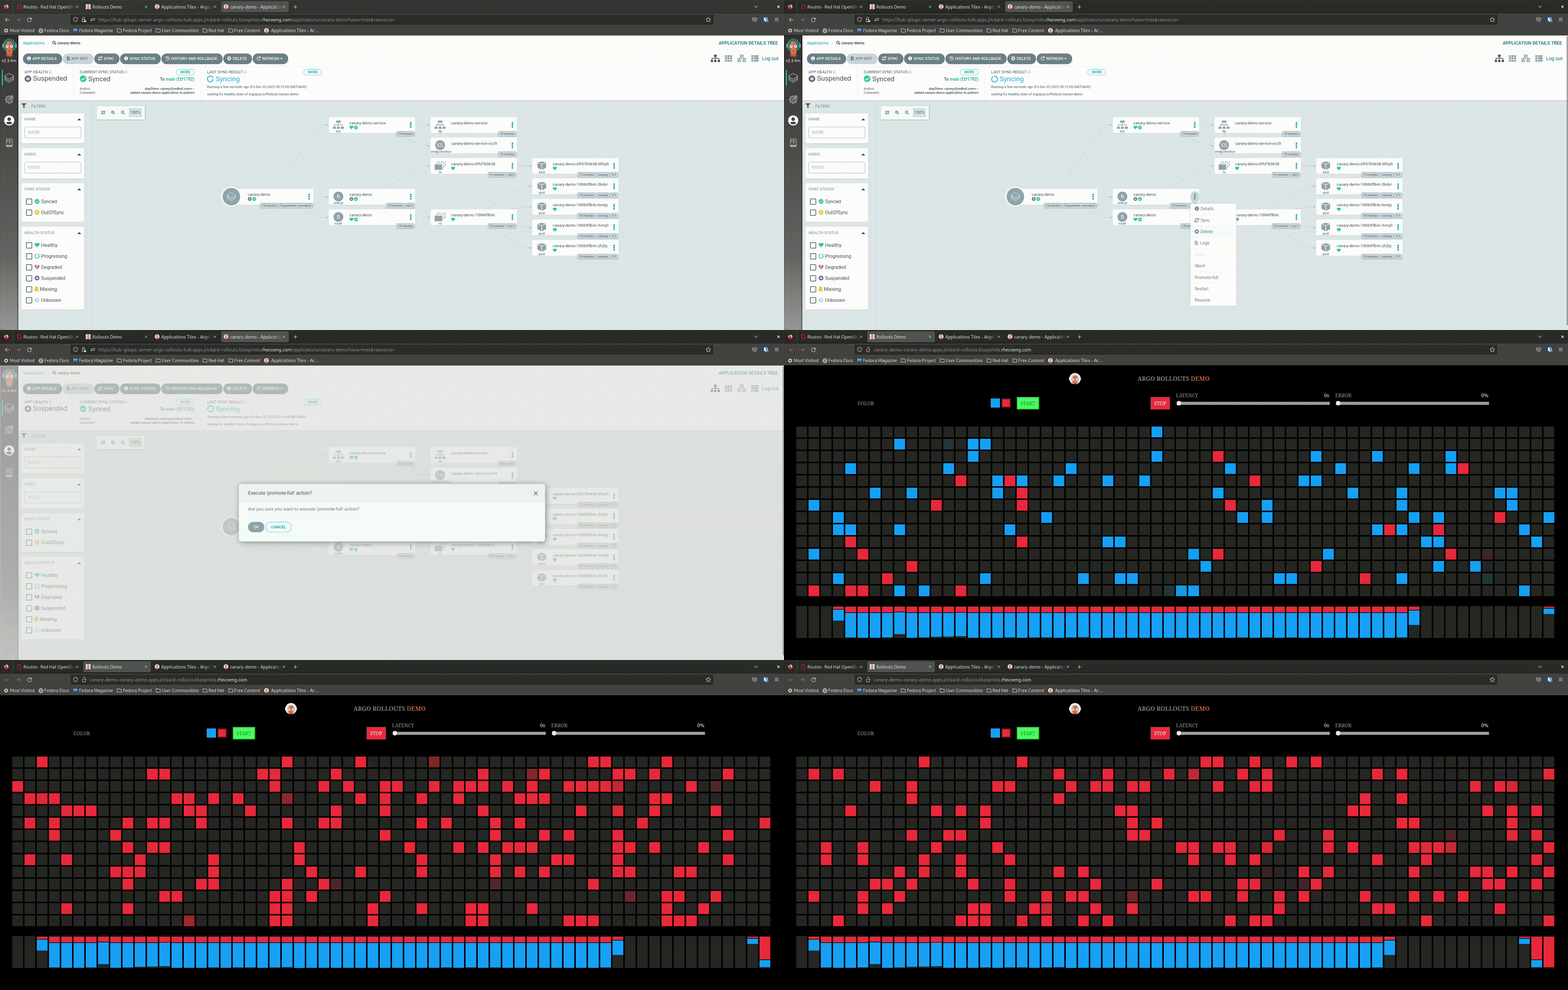
Let’s take a look at what it looks like using the argo rollouts plugin

Conclusion
Argo Rollouts makes progressive delivery of our applications super easy. Whether you want to deploy using blue-green or the more advanced canary rollout is up to you. The canary rollout is very powerful and as we saw gives us the ultimate control, with insights and flexibility to deploy applications. There is so much more that argo rollouts can do - this demo barely scratches the surface! Keep an eye out for argo rollouts as part of openshift-gitops in ‘23.
