Deploying the OpenShift Virtualization Data Protection Pattern
General Prerequisites
- An OpenShift cluster ( Go to the OpenShift console). See also sizing your cluster. Currently this pattern only supports AWS. It could also run on a baremetal OpenShift cluster, because OpenShift Virtualization supports that; there would need to be some customizations made to support it as the default is AWS. We hope that GCP and Azure will support provisioning metal workers in due course so this can be a more clearly multicloud pattern.
- A GitHub account (and, optionally, a token for it with repositories permissions, to read from and write to your forks)
- The helm binary, see here
- Ansible, which is used in the bootstrap and provisioning phases of the pattern install (and to configure Ansible Automation Platform).
- Please note that when run on AWS, this pattern will provision an additional worker node, which will be a metal instance (c5n.metal) to run the Edge Virtual Machines. This worker is provisioned through the OpenShift MachineAPI and will be automatically cleaned up when the cluster is destroyed.
The use of this pattern depends on having a running Red Hat OpenShift cluster. It is desirable to have a cluster for deploying the GitOps management hub assets and a separate cluster(s) for the managed cluster(s).
If you do not have a running Red Hat OpenShift cluster you can start one on a public or private cloud by using Red Hat’s cloud service.
Credentials Required in Pattern
In addition to the OpenShift cluster, you will need to prepare a number of secrets, or credentials, which will be used
in the pattern in various ways. To do this, copy the values-secret.yaml template to your home directory as values-secret.yaml and replace the explanatory text as follows:
- AWS Credentials (an access key and a secret key). These are used to provision the metal worker in AWS (which hosts the VMs) and (by default) to access a pre-created S3 bucket for exporting VM backups with Veeam Kasten.
---
# NEVER COMMIT THESE VALUES TO GIT
version: "2.0"
secrets:
  - name: aws-creds
    fields:
    - name: aws_access_key_id
      value: 'An aws access key that can provision EC2 VMs and read/write to S3'

    - name: aws_secret_access_key
      value: 'An aws access secret key that can provision VMs and read/write to S3'
- A username and SSH Keypair (private key and public key). These will be used to provide access to the Kiosk VMs in the demo.
  - name: kiosk-ssh
    fields:
    # Username of user to which the privatekey and publickey are attached - cloud-user is a typical value
    - name: username
      value: 'cloud-user'

    # Private ssh key of the user who will be able to elevate to root to provision kiosks
    - name: privatekey
      value: |
        -----BEGIN OPENSSH PRIVATE KEY-----
        b3BlbnNzaC1rZXktdjEAAAAABG5vbmUAAAAEbm9uZQAAAAAAAAABAAACFwAAAAdzc2gtcn
        ...
        5nZRiM0qkhEAAAAKY2xvdWQtdXNlcgE=
        -----END OPENSSH PRIVATE KEY-----

    # Public ssh key of the user who will be able to elevate to root to provision kiosks
    - name: publickey
      value: |
        ssh-rsa AAAAB3NzaC1yc2EAAAA...xiVgKANw== cloud-user
- A Red Hat Subscription Management username and password. These will be used to register Kiosk VM templates to the Red Hat Content Delivery Network and install content on the Kiosk VMs to run the demo.
  - name: rhsm
    fields:
    - name: username
      value: 'username of user to register RHEL VMs'
    - name: password
      value: 'password of rhsm user in plaintext'
- Container “extra” arguments which will set the admin password for the ignition application when it’s running.
  - name: kiosk-extra
    fields:
    # Optional extra params to pass to kiosk ignition container, including admin password
    - name: container_extra_params
      value: '--privileged -e GATEWAY_ADMIN_PASSWORD=redhat'
- A userData block to use with cloud-init. This will allow console login as the user you specify (traditionally cloud-user) with the password you specify. The value in cloud-init is used as the default; roles in the edge-gitops-vms chart can also specify other secrets to use by referencing them in the role block.
  - name: cloud-init
    fields:
    - name: userData
      value: |-
        #cloud-config
        user: 'username of user for console, probably cloud-user'
        password: 'a suitable password to use on the console'
        chpasswd: { expire: False }
- A manifest file with an entitlement to run Ansible Automation Platform. This file (which will be a .zip file) will be posted to Ansible Automation Platform instance to enable its use. Instructions for creating a manifest file can be found here
  - name: aap-manifest
    fields:
    - name: b64content
      # Ex. /Users/john.doe/ansible-edge-gitops-kasten/my-aap-manifest.zip
      path: 'full path and file name of the Satellite Manifest .zip for entitling Ansible Automation Platform'
      base64: true
- A passphrase that will be used to encrypt backups of the Veeam Kasten internal catalog of restore points, a process known as Kasten DR. These Kasten DR backups can be used to restore access to the catalog of previously created application backups in the event of infrastructure failure or cluster loss.
  - name: kastendr-passphrase
    fields:
    - name: key
      value: 'passphrase'
Prerequisites for deployment via make install
If you are going to install via make install from your workstation, you will need the following tools and packages:
{% include prerequisite-tools.md %}
And additionally, the following ansible collections:
- community.okd
- redhat_cop.controller_configuration
- awx.awx
To see what collections are installed:
ansible-galaxy collection list
To install a collection that is not currently installed:
ansible-galaxy collection install <collection>
How to deploy
Login to your cluster using oc login or exporting the KUBECONFIG
oc loginor set KUBECONFIG to the path to your
kubeconfigfile. For example:export KUBECONFIG=~/my-ocp-env/hub/auth/kubeconfigFork the ansible-edge-gitops-kasten repo on GitHub. It is necessary to fork to preserve customizations you make to the default configuration files.
Clone the forked copy of this repository.
git clone git@github.com:your-username/ansible-edge-gitops-kasten.gitCreate a local copy of the Helm values file that can safely include credentials
WARNING: DO NOT COMMIT THIS FILE
You do not want to push personal credentials to GitHub.
cp values-secret.yaml.template ~/values-secret.yaml
vi ~/values-secret.yaml
Customize default Kasten settings to specify the configuration of your S3 backup target:
git checkout -b my-branch
vi values-kasten.yaml
--- kasten: kdrSecretKey: secret/data/hub/kastendr-passphrase policyDefaults: locationProfileName: my-location-profile presetName: daily-backup ignoreExceptions: false locationProfileDefaults: secretKey: secret/data/hub/aws-creds immutable: false protectionPeriod: 120h0m0s # 5 Days s3Region: us-east-1 locationProfiles: location-profile-1: name: my-location-profile bucketName: your-bucket-name # REPLACE with the AWS S3 bucket name to store backup data immutable: false # SET true only if AWS S3 bucket was created with Versioning/Object Lock enabled; otherwise false protectionPeriod: 168h0m0s # 7 Days # OPTIONAL, override default immutablility period. Caution, you will not be able to delete backup data for this amount of time!git add values-kasten.yaml git commit values-kasten.yaml git push origin my-branchCustomize the deployment for your cluster (Optional - the defaults in values-global.yaml are designed to work in AWS):
git checkout -b my-branch
vi values-global.yaml
git add values-global.yaml
git commit values-global.yaml
git push origin my-branch
Please review the Patterns quick start page. This section describes deploying the pattern using pattern.sh. You can deploy the pattern using the validated pattern operator. If you do use the operator then skip to Validating the Environment below.
(Optional) Preview the changes. If you’d like to review what is been deployed with the pattern,
pattern.shprovides a way to show what will be deployed../pattern.sh make showApply the changes to your cluster. This will install the pattern via the Validated Patterns Operator, and then run any necessary follow-up steps.
./pattern.sh make install
The installation process will take between 45-60 minutes to complete. If you want to know the details of what is happening during that time, the entire process is documented here.
Installation Validation
Check the operators have been installed using OpenShift Console under Operators > Install Operators:
The screen should like this when installed via
make install: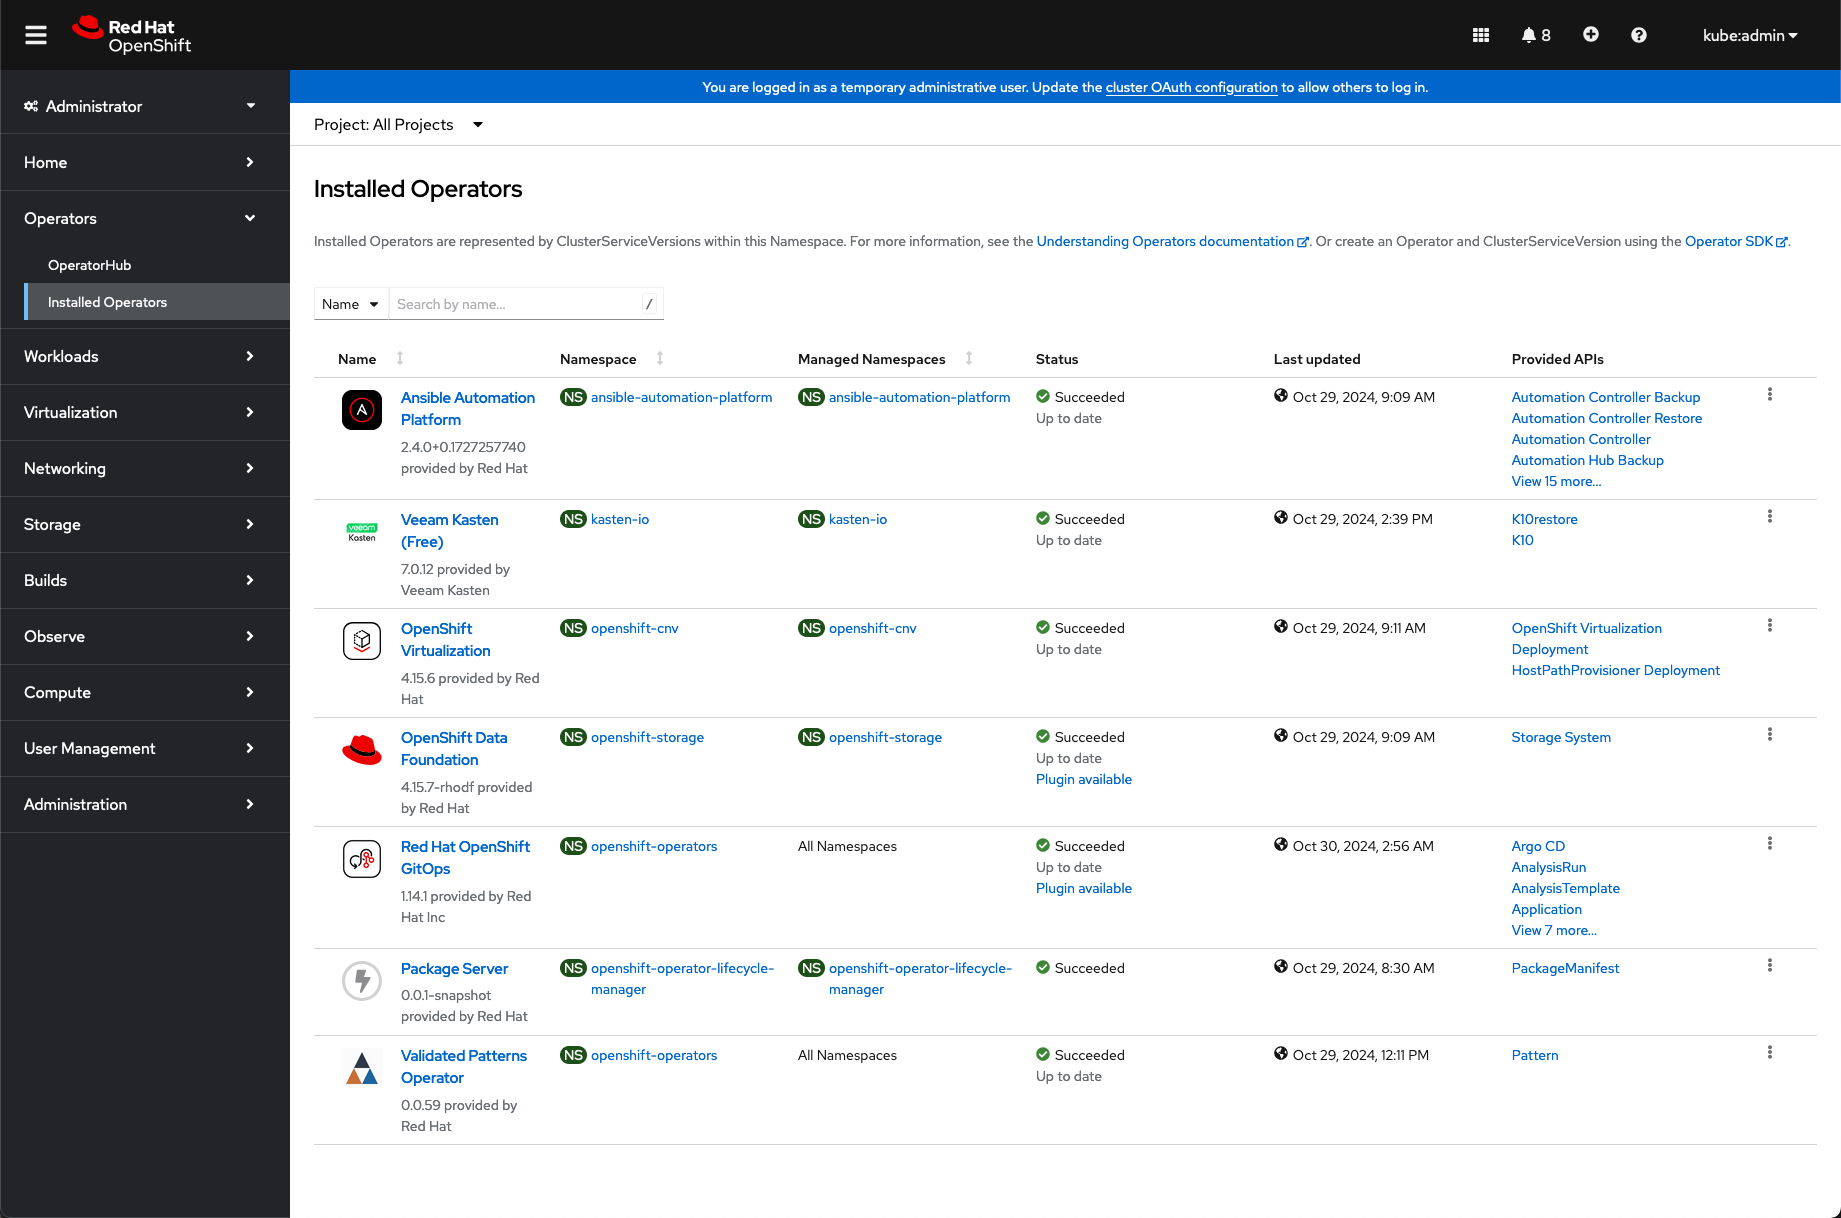
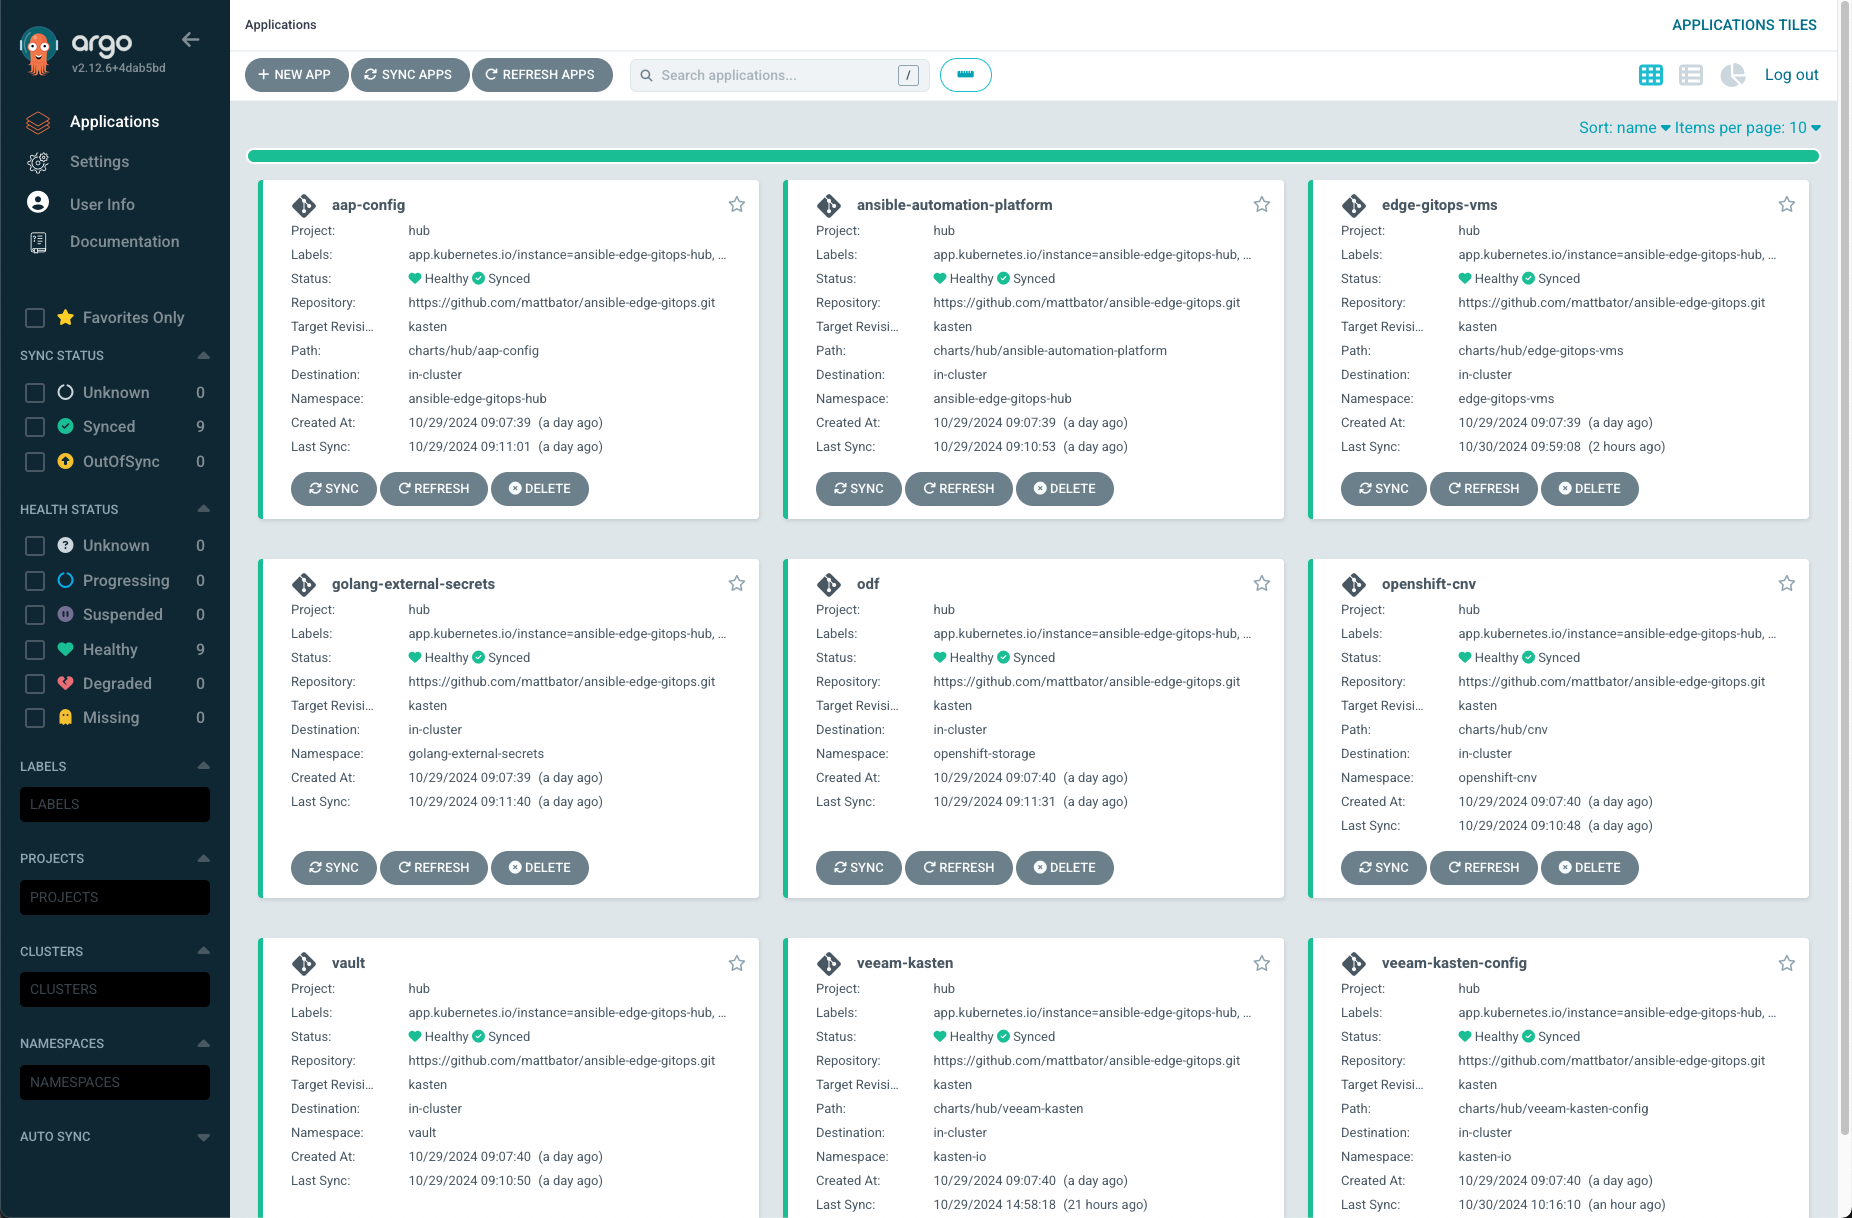
Under Networking > Routes, click on the URL for the
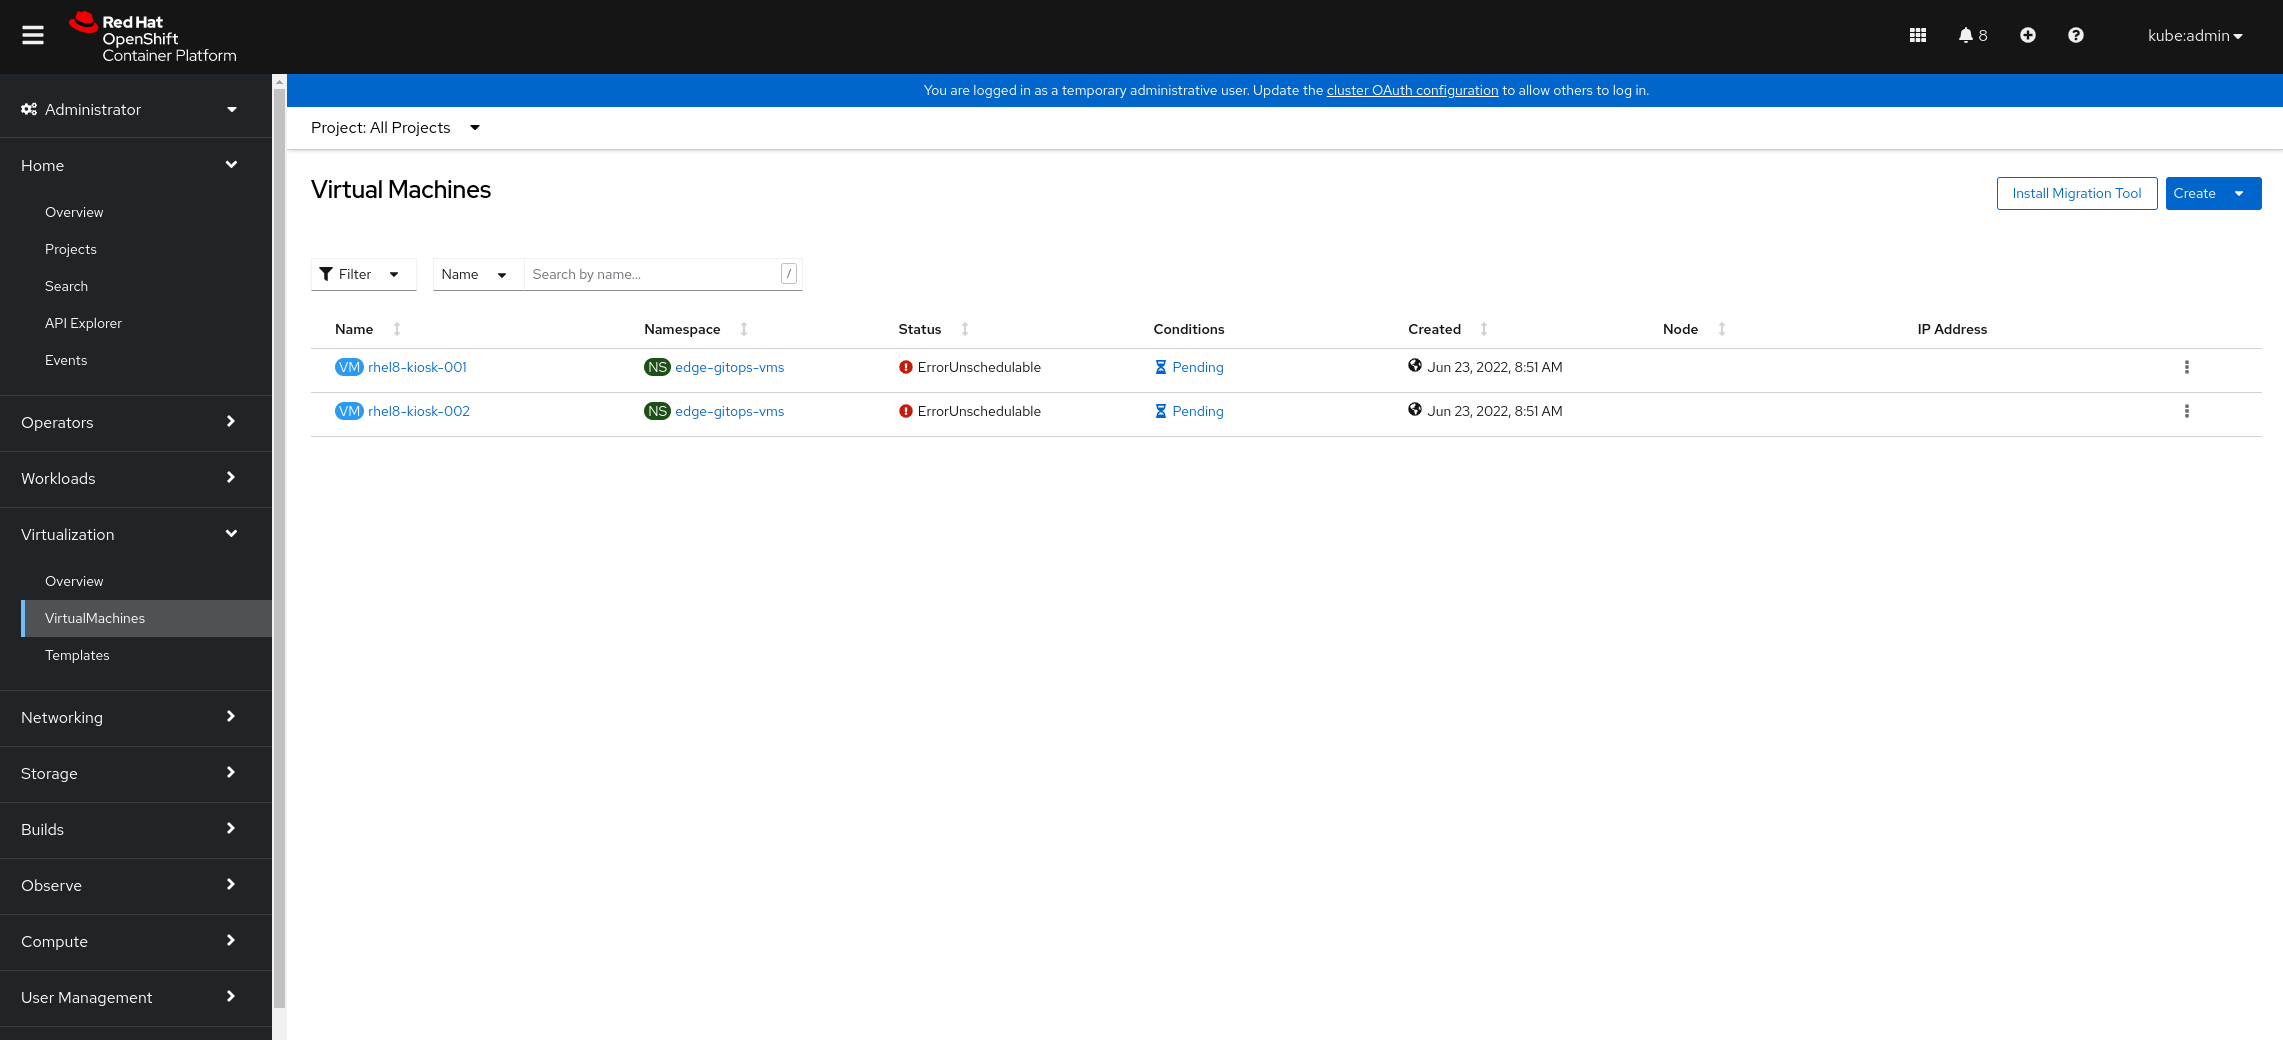
hub-gitops-serverand check applications are syncronized/syncronizing:All applications will sync, but this takes time as ODF has to completely install, and OpenShift Virtualization cannot provision VMs until the metal node has been fully provisioned and ready. Additionally, the Dynamic Provision Kiosk Template in AAP must complete; it can only start once the VMs have provisioned and are running.
While the metal node is building, the VMs in OpenShift console will show as “Unschedulable.” This is normal and expected, as the VMs themselves cannot run until the metal node completes provisioning and is ready.
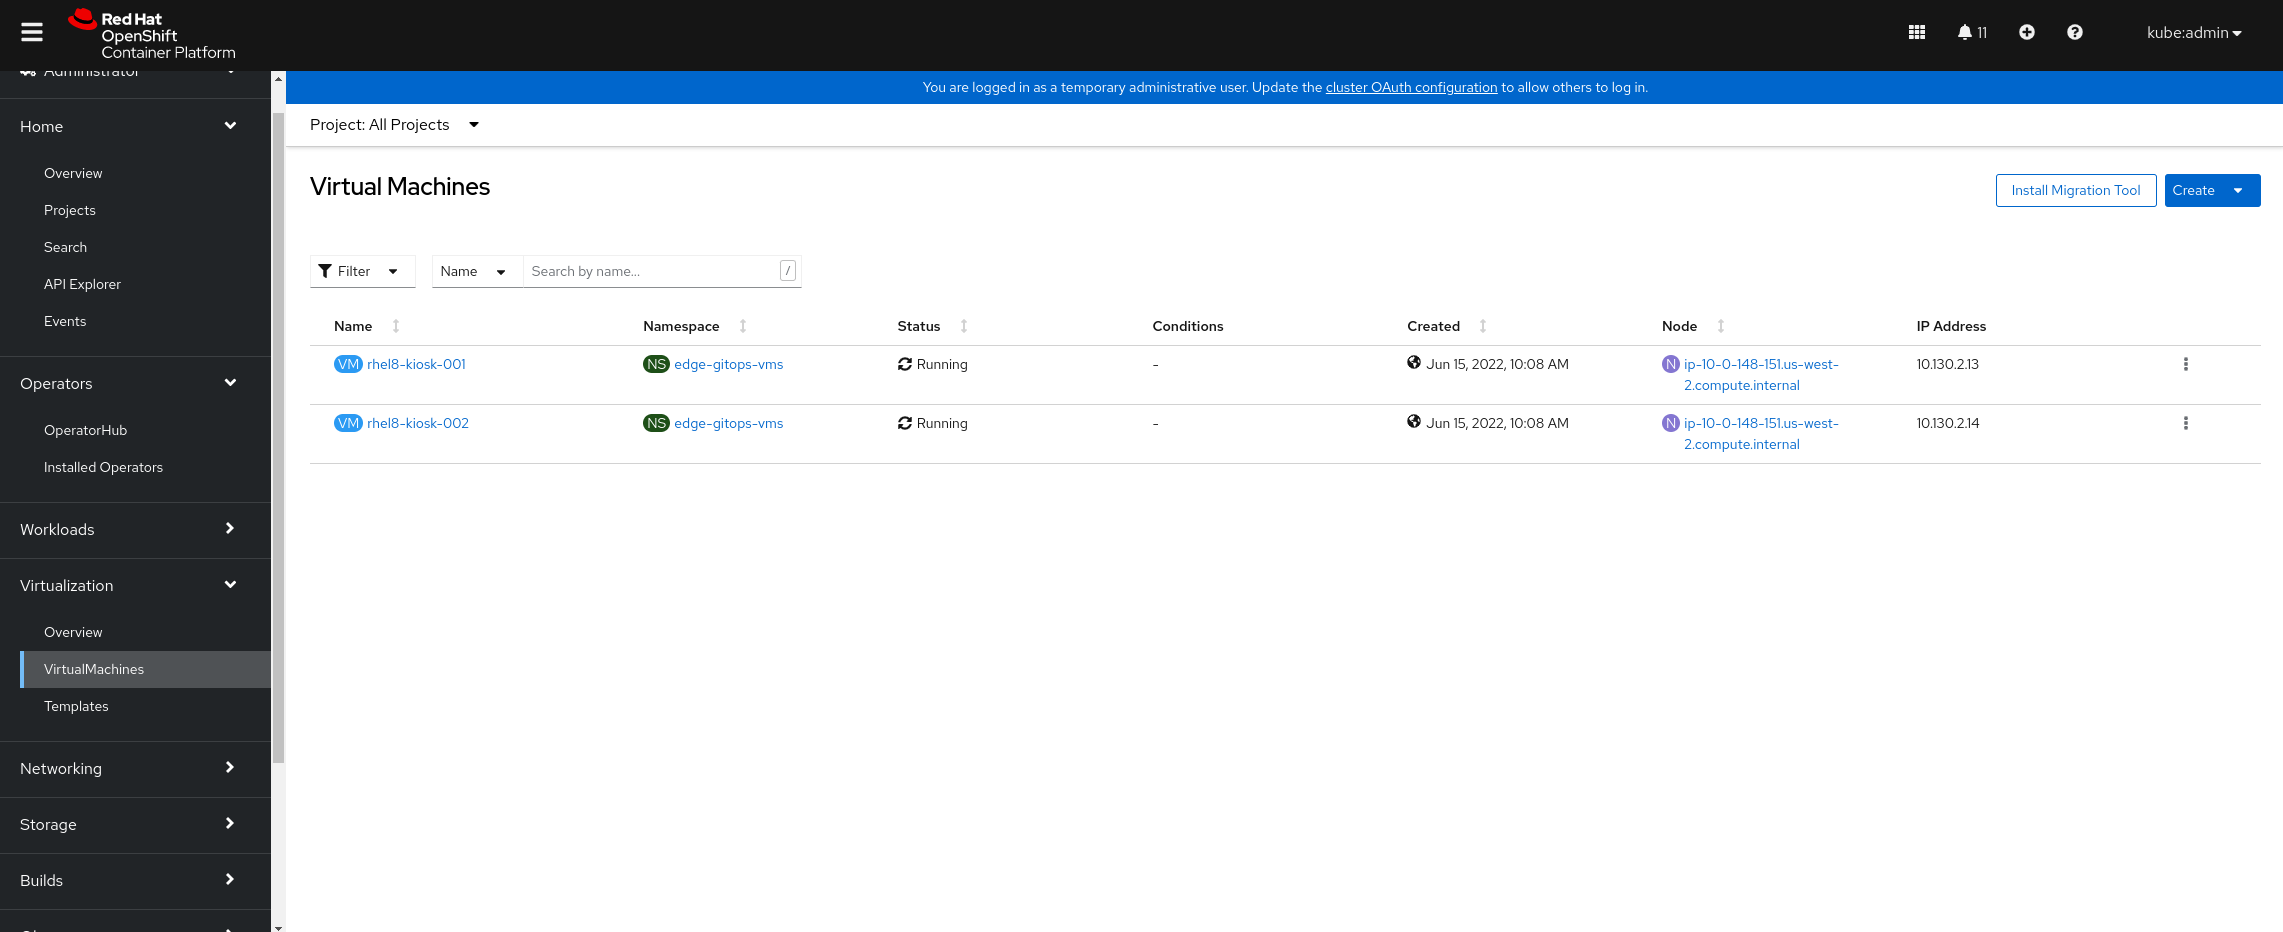
Under Virtualization > Virtual Machines, the virtual machines will eventually show as “Running.” Once they are in “Running” state the Provisioning workflow will run on them, and install Firefox, Kiosk mode, and the Ignition application on them:
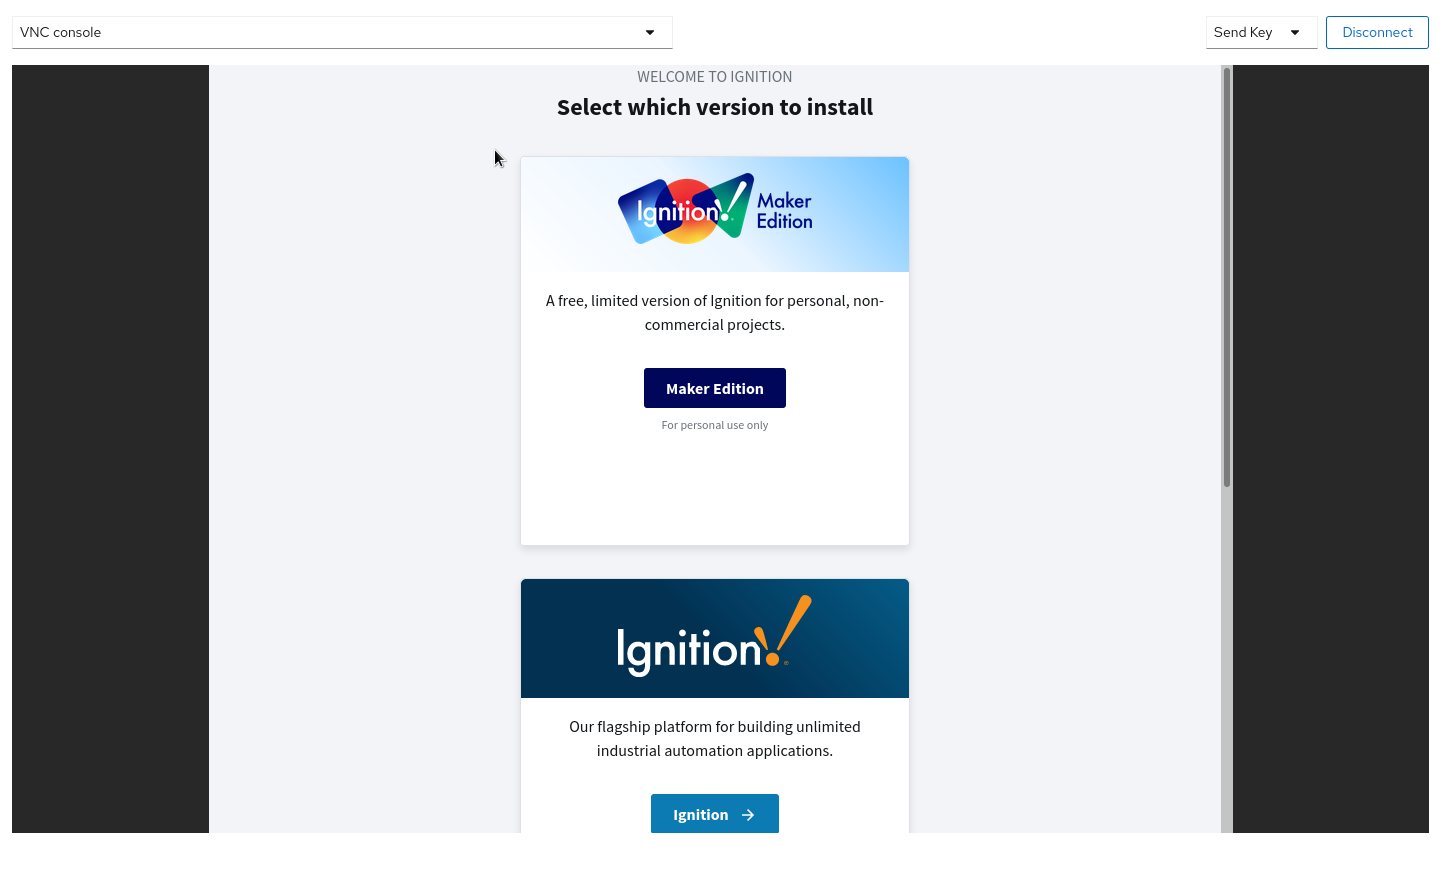
Finally, the VM Consoles will show the Ignition introduction screen. You can choose any of these options; this tutorial assumes you chose “Ignition”:
You should be able to login to the application with the userid “admin” and the password you specified as the GATEWAY_ADMIN_PASSWORD in
container_extra_paramsin your values-secret.yaml file.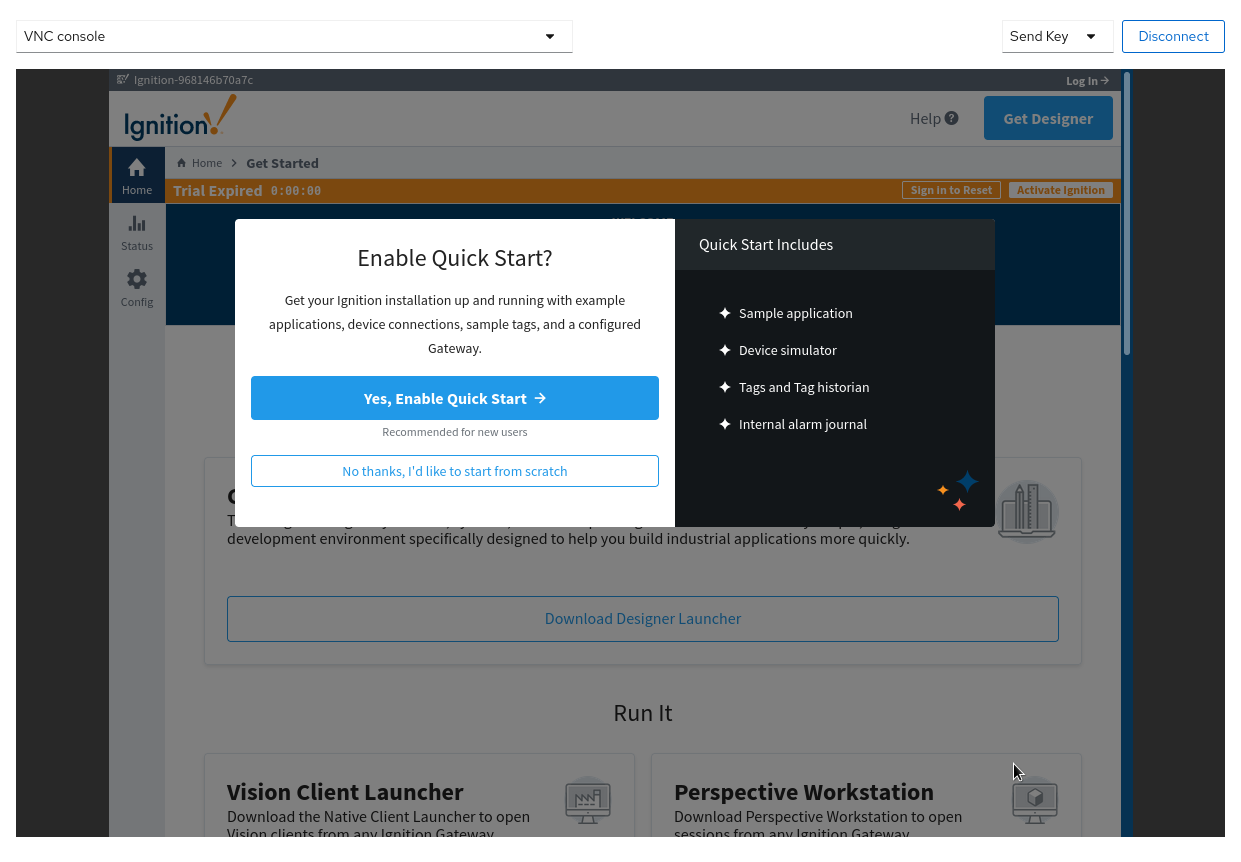
Infrastructure Elements of this Pattern
Ansible Automation Platform
A fully functional installation of the Ansible Automation Platform operator is installed on your OpenShift cluster to configure and maintain the VMs for this demo. AAP maintains a dynamic inventory of kiosk machines and can configure a VM from template to fully functional kiosk in about 10 minutes.
OpenShift Virtualization
OpenShift Virtualization is a Kubernetes-native way to run virtual machine workloads. It is used in this pattern to host VMs simulating an Edge environment; the chart that configures the VMs is designed to be flexible to allow easy customization to model different VM sizes, mixes, versions and profiles for future pattern development.
Inductive Automation Ignition
The goal of this pattern is to configure 2 VMs running Firefox in Kiosk mode displaying the demo version of the Ignition application running in a podman container. Ignition is a popular tool in use with Oil and Gas companies; it is included as a real-world example and as an item to spark imagination about what other applications could be installed and managed this way.
The container used for this pattern is the container image published by Inductive Automation.
HashiCorp Vault
Vault is used as the authoritative source for the Kiosk ssh pubkey via the External Secrets Operator. As part of this pattern HashiCorp Vault has been installed. Refer to the section on Vault.
Veeam Kasten
Veeam Kasten is used to provide Kubernetes-native data protection for OpenShift Virtualization VMs and optionally other Kubernetes workloads as the pattern is further expanded.
Next Steps
See Installation Details for more information on the steps of installation.
See Ansible Automation Platform for more information on how this pattern uses the Ansible Automation Platform Operator for OpenShift.
See OpenShift Virtualization for more information on how this pattern uses OpenShift Virtualization.
See Veeam Kasten for more information on how this pattern uses Veeam Kasten.
