Deploying the Multicluster DevSecOps Pattern
Prerequisites
- An OpenShift cluster (Go to the OpenShift console). Cluster must have a dynamic StorageClass to provision PersistentVolumes. See also sizing your cluster.
- A second OpenShift cluster for development using secure CI pipelines.
- A third OpenShift cluster for production. (optional but desirable)
- A GitHub account (and a token for it with repositories permissions, to read from and write to your forks)
- Tools Podman and Git. (see below)
If you do not have running Red Hat OpenShift clusters you can start one on a public or private cloud by using Red Hat’s cloud service.
Credentials Required in Pattern
In addition to the openshift cluster, you will need to prepare a number of secrets, or credentials, which will be used
in the pattern in various ways. To do this, copy the values-secret.yaml template to your home directory as values-secret.yaml and replace the explanatory text as follows:
- Your git repository username and password. The password must be base64 encoded.
---
secrets:
  # NEVER COMMIT THESE VALUES TO GIT
  git:
    # Go to: https://github.com/settings/tokens
    # Then: echo -n 'your string value' | base64
    username: USERNAME
    password: 'encoded password in single quotes'
- You application secret. TBD This may change when the application is changed.
---
secrets:
  # NEVER COMMIT THESE VALUES TO GIT
  config-demo:
    # Secret used for demonstrating vault storage, external secrets, and ACM distribution secure
    secret: PLAINTEXT
Preparing to deploy
Install the installation tooling dependencies. See Patterns quick start
Fork the Multicluster DevSecOps repository on GitHub. It is necessary to fork because your fork will be updated as part of the GitOps and DevSecOps processes. The Fork information and pull down menu can be found on the top right of the GitHub page for a pattern. Select the pull down an select Create a new fork.
Clone the forked copy of the
multicluster-devsecopsrepository. Use branchv1.0. (Clone in an appropriate sub-dir)git clone git@github.com:{your-username}/multicluster-devsecops.git cd multicluster-devsecops git checkout v1.0You could create your own branch where your specific values will be pushed to:
git checkout -b my-branchA
values-secret.yamlfile is used to automate setup of secrets needed for:- A Git repository (E.g. Github, GitLab etc.)
- Quay registry deployment secrets.
- Any application secrets that are needed.
DO NOT COMMIT THIS FILE. You do not want to push personal credentials to GitHub. Instead copy the template file
values-secret.yaml.templateto your home directory. Change the values in that file to ones that fit your environment.cp values-secret.yaml.template ~/values-secret.yaml vi ~/values-secret.yamlCustomize the deployment for your cluster. Change the appropriate values in
values-global.yamlvi values-global.yaml git add values-global.yaml git commit values-global.yaml git push origin my-branch
Getting Started Video
Make sure to set up the values-secret.yaml and values-global.yaml correctly (see above). For a demonstration of the deployment, click on the image below to launch the video.
How to deploy
Please review the Patterns quick start page. This section describes deploying the pattern using pattern.sh. You can deploy the pattern using the validated pattern operator. If you do use the operator then skip to Validating the Environment below.
Preview the changes. If you’d like to review what is been deployed with the pattern,
pattern.shprovides a way to show what will be deployed../pattern.sh make showLogin to your cluster using
oc loginor exporting the kuberneteskubeconfigfile withKUBECONFIG:oc loginor
export KUBECONFIG=~/<path-to-kubeconfig/kubeconfigApply the changes to your cluster
./pattern.sh make install
Validating the Environment
Check the operators have been installed
OpenShift Console UI -> Installed OperatorsNavigate to the OpenShift GitOps instances using the links on the top right hand side of the screen.
The most important ArgoCD instance to examine at this point is
hub-gitops-server. This is where all the applications for the hub (datacenter), including the test environment, can be tracked.Apply the secrets from the
values-secret.yamlto the secrets management Vault. This can be done through Vault’s UI - manually without the file. The required secrets and scopes are:- secret/git git username & password (GitHub token)
- secret/quay The admin username and password and email.
- secret/imageregistry Quay.io or DockerHub username & password
Or you can set up the secrets using the command-line by running the following (Ansible) playbook.
scripts/setup-secrets.yamlUsing the Vault UI check that the secrets have been setup.
For more information on secrets management see here. For information on Hashicorp’s Vault see here
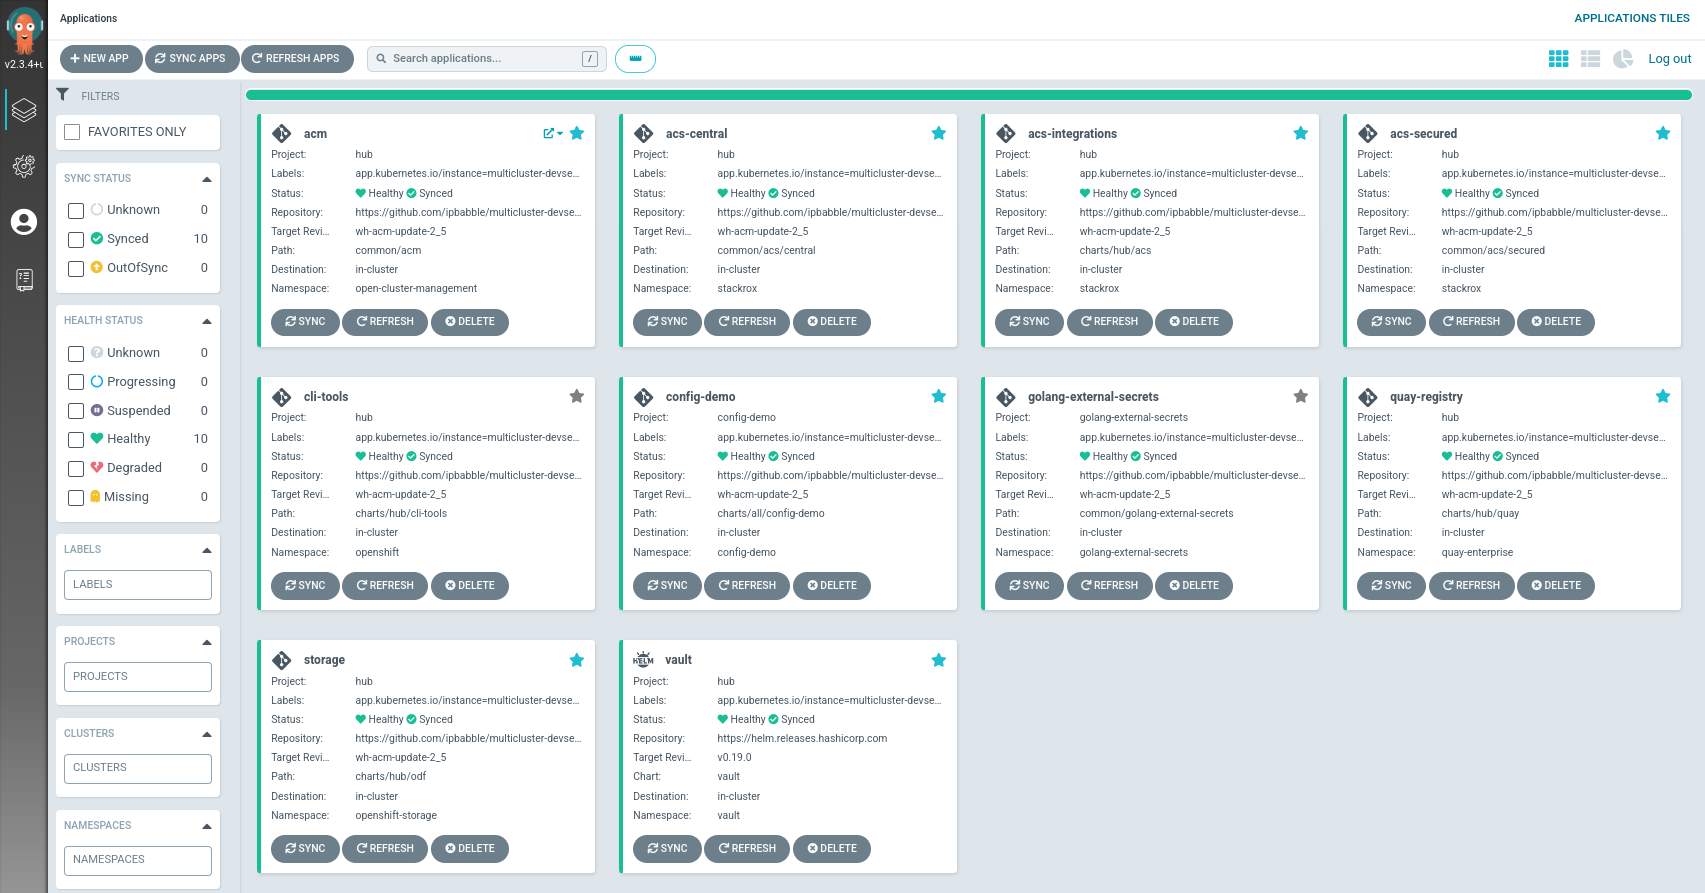
Check all applications are synchronized in OpenShift GitOps.
Check the ACM policy deployment
After ACM is installed a message regarding a “Web console update is available” may be displayed. Click on the “Refresh web console” link.
Navigate to the ACM hub console. On the upper-left side you’ll see a pull down labeled “local-cluster”. Click on this and select “All Clusters” from this pull down. This will navigate to the ACM console and to its “Clusters” section
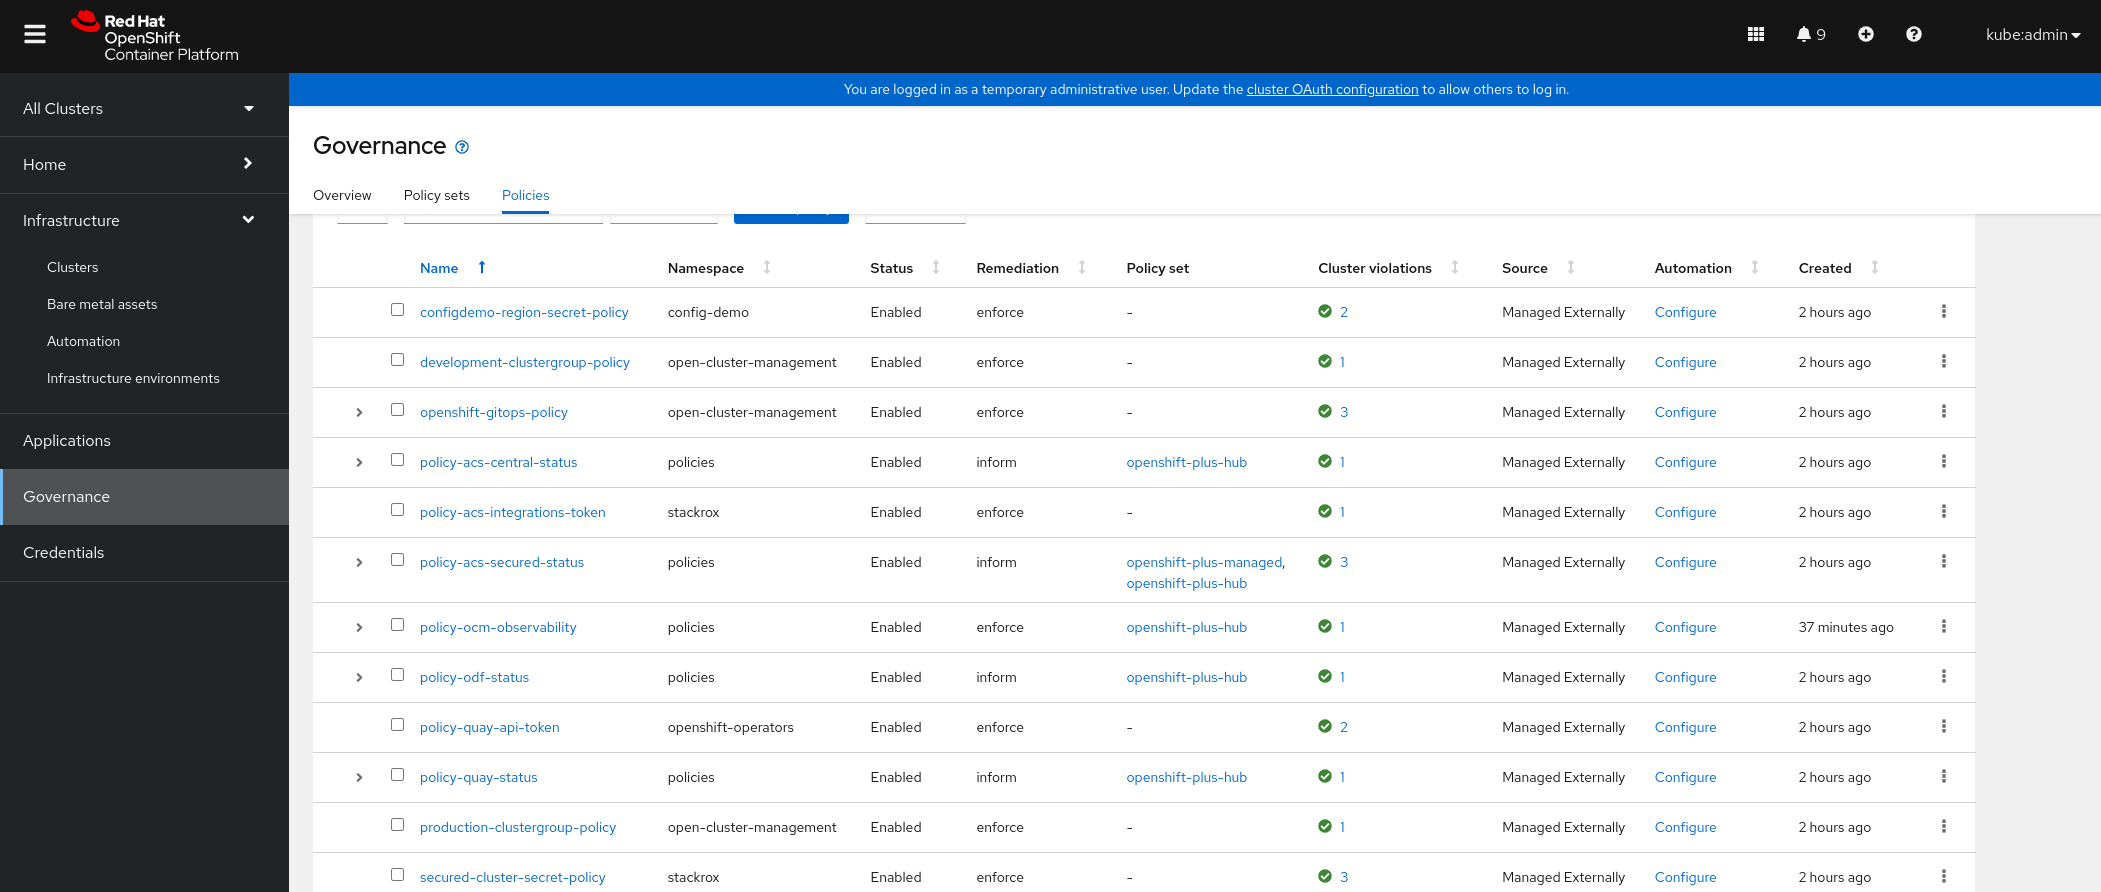
The Governance dashboard shows high level information on Policy set violations and Policy violations.

Navigate to the Governance page and select the
Policy setsGovernance tab. There are two policy sets deployed, one for the hub, openshift-plus-hub, and one for managed clusters, openshift-plus-managed.Explore the Policies tab and select some policies to examine. The image below shows and example of ACM policy status for a three cluster deployment.
Checking the ACS deployment
Select the
stackrox Project(namespace). Navigate to the OCP Networking->Routes page. Click on thecentralroute location URL. It might take a few minutes for this link to be active. When it does it will launch a new tab with the ACS Central login page.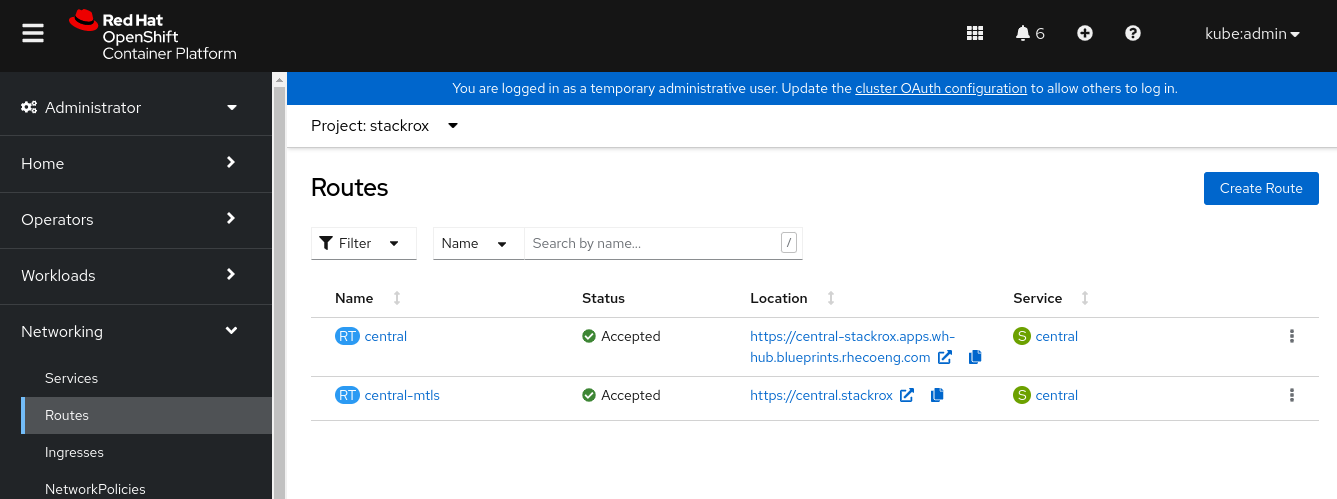
Return to the OCP console tab and navigate to the Workload->Secrets page. Find the
central-htpasswdsecret and select it.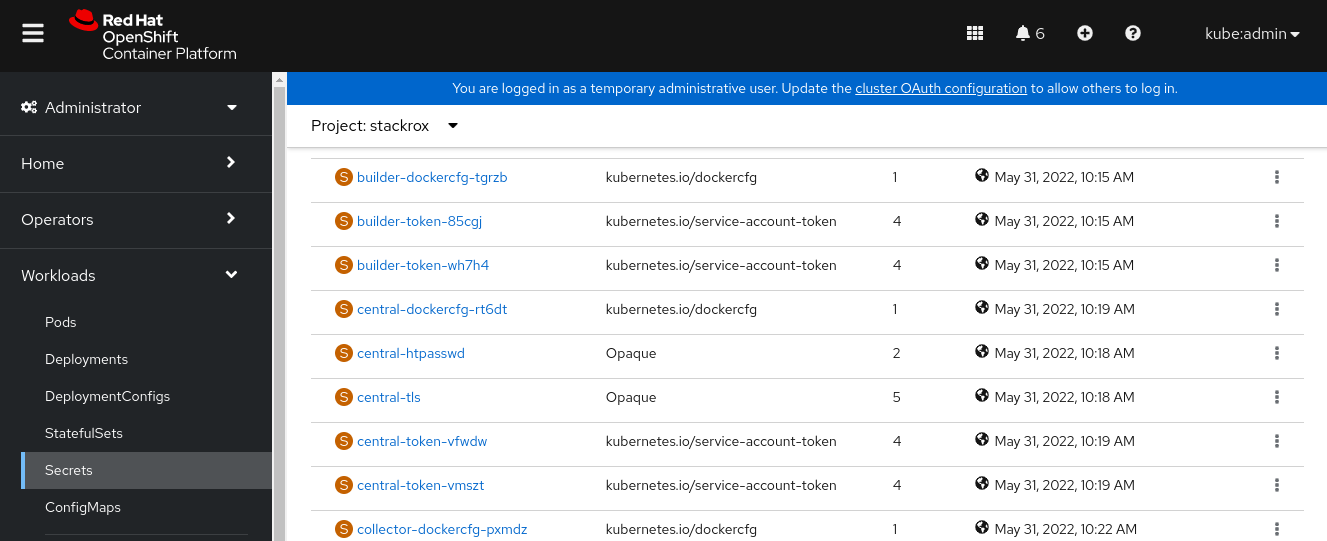
On the
central-htpasswdpage, scroll to the Data section and select the copy icon on the right in thepasswordfield.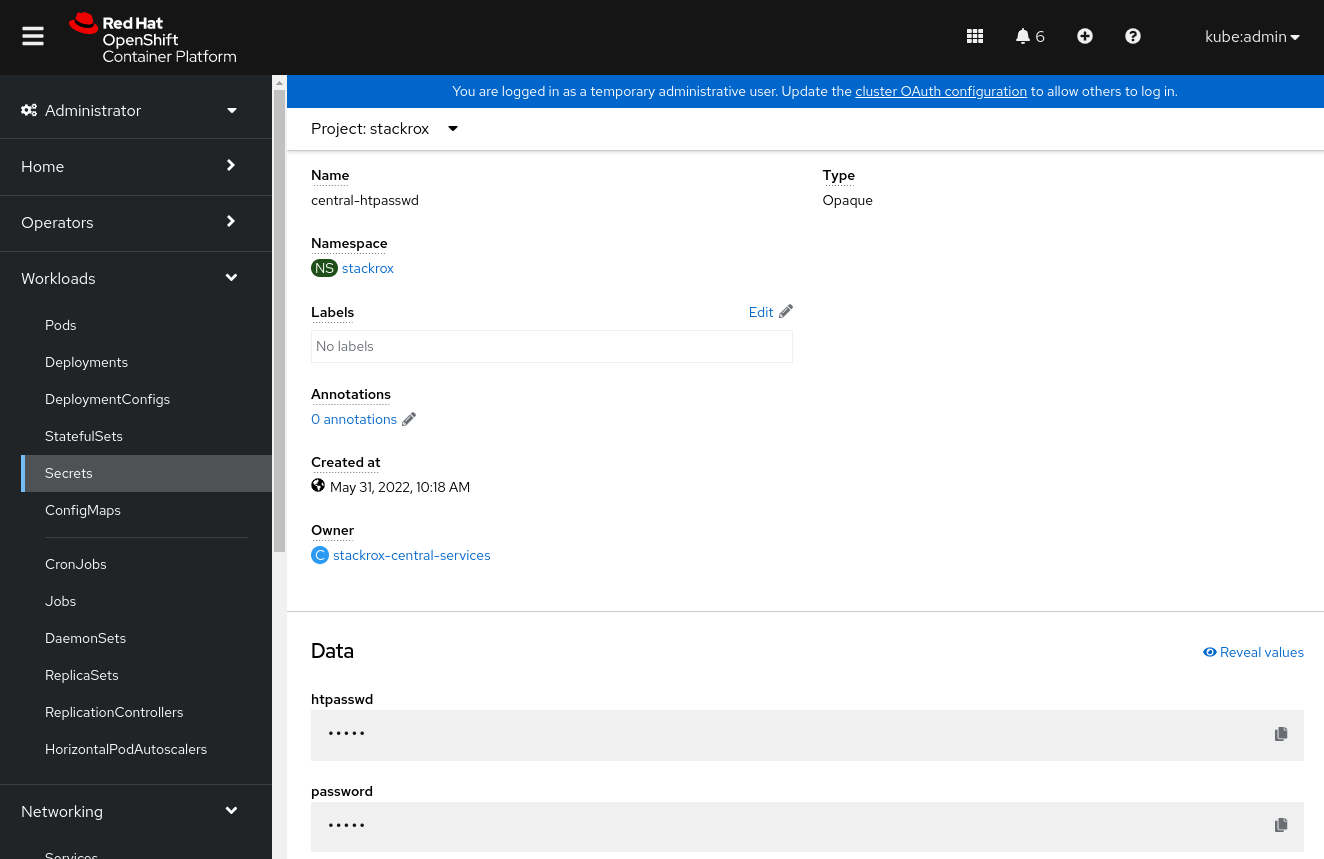
Return to the ACS Central tab and paste the password into the password field. Make sure that the Username is
admin.This will bring you to the ACS Central dashboard page. At first it may not show any clusters showing but as the ACS secured deployment on the hub syncs with ACS central on the hub then information will start to show.
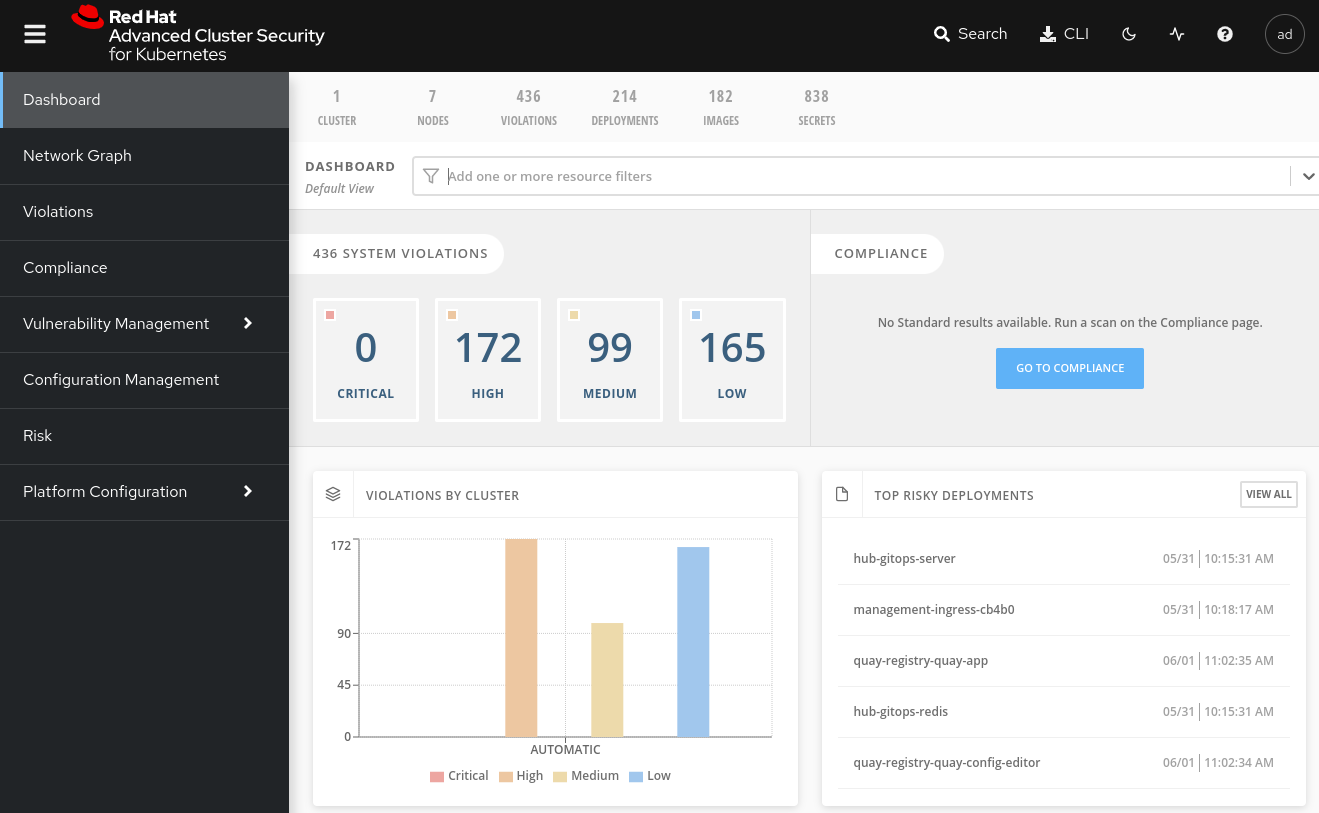
Return to this dashboard later after deploying the development and production clusters so you can see their information in this dashboard. All clusters in this pattern are ACS secured and therefore ought to show up in this dashboard when those clusters join the hub and are fully deployed.
Check the Quay deployment
Select the
quay-enterpriseproject (namespace). Navigate to the OCP Networking->Routes page. Click on thequay-registry-quayroute location URL (standard Quay naming apparently). It might take a few minutes for this link to be active. When it does it will launch a new tab with the Quay login page.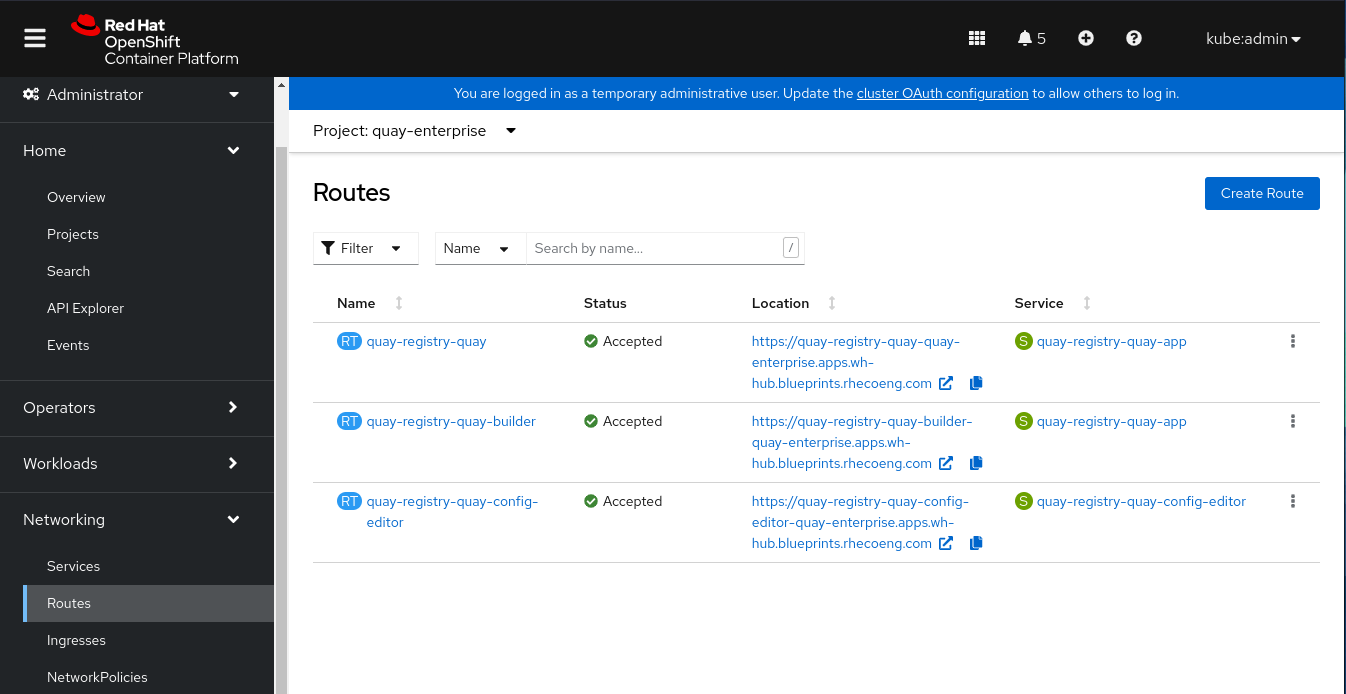
An initial
quayadminaccount has already been created for you as part of the deployment. The password isquayadmin123. If you want to change initial admin user name and password you can do so by editing thecharts/hub/quay/values.yamlor by adding those entries to thevalues-global.yamlfile. Log in using the username and password.After logging in, the private Quay registry dashboard will be displayed.

Completing the Quay Bridge with a bearer token
Managed clusters use a Quay Bridge in order to provide integration between the cluster and Quay Enterprise running on the hub/central cluster. The Quay Bridge looks like a local OpenShift registry but acts as a proxy to the Quay Enterprise registry. Currently there is a manual step to completing the Quay Bridge setup for managed clusters.
Log in to Red Hat Quay through the web UI.
Select the organization for which the external application will be configured.
On the navigation pane, select Applications.
Select Create New Application and enter a name for the new application, for example, openshift.
On the OAuth Applications page, select your application, for example,
devel-automation.On the navigation pane, select Generate Token.
Select the following fields and press Generate Access Token at the bottom of the page:
Administer Organization
Administer Repositories
Create Repositories
View all visible repositories
Read/Write to any accessible repositories
Administer User
Read User Information
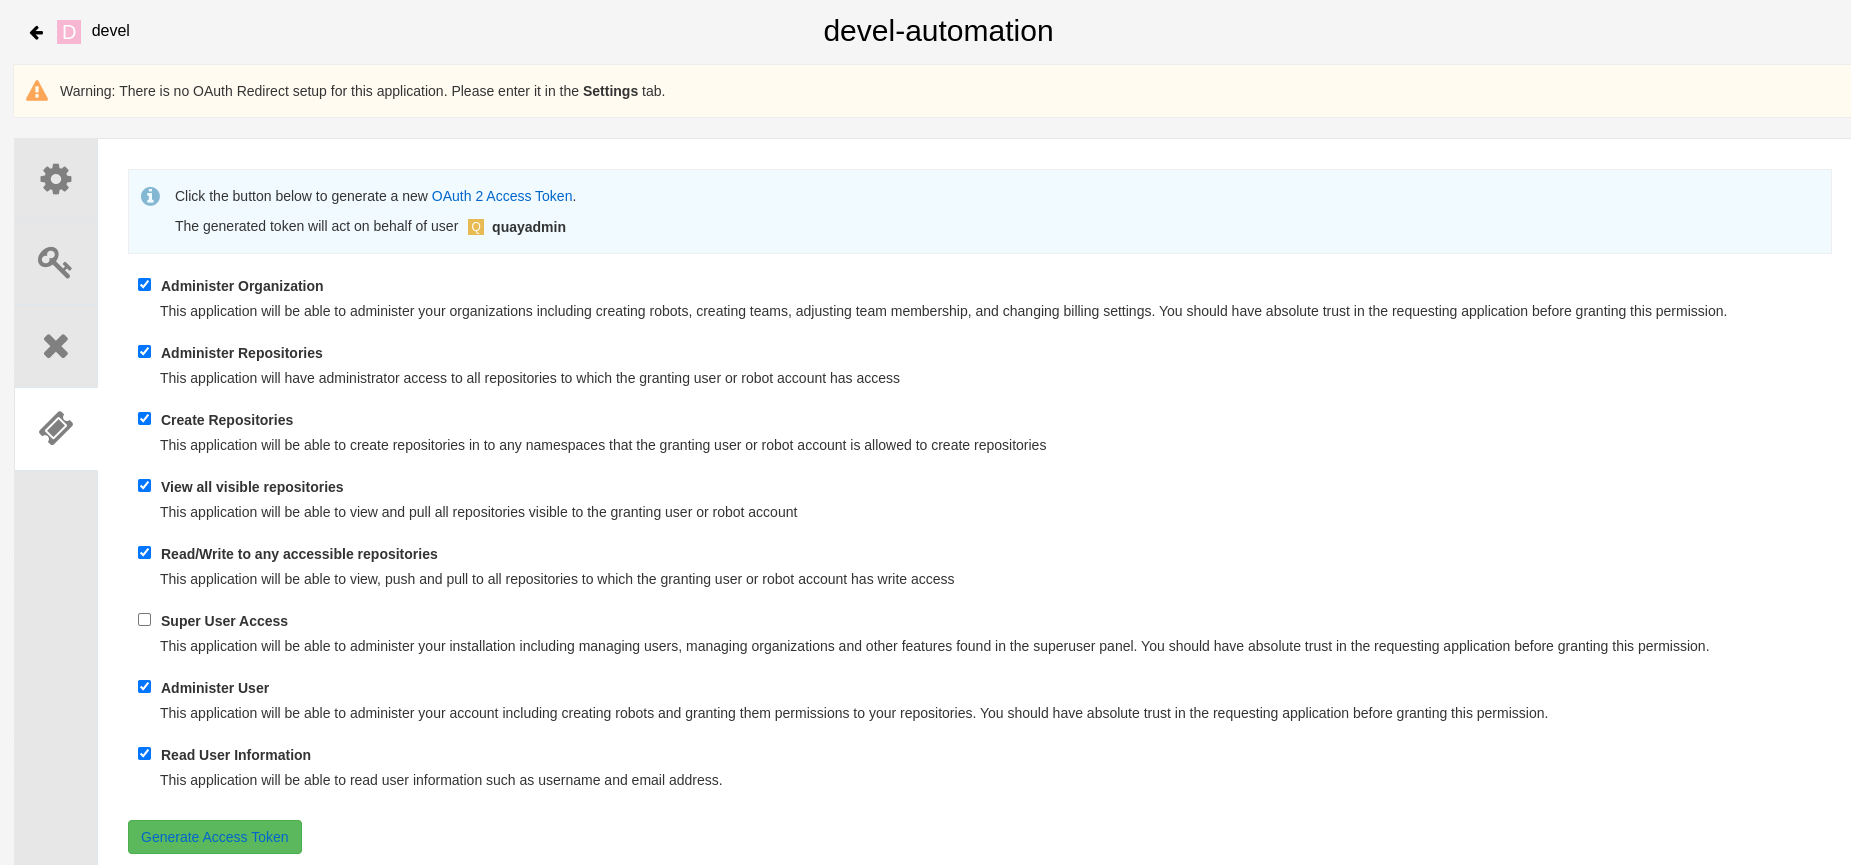
Review the assigned permissions.
Select Authorize Application and then confirm confirm the authorization by selecting Authorize Application at the bottom of the page.
Save/copy the generated access token.
At a command line prompt that has KUBECONFIG set to the central/hub cluster’s
auth/kubeconfigfile, run the following command with the token that was saved/copied above.
$ oc create secret -n openshift-operators generic quay-integration --from-literal=token=<access_token>
There is a ACM policy that will make sure that this is copied out to the managed clusters. If there are any problems with the managed cluster’s Quay Bridge quay-integration token, you can run the same command on the managed cluster.
Creating an ACS/Quay integration
Advanced Cluster Security needs to be integrated with Quay Enterprise registry. Currently there is no way to automate this as it requires the above manual step to generate the OAuth token.
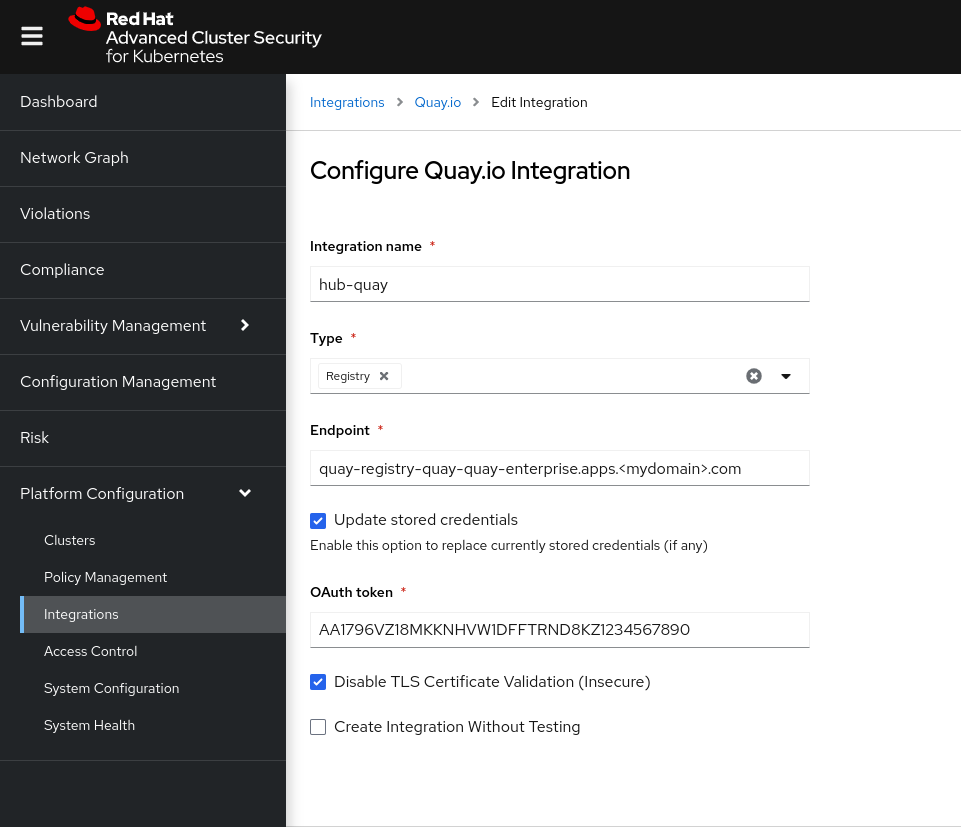
On the ACS console, under ==Platform Configuration== on the left hand side, select ==Integrations==.
Under Image Integrations select ==Red Hat Quay.io==
In the Integrations > Quay.io page select ==New Integration== and fill out the form: Give it a name like
hub-quayand select Registry as the type. Provide the URL for Quay Enterprise and the OAuth token generated in above. Press ==Save==. Here is an example.
Next Steps
Help & Feedback{: .btn .fs-5 .mb-4 .mb-md-0 .mr-2 } Report Bugs{: .btn .btn-red .fs-5 .mb-4 .mb-md-0 .mr-2 }
Once the hub has been setup correctly and confirmed to be working, you can:
Add a dedicated development cluster to deploy the CI pipelines using ACM
Add a dedicated production cluster to deploy production using ACM
Once the hub, production and devel clusters have been deployed you will want to check out and test the Multi-Cluster DevSecOps demo code. You can find that here TBD
a. Making configuration changes with GitOps TBD a. Making application changes using DevOps TBD
Uninstalling
Probably wont work
Turn off auto-sync
helm upgrade manuela . --values ~/values-secret.yaml --set global.options.syncPolicy=ManualRemove the ArgoCD applications (except for manuela-datacenter)
a. Browse to ArgoCD a. Go to Applications a. Click delete a. Type the application name to confirm a. Chose “Foreground” as the propagation policy a. Repeat
Wait until the deletions succeed
tbdshould be the only remaining applicationComplete the uninstall
helm delete tbdCheck all namespaces and operators have been removed
