$ git clone git@github.com:<your-username>/federated-edge-observability.gitDeploying the Federated Edge Observability pattern
Prerequisites
An OpenShift cluster
To create an OpenShift cluster, go to the Red Hat Hybrid Cloud console.
Select OpenShift -> Red Hat OpenShift Container Platform -> Create cluster.
A GitHub account and a token for it with repositories permissions, to read from and write to your forks.
The Helm binary, see Installing Helm For installation tool dependencies, see Patterns quick start.
Preparing for deployment
Procedure
Fork the federated-edge-observability repository on GitHub. You must fork the repository because your fork is updated as part of the GitOps and DevOps processes.
Clone the forked copy of this repository.
Go to your repository: Ensure you are in the root directory of your Git repository by using:
$ cd /path/to/your/repositoryRun the following command to set the upstream repository:
$ git remote add -f upstream git@github.com:validatedpatterns-sandbox/federated-edge-observability.gitVerify the setup of your remote repositories by running the following command:
$ git remote -vExample outputorigin git@github.com:kquinn1204/federated-edge-observability.git (fetch) origin git@github.com:kquinn1204/federated-edge-observability.git (push) upstream git@github.com:validatedpatterns-sandbox/federated-edge-observability.git (fetch) upstream git@github.com:validatedpatterns-sandbox/federated-edge-observability.git (push)Make a local copy of secrets template outside of your repository to hold credentials for the pattern.
Do not place this file in your repository, and do not commit or push it. This would risk pushing personal credentials to GitHub.
Run the following commands:
$ cp values-secret.yaml.template ~/values-secret.yamlPopulate this file with secrets, or credentials, that are needed to deploy the pattern successfully:
$ vi ~/values-secret.yamlEdit the
vm-sshsection to include the username, private key, and public key. To ensure the seamless flow of the pattern, the value associated with theprivatekeyandpublickeyhas been updated withpath. For example:- name: vm-ssh fields: - name: username value: 'cloud-user' - name: privatekey path: '/path/to/private-ssh-key' - name: publickey path: '/path/to/public-ssh-key'Paste the path to your locally stored private and public keys. If you do not have a key pair, generate one using
ssh-keygen.Edit the
rhsmsection to include the Red Hat Subscription Management username and password. For example:- name: rhsm fields: - name: username value: 'username of user to register RHEL VMs' - name: password value: 'password of rhsm user in plaintext'This is the username and password that you use to log in to registry.redhat.io..
Edit the
cloud-initsection to include theuserDatablock to use with cloud-init. For example:- name: cloud-init fields: - name: userData value: |- #cloud-config user: 'cloud-user' password: 'cloud-user' chpasswd: { expire: False }Edit the
aap-manifestsection to include the path to the downloaded manifest zip file that gives an entitlement to run Ansible Automation Platform. Create a subscription manifest by following the guidance at Obtaining a manifest file. For example add the following:- name: aap-manifest fields: - name: path: '~/Downloads/<manifest_filename>.zip' base64: trueEdit the
automation-hub-tokensection to include the token generated at . Click the Load token link at Automation Hub Token to generate a token. For example:- name: automation-hub-token fields: - name: token path: '/path/to/automation-hub-token'Optionally: Edit the
agof-vault-filesection to use the following (you do not need additional secrets for this pattern):- name: agof-vault-file fields: - name: agof-vault-file value: '---' base64: trueEdit the
otel-certsection to include the path to a pre-existing TLS key and certificate. Populate as shown below:- name: otel-cert fields: - name: tls.key path: '~/federated-edge-observability-otel-collector-edge-observability-stack.key' - name: tls.crt path: '~/federated-edge-observability-otel-collector-edge-observability-stack.crt'Certificates for the OpenTelemetry collector infrastructure.
Snakeoilthat is, self-signed certificates are automatically generated by themakefileas follows by themake snakeoil-certstarget, which is automatically run bymake install.
Create and switch to a new branch named my-branch, by running the following command:
$ git checkout -b my-branchEdit the
values-global.yamlfile to customize the deployment for your cluster. The defaults invalues-global.yamlare designed to work in AWS. For example:$ vi values-global.yamlAdd the changes to the staging area by running the following command:
$ git add values-global.yamlCommit the changes by running the following command:
$ git commit -m "No updates"Push the changes to your forked repository:
$ git push origin my-branch
The preferred way to install this pattern is to use the script ./pattern.sh script.
Deploying the cluster by using the pattern.sh file
To deploy the cluster by using the pattern.sh file, complete the following steps:
Log in to your cluster by running the following this procedure:
Obtain an API token by visiting https://oauth-openshift.apps.<your-cluster>.<domain>/oauth/token/request.
Log in to the cluster by running the following command:
$ $ oc login --token=<retrieved-token> --server=https://api.<your-cluster>.<domain>:6443Alternatively log in by running the following command:
$ export KUBECONFIG=~/<path_to_kubeconfig>
Deploy the pattern to your cluster. Run the following command:
$ ./pattern.sh make install
Verification
Verify that the Operators have been installed, in the OpenShift Container Platform web console, navigate to Operators → Installed Operators page.
 Figure 1. Federated Edge Observability Operators
Wait some time for everything to deploy. You can track the progress through the
Hub ArgoCDUI from the nines menu.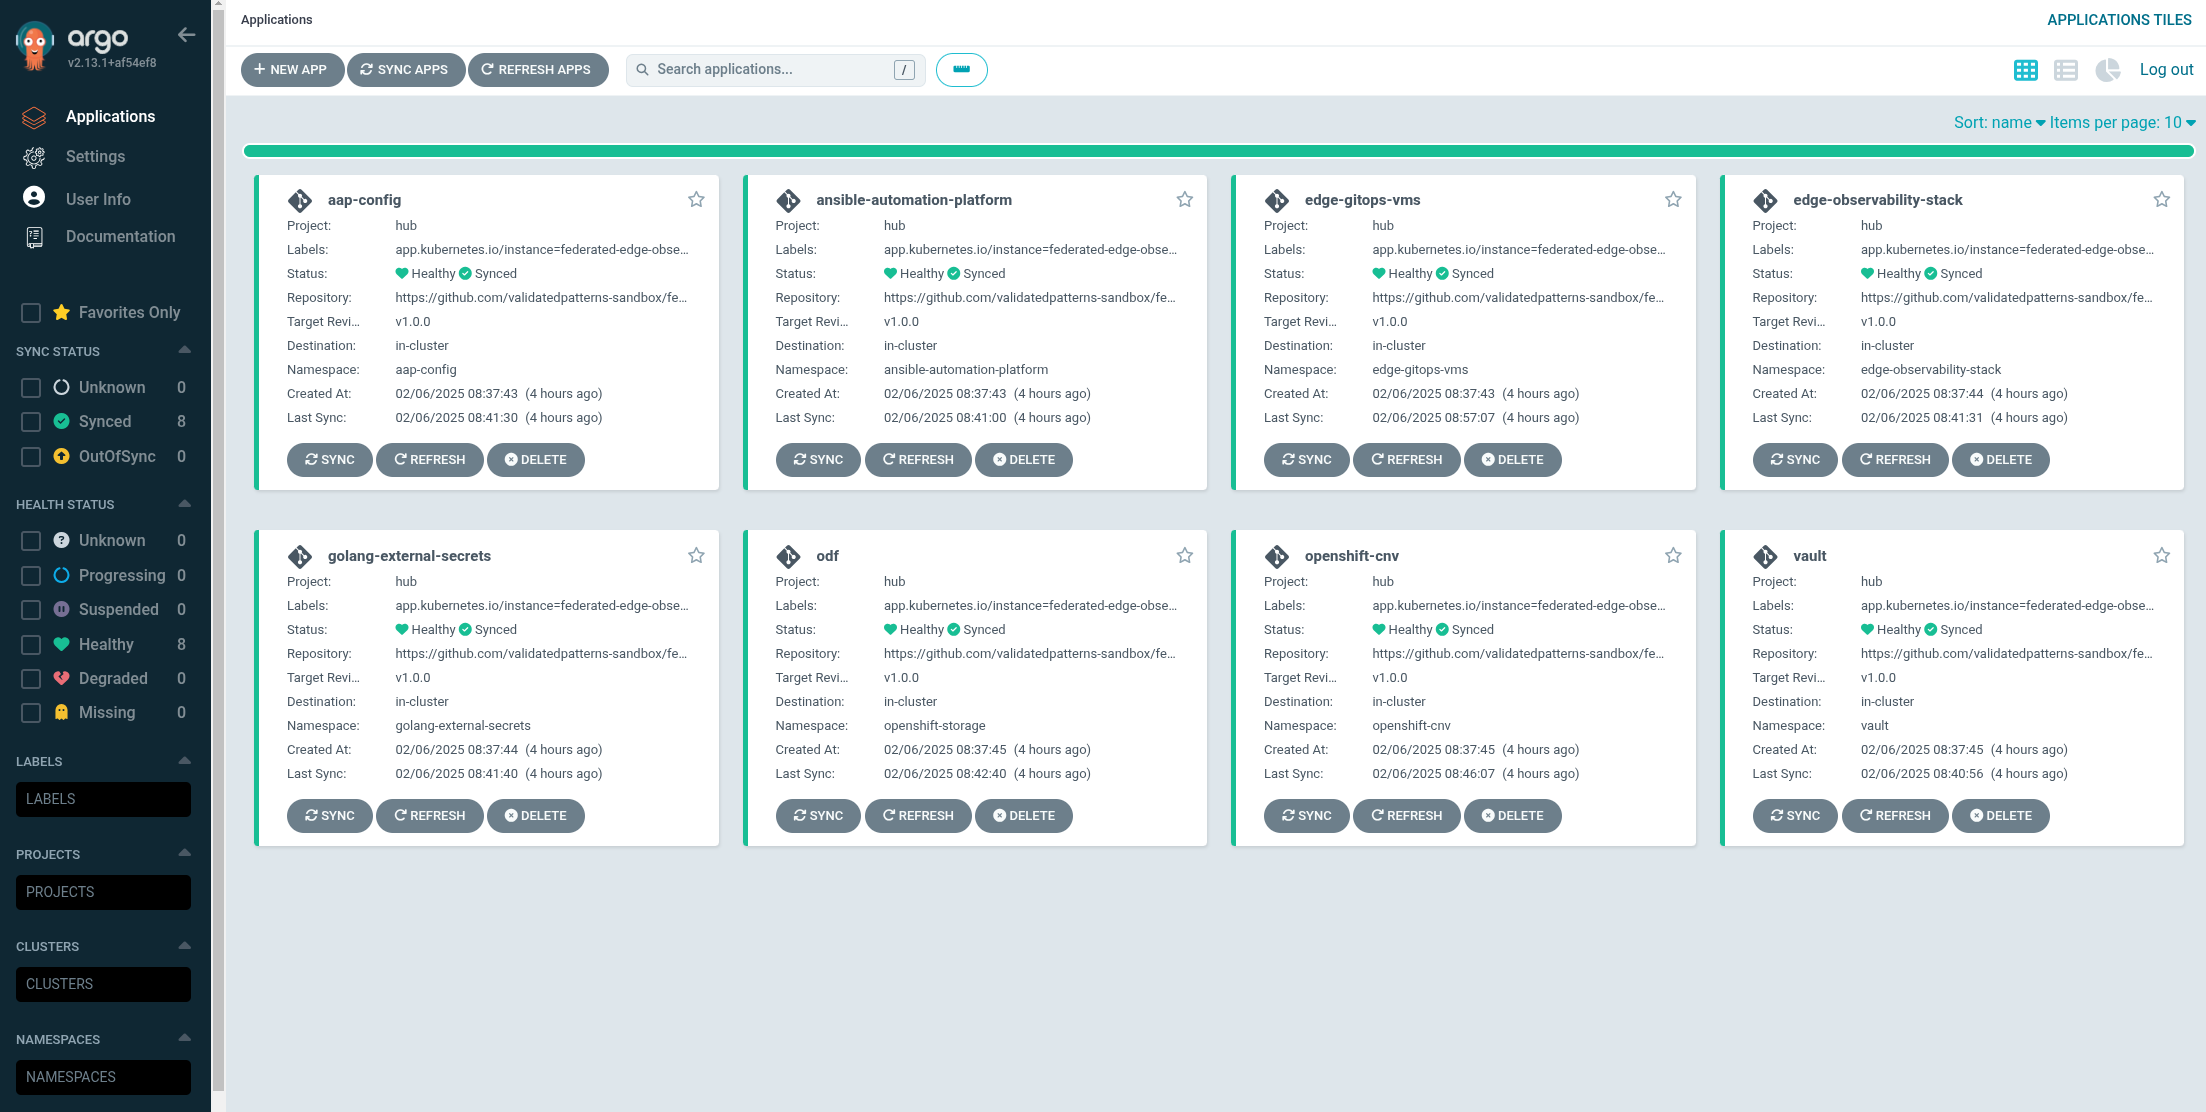 Figure 2. Federated Edge Observability Applications
As part of installing by using the script pattern.sh pattern, HashiCorp Vault is installed. Running ./pattern.sh make install also calls the load-secrets makefile target. This load-secrets target looks for a YAML file describing the secrets to be loaded into vault and in case it cannot find one it will use the values-secret.yaml.template file in the git repository to try to generate random secrets.
For more information, see section on Vault.
Under Virtualization > VirtualMachines, the virtual machines show as
Running. Once they are inRunningstate the Provisioning workflow will run on them, install the OpenTelemetry collector, and start reporting metrics to the Edge Observability Stack in the hub cluster.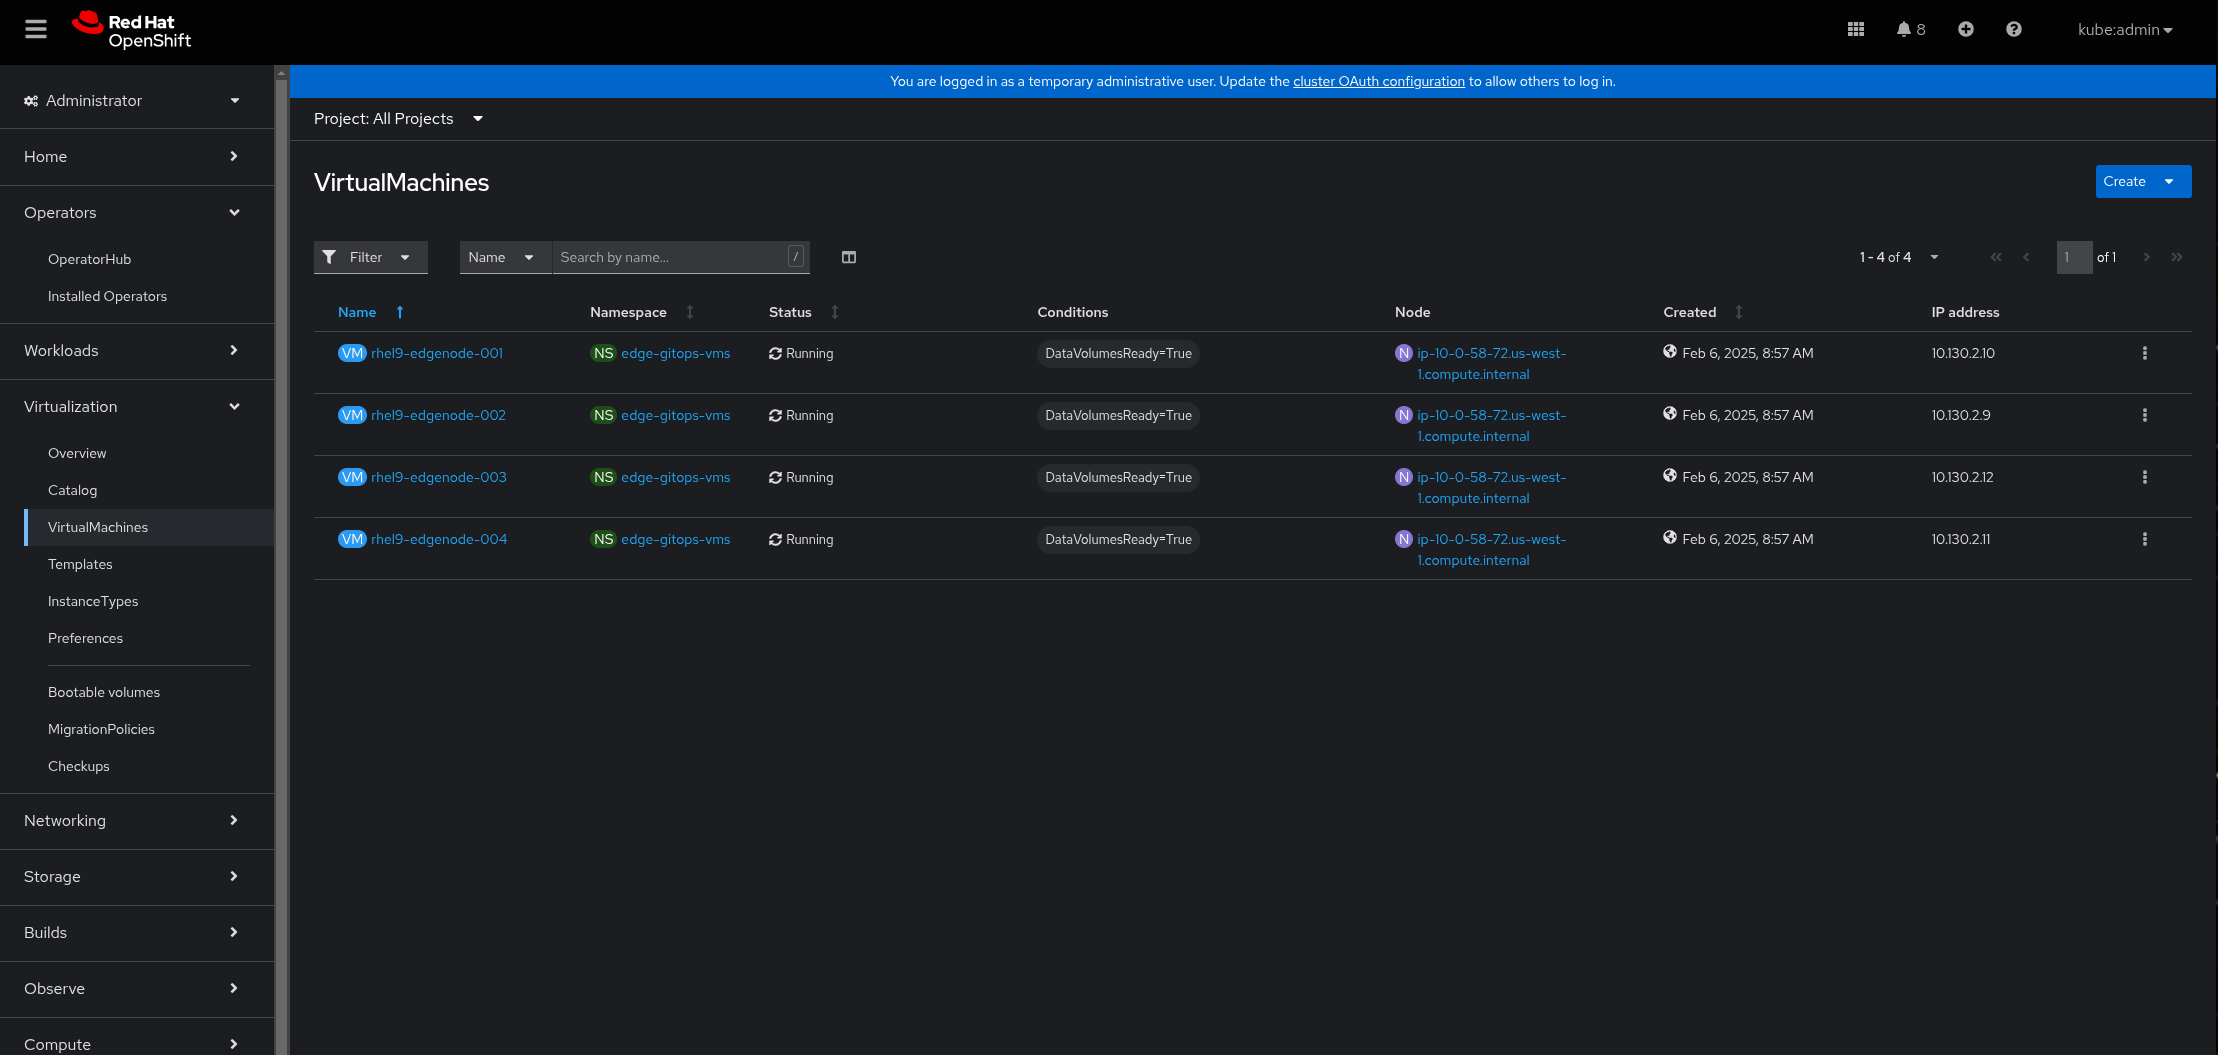 Figure 3. Federated Edge Observability Virtual Machines
Log in to the Grafana dashboard in the nines menu under Grafana Observability. Log in username and password is
admin.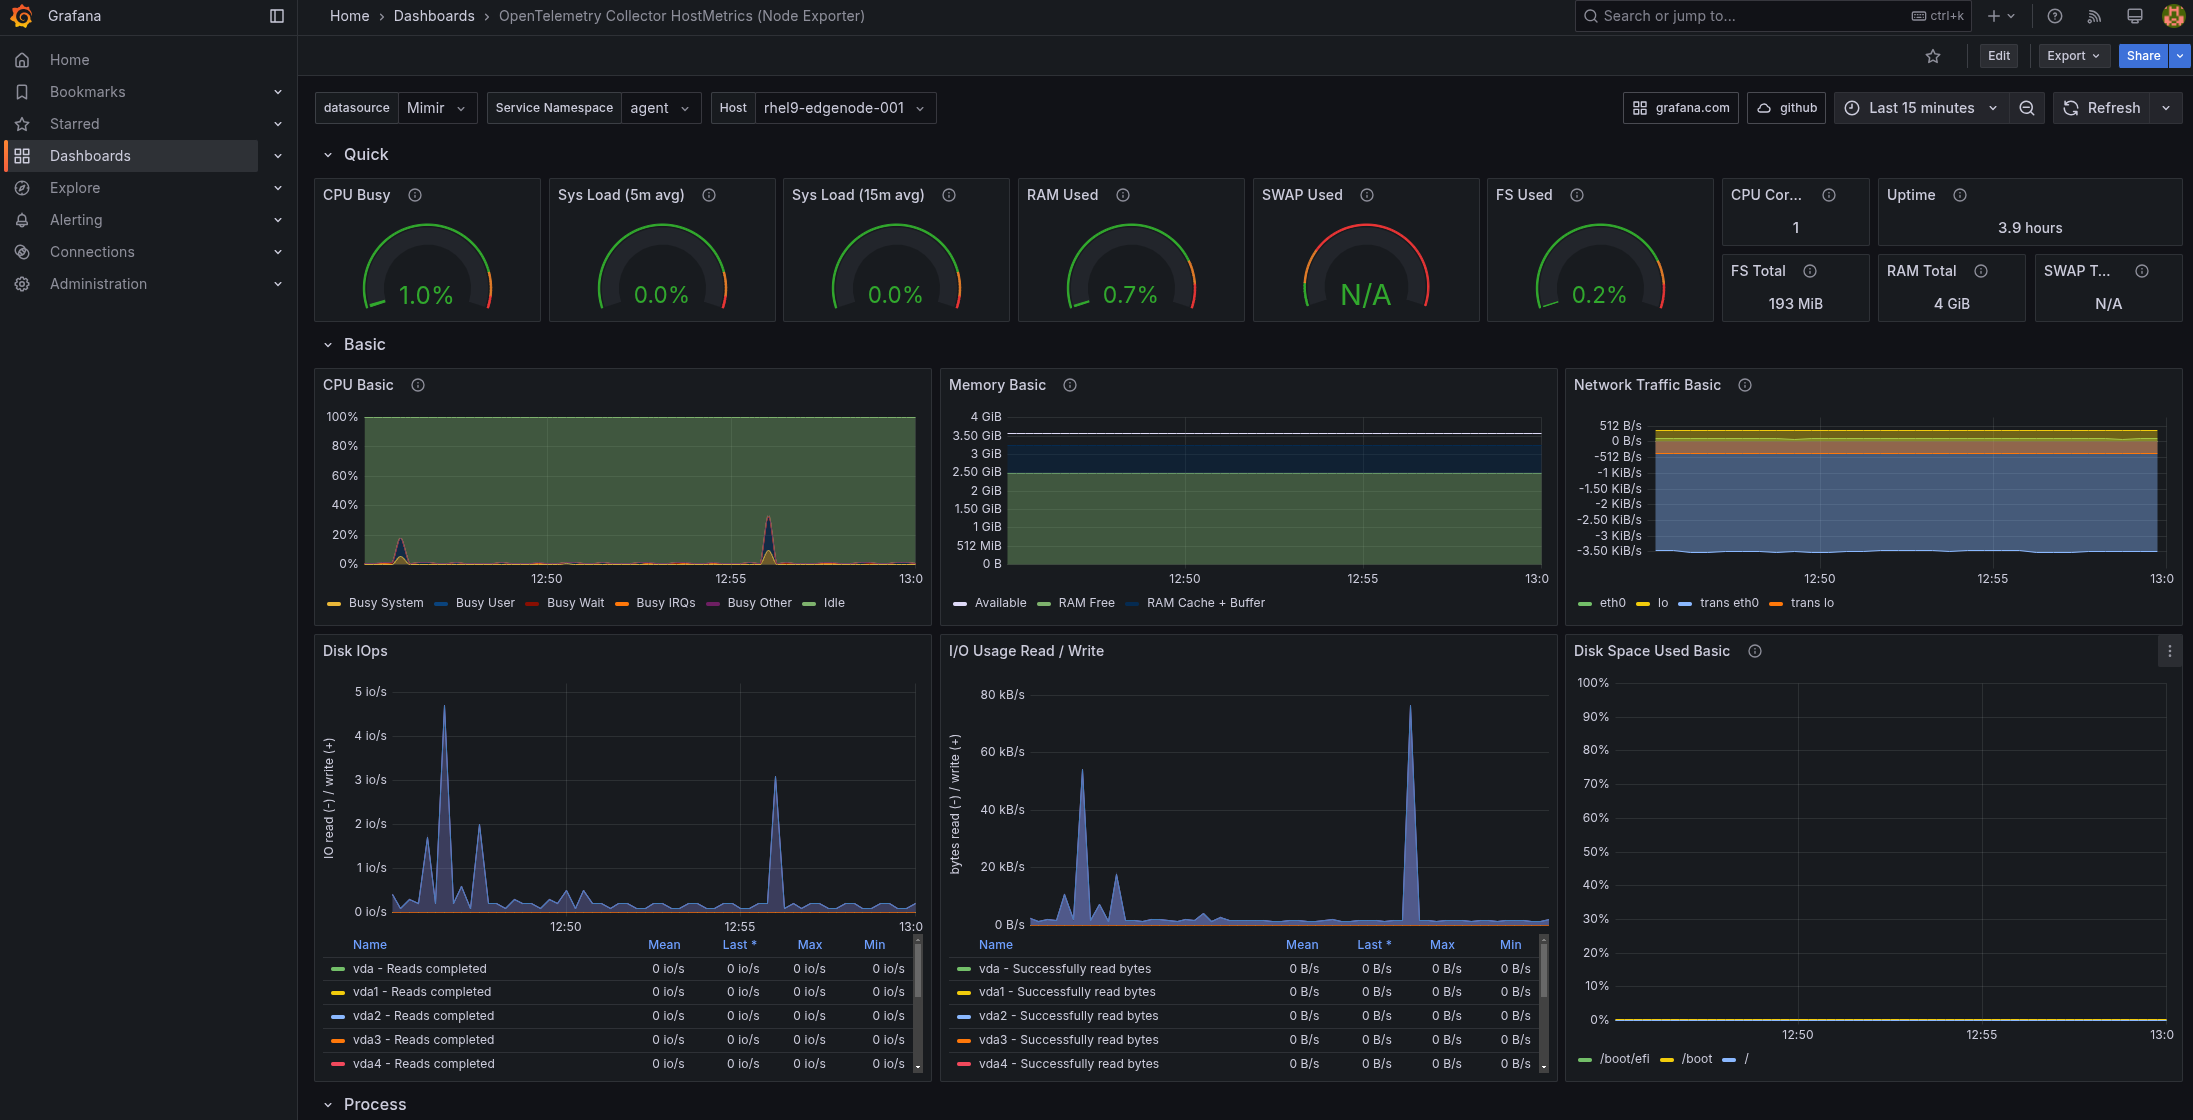 Figure 4. Federated Edge Observability Graphs
Under Dashboards select OpenTelemetry Collector HostMetrics (Node Exporter) should be receiving data and drawing graphs for each of the nodes:
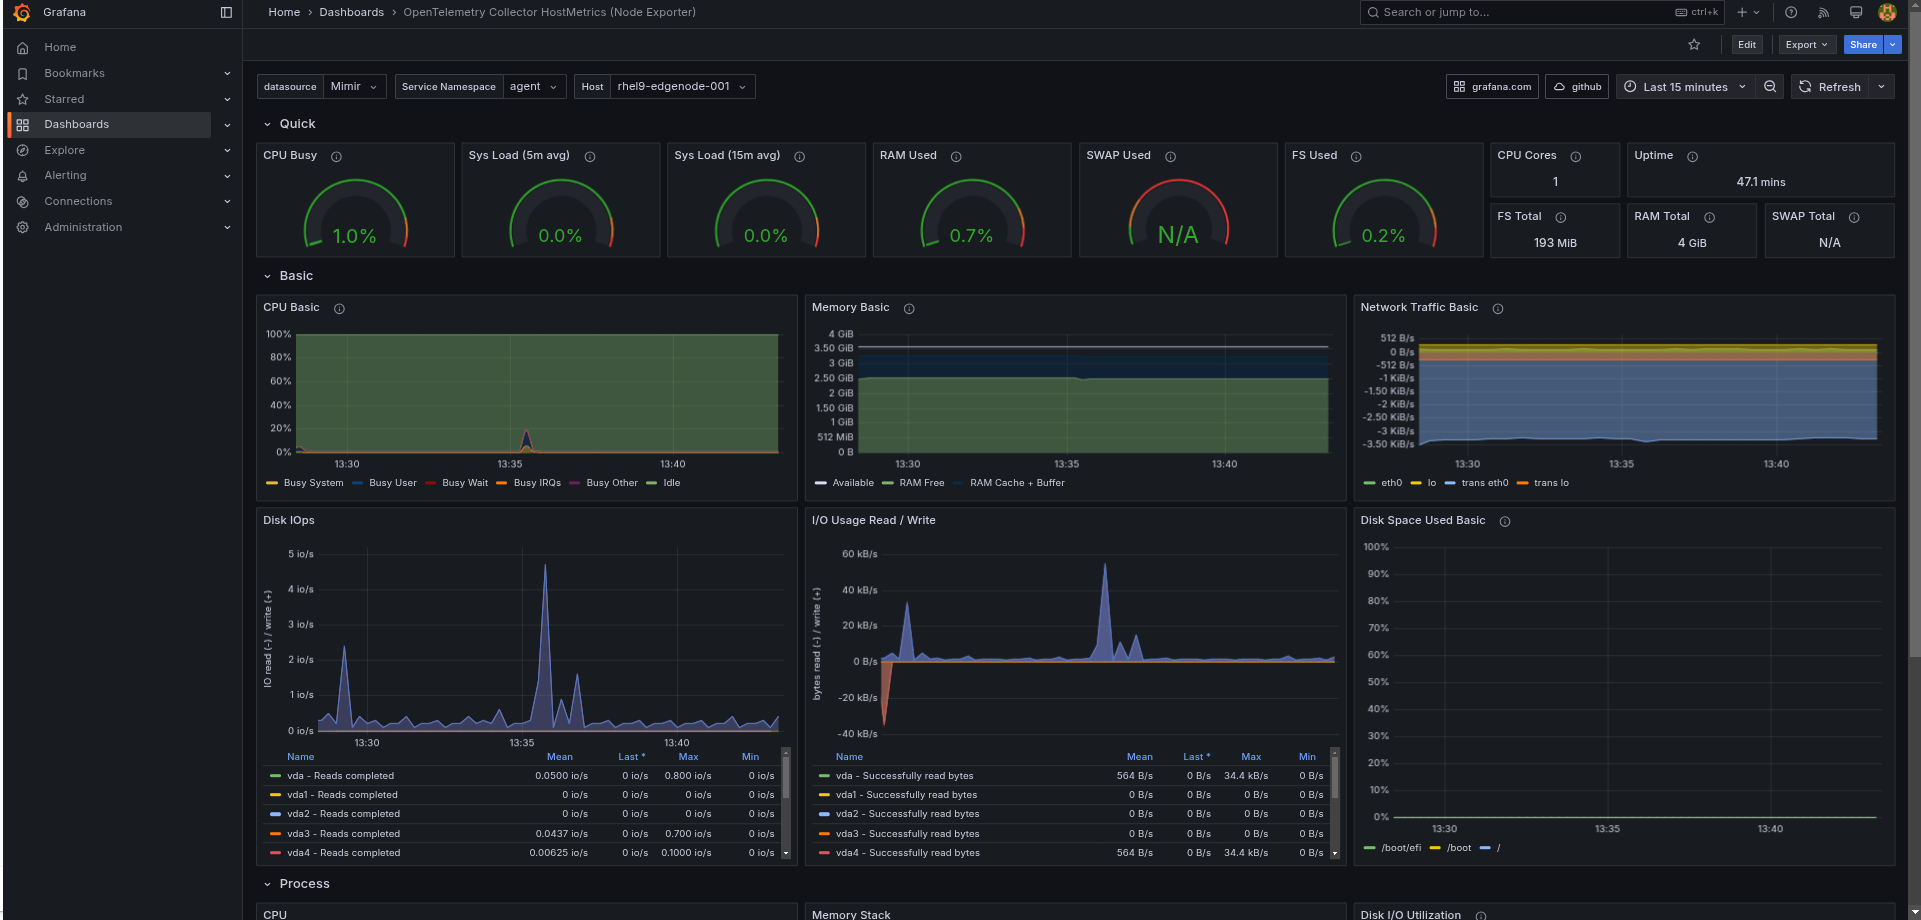 Figure 5. Federated Edge Observability displayed Graphs
See AnsibleAutomation Platform for more information on how this pattern uses the Ansible Automation Platform Operator for OpenShift.
Infrastructure Elements of this Pattern
Ansible Automation Platform
A fully functional installation of the Ansible Automation Platform operator is installed on your OpenShift cluster to configure and maintain the VMs for this demo. AAP maintains a dynamic inventory of kiosk machines and can configure a VM from template to fully functional kiosk in about 10 minutes.
OpenShift Virtualization
OpenShift Virtualization is a Kubernetes-native way to run virtual machine workloads. It is used in this pattern to host VMs simulating an Edge environment; the chart that configures the VMs is designed to be flexible to allow easy customization to model different VM sizes, mixes, versions and profiles for future pattern development.
