git clone git@github.com:your-username/qna-chat-gaudi.gitDeploying the OPEA QnA chat accelerated with Intel Gaudi pattern
Prerequisites
An OpenShift Container Platform cluster
To create an OpenShift Container Platform cluster, go to the Red Hat Hybrid Cloud console and select Services -> Containers -> Create cluster.
The cluster must have a dynamic
StorageClassto provisionPersistentVolumes. It was tested with ODF (OpenShift Data Foundation) or LVM Storage solutions. CephFS should be set as a default Storage Class - Setup Guide
OpenShift Container Platform Cluster must have a configured Image Registry - Setup Guide
A GitHub account and a token for it with repositories permissions, to read from and write to your forks.
A HuggingFace account and User Access token, which allows to download AI models. More about User Access token can be found on official HuggingFace website
Install AWS CLI tool to check status of S3 bucket (RGW storage).
If you do not have a running Red Hat OpenShift cluster, you can start one on a public or private cloud by using Red Hat Hybrid Cloud Console.
Procedure
Fork the qna-chat-gaudi repository on GitHub.
Clone the forked copy of this repository.
Create a local copy of the secret values file that can safely include credentials. Run the following commands:
cp values-secret.yaml.template ~/values-gaudi-rag-chat-qna.yamlvi ~/values-gaudi-rag-chat-qna.yamlDo not commit this file. You do not want to push personal credentials to GitHub. If you do not want to customize the secrets by copying secret, these steps are not needed. User can just type in required HuggingFace User Access Token while installing pattern. In the beginning of the installation process there should appear prompt asking for the HuggingFace User Access Token.
(Optional) If cluster is behind proxy
values-global.yamlshould be similar to the following:If the cluster is behind proxy remember to change proxy values of fields
gaudillm.build_envsandgaudillm.runtime_envsinvalues-global.yamlfile to appropriate ones.gaudillm: namespace: gaudi-llm build_envs: - name: http_proxy value: http://proxy-internal.cluster1.gaudi.internal:912 - name: https_proxy value: http://proxy-internal.cluster1.gaudi.internal:912 - name: HTTP_PROXY value: http://proxy-internal.cluster1.gaudi.internal:912 - name: HTTPS_PROXY value: http://proxy-internal.cluster1.gaudi.internal:912 - name: no_proxy value: .cluster.local,.gaudi.internal,.cluster1.gaudi.internal,.svc,192.168.122.0/24,10.128.0.0/14,127.0.0.1,172.30.0.0/16,api-int.cluster1.gaudi.internal,localhost - name: NO_PROXY value: .cluster.local,.gaudi.internal,.cluster1.gaudi.internal,.svc,192.168.122.0/24,10.128.0.0/14,127.0.0.1,172.30.0.0/16,api-int.cluster1.gaudi.internal,localhost runtime_envs: - name: http_proxy value: http://proxy-internal.cluster1.gaudi.internal:912 - name: https_proxy value: http://proxy-internal.cluster1.gaudi.internal:912 - name: HTTP_PROXY value: http://proxy-internal.cluster1.gaudi.internal:912 - name: HTTPS_PROXY value: http://proxy-internal.cluster1.gaudi.internal:912 - name: no_proxy value: .cluster.local,.gaudi.internal,.cluster1.gaudi.internal,.svc,192.168.122.0/24,10.128.0.0/14,127.0.0.1,172.30.0.0/16,api-int.cluster1.gaudi.internal,localhost - name: NO_PROXY value: .cluster.local,.gaudi.internal,.cluster1.gaudi.internal,.svc,192.168.122.0/24,10.128.0.0/14,127.0.0.1,172.30.0.0/16,api-int.cluster1.gaudi.internal,localhostCustomize the deployment for your cluster. Run the following command:
git checkout -b my-branchvi values-global.yamlgit add values-global.yamlgit commit values-global.yamlgit push origin my-branchDeploy the pattern by running
./pattern.sh make installor by using the Validated Patterns Operator.If you have not set HuggingFace token in secrets file there will be prompt to set the token.
Deploying the cluster by using the pattern.sh file
To deploy the cluster by using the pattern.sh file, complete the following steps:
Login to your cluster by running the following command:
oc loginOptional: Set the
KUBECONFIGvariable for thekubeconfigfile path:export KUBECONFIG=~/<path_to_kubeconfig>Deploy the pattern to your cluster. Run the following command:
./pattern.sh make installIn the beginning of installation there should be prompt to enter HuggingFace token, looking like this:
Insert HuggingFace Token:Validated Pattern can take a while to be fully installed as it requires couple of reboots to apply MachineConfigs for worker nodes.
As part of this pattern, HashiCorp Vault has been installed. Refer to the section on Vault.
Verification
Verify that the Operators have been installed.
To verify, in the OpenShift Container Platform web console, navigate to Operators → Installed Operators page.
Check that the Operators are installed in the
openshift-operatorsnamespace and its status isSucceeded.
Verify that S3 bucket was created successfully. Run following commands:
export AWS_ACCESS_KEY_ID=$(oc -n openshift-storage get secret s3-secret-bck -ojsonpath='{.data.AWS_ACCESS_KEY_ID}' | base64 -d)
export AWS_SECRET_ACCESS_KEY=$(oc -n openshift-storage get secret s3-secret-bck -ojsonpath='{.data.AWS_SECRET_ACCESS_KEY}' | base64 -d)
export CEPH_RGW_ENDPOINT=http://$(oc -n openshift-storage get route s3-rgw -ojsonpath='{.spec.host}')
aws --endpoint ${CEPH_RGW_ENDPOINT} s3api list-buckets
Expected response should show that bucket named
model-bucketexists:{ "Buckets": [ { "Name": "model-bucket", "CreationDate": "2024-06-27T08:44:09.451000+00:00" } ], "Owner": { "DisplayName": "ocs-storagecluster", "ID": "ocs-storagecluster-cephobjectstoreuser" } }Verify that MachineConfigPool is ready. To check the status run following command:
oc get mcpVerify that all applications are healthy and synchronized. Under the project
gaudi-rag-chat-qnaclick the URL for thehubgitopsserver.
Setup Red Hat OpenShift AI
After all components are properly deployed user can proceed to setup Red Hat OpenShift AI. The procedures consists of two manual steps:
Uploading AI model to S3 bucket (RGW storage) on the cluster
Deploying TGI
Upload AI model
First step is to go to
RHOAI dashboard/Data Science Projectstab and selectgaudi-llmproject (If thegaudi-llmproject is missing user should check if app is ready in ArgoCD dashboard):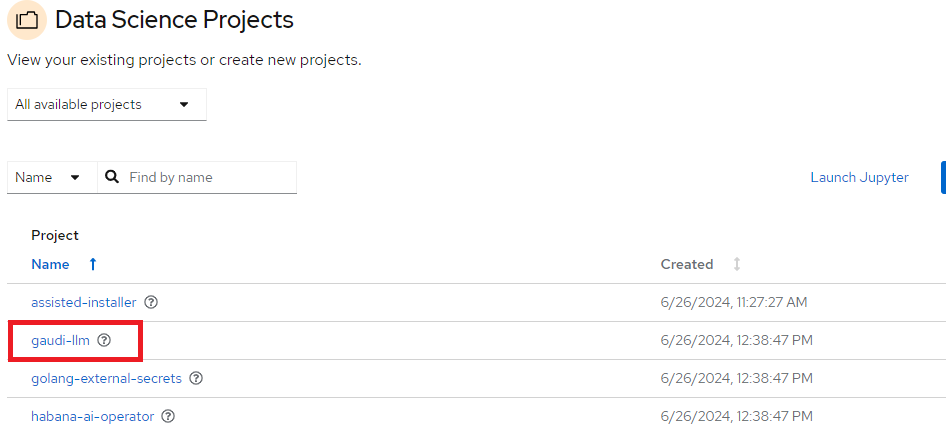
Go to
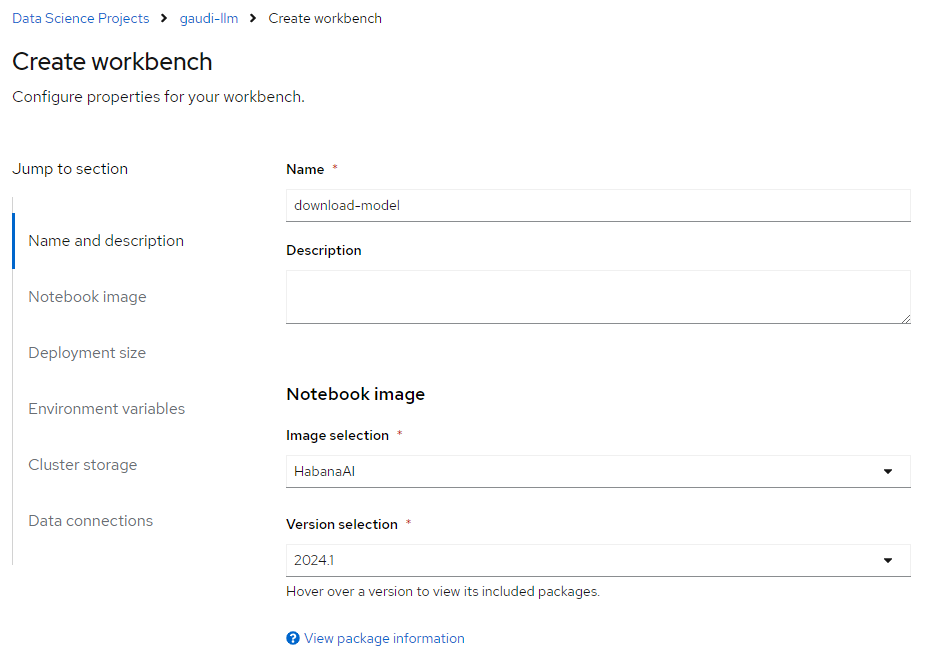
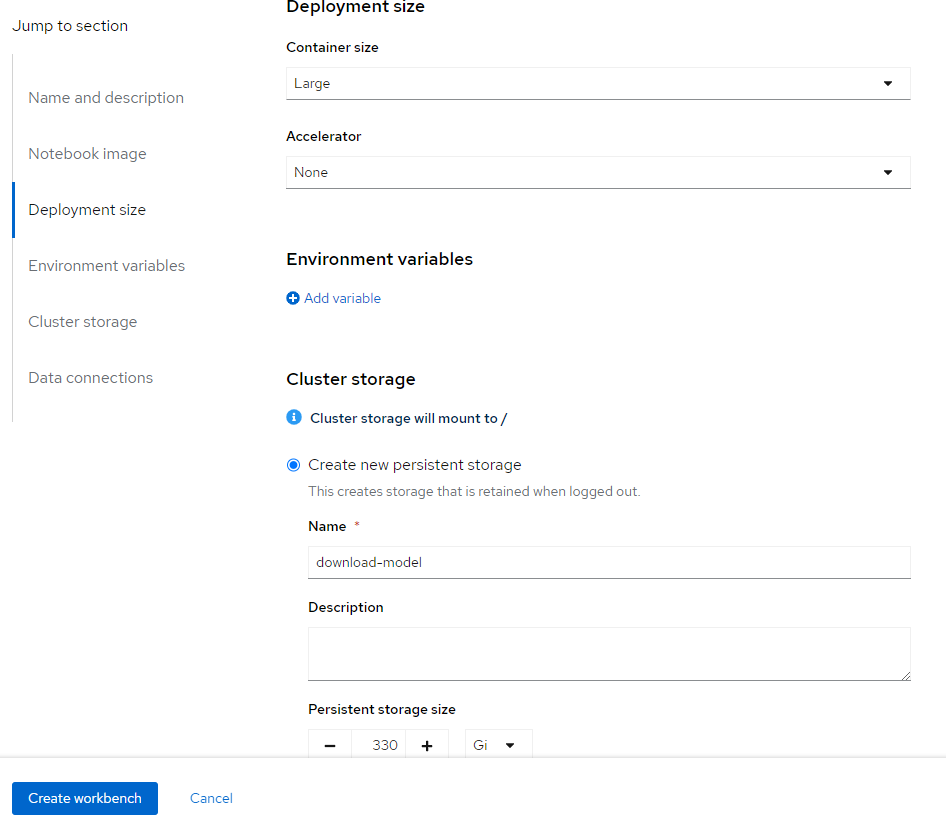
Workbenchestab and clickCreate workbench: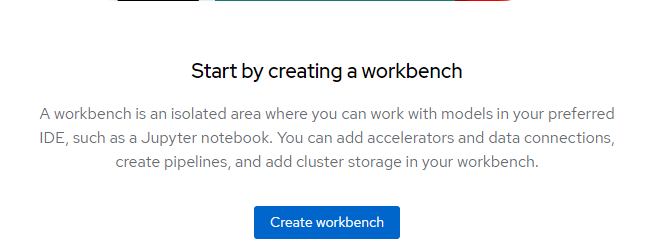
Fill the input form following images below:
After workbench is created go to this Jupyter notebook dashboard and upload Jupyter notebook file
/download-model.ipynbto the file explorer so it looks like this: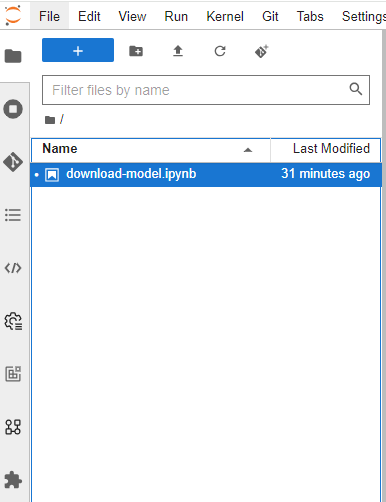
When
download-modelis uploaded, run notebook’s all commands. After notebook is executed, model should be uploaded to S3 bucket. To check if model is present please run following commands:export AWS_ACCESS_KEY_ID=$(oc -n openshift-storage get secret s3-secret-bck -ojsonpath='{.data.AWS_ACCESS_KEY_ID}' | base64 -d) export AWS_SECRET_ACCESS_KEY=$(oc -n openshift-storage get secret s3-secret-bck -ojsonpath='{.data.AWS_SECRET_ACCESS_KEY}' | base64 -d) export CEPH_RGW_ENDPOINT=http://$(oc -n openshift-storage get route s3-rgw -ojsonpath='{.spec.host}') aws --endpoint ${CEPH_RGW_ENDPOINT} s3 ls model-bucket/models/Response should show that model directory is present.
Deploy TGI
First step is to go to
RHOAI dashboard/Data Science Projectstab and selectgaudi-llmproject:Now select
Data connectionstab and clickAdd data connection: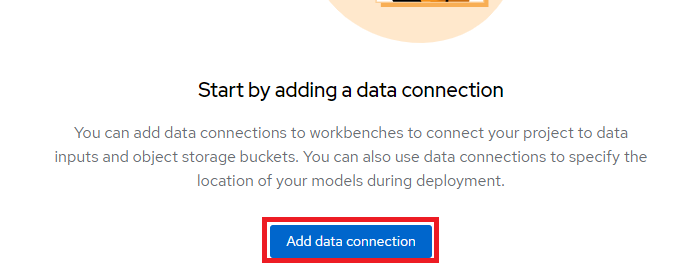
There should appear form
Add data connectionwith couple of inputs. Form should be looking similar to this: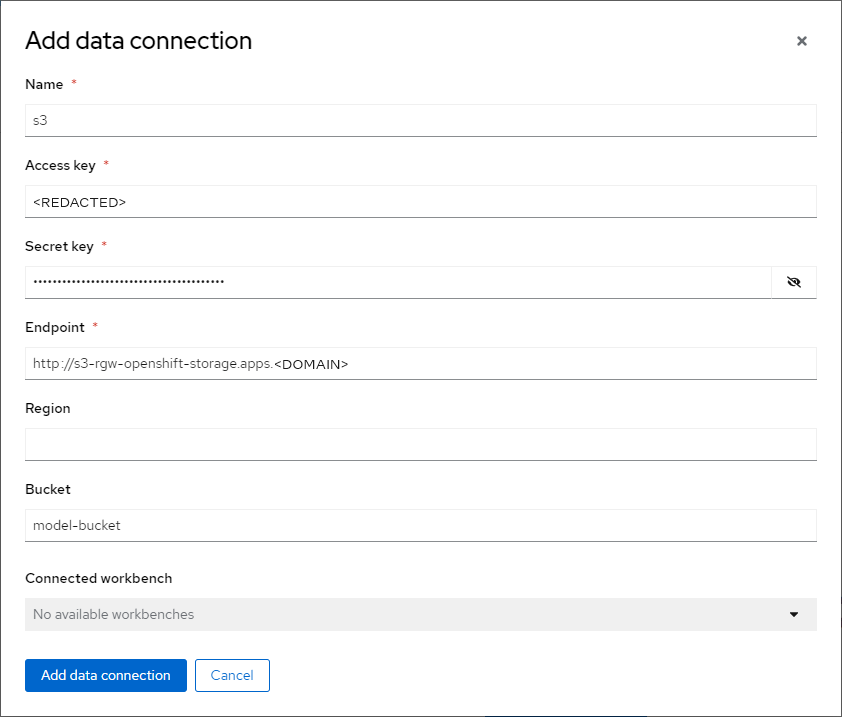
To get value for
Access keyrun command:oc -n openshift-storage get secret s3-secret-bck -ojsonpath='{.data.AWS_ACCESS_KEY_ID}' | base64 -dTo get value for
Secret keyrun command:oc -n openshift-storage get secret s3-secret-bck -ojsonpath='{.data.AWS_SECRET_ACCESS_KEY}' | base64 -dTo get value for
Endpointrun command:echo "http://$(oc -n openshift-storage get route s3-rgw -ojsonpath='{.spec.host}')"
Next step is to go to tab
Modelsand clickDeploy modelinSingle-model serving platformsection: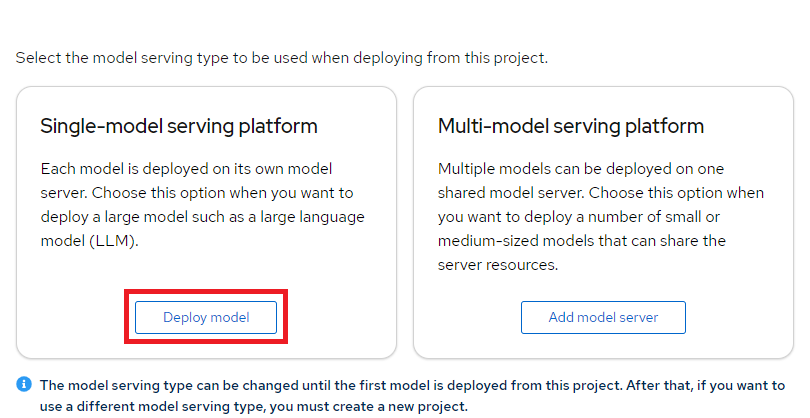
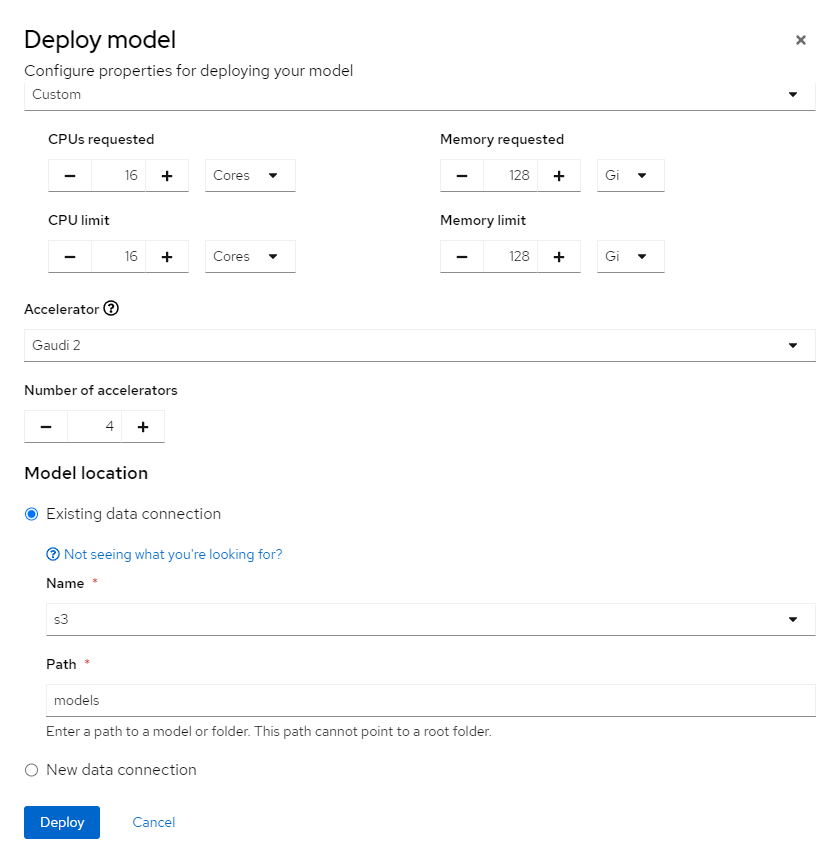
There should appear form
Deploy model. Fill all the inputs like in following images and then clickDeploybutton: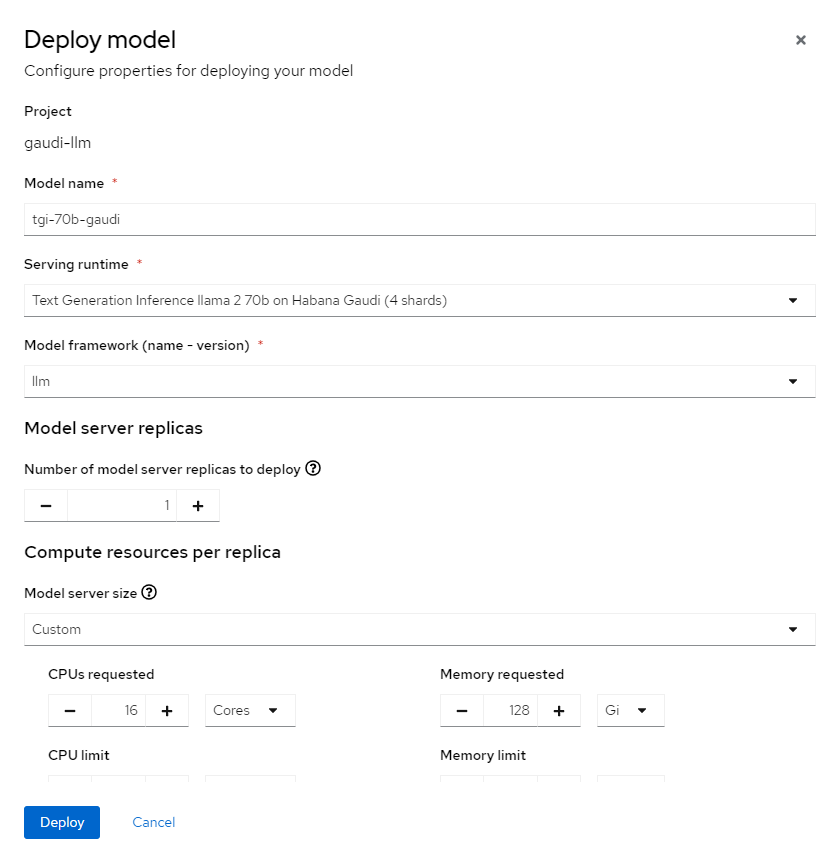
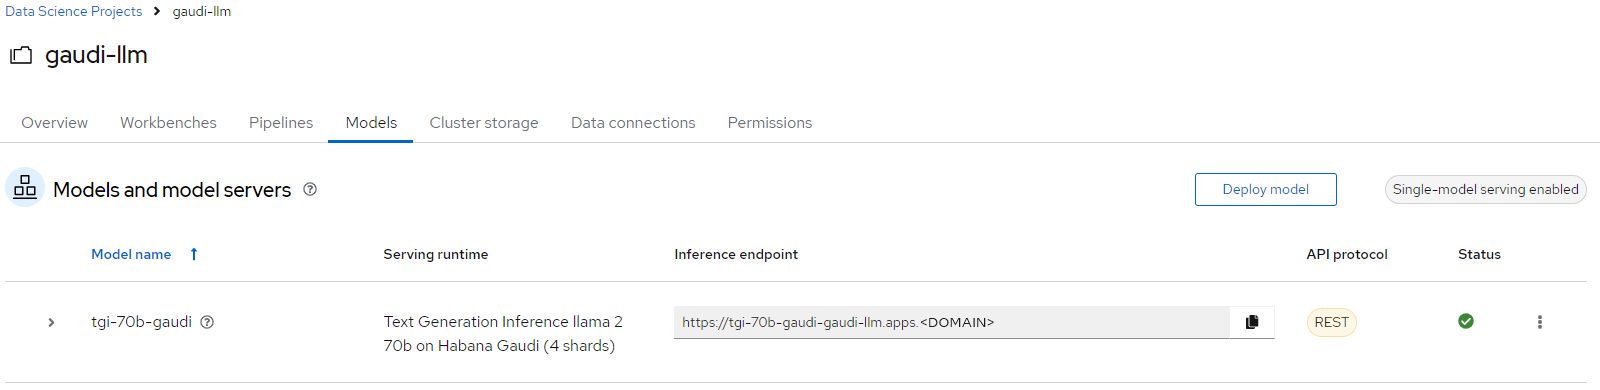
If everything is setup correctly go to tab
Modelsagain to check status of TGI. It should be looking like this: