apiVersion: tekton.dev/v1
kind: PipelineRun
metadata:
  generateName: qtodo-manual-run-
  namespace: layered-zero-trust-hub
spec:
  pipelineRef:
    name: qtodo-supply-chain
  taskRunTemplate:
    serviceAccountName: pipeline
  timeouts:
    pipeline: 1h0m0s
  workspaces:
  - name: qtodo-source
    persistentVolumeClaim:
      claimName: qtodo-workspace-source
  - name: registry-auth-config
    secret:
secretName: qtodo-registry-authUse case: Automating the secure supply chain
The Secure multitiered applications use case describes how to implement a secure supply chain for application development by using Red Hat Trusted Artifact Signer (RHTAS) and the Red Hat Trusted Profile Analyzer (RHTPA). This use case demonstrates automation of the secure supply chain for application development by using Red Hat OpenShift Pipelines.
OpenShift Pipelines orchestrates the application building and certification process. The Zero Trust Validated Pattern (ZTVP) creates a pipeline in the cluster named qtodo-supply-chain.
Pipeline tasks
The pipeline includes the following tasks:
qtodo-clone-repository: Clones the
qtodorepository.qtodo-build-artifact: Builds an
uber-jarof theqtodoapplication.qtodo-sign-artifact: Signs the generated JAR file.
qtodo-verify-artifact: Verifies the JAR signature.
qtodo-build-image: Builds a container image and uploads it to a registry.
qtodo-sign-image: Signs the container image.
qtodo-generate-sbom: Generates an SBOM from the image.
qtodo-sbom-attestation: Creates a signed attestation and attaches it to the image.
qtodo-upload-sbom: Uploads the SBOM file to RHTPA.
qtodo-verify-image: Verifies the attestation and signature.
Running the pipeline
Start the pipeline by using the OpenShift Container Platform web console or the CLI.
Running the pipeline from the web console
To start a pipeline execution from the OpenShift Container Platform Web console:
Procedure
Log in to the OpenShift Container Platform web console.
From the left navigation bar, select Pipelines → Pipelines.
In the layered-zero-trust-hub project, find the qtodo-supply-chain pipeline.
Click the Options menu (⋮) and select Start.
Verify the parameters. Most default values are correct for single-cluster mode.
Configure the following workspaces:
For qtodo-source, select PersistentVolumeClaim and ensure the PVC name is qtodo-workspace-source.
For registry-auth-config, select Secret and ensure the secret name is qtodo-registry-auth.
Click Start.
Running the pipeline from the CLI
Start a pipeline execution by creating a PipelineRun resource that references the qtodo-supply-chain pipeline.
Procedure
Create a file named
qtodo-pipeline.yamlwith the following content:Verify the values for the PVC storage and registry configuration.
Create the
PipelineRunresource:$ oc create -f qtodo-pipeline.yaml
Verification
Review the pipeline logs using the Tekton CLI:
$ tkn pipeline logs -n layered-zero-trust-hub -L -f
Inspecting pipeline results
Verify the status and output of the pipeline by using the web console or the CLI.
Inspecting results from the web console
You can inspect the results of the pipeline execution from the OpenShift Container Platform web console.
Procedure
Log in to the OpenShift Container Platform web console.
From the left navigation bar, select Pipelines → Pipelines.
In the layered-zero-trust-hub project, find the qtodo-supply-chain pipeline.
Click the PipelineRun link in the Last run column.
In the Details tab, view the summary of the pipeline execution and tasks.
Click on a task or the Logs tab to see the output of specific tasks.
Inspecting results from the CLI
You can inspect the results of the pipeline execution by using the CLI.
Procedure
Verify that the pipeline completed successfully:
$ oc get pipelinerun -n layered-zero-trust-hub

NAME                        SUCCEEDED   REASON      STARTTIME   COMPLETIONTIME
qtodo-manual-run-p46f7      True        Succeeded   7m4s        2m12s
Review the
TaskRunsto see the results of each step:$ oc get taskruns -n layered-zero-trust-hub NAME SUCCEEDED REASON STARTTIME COMPLETIONTIME qtodo-manual-run-p46f7-qtodo-build-artifact True Succeeded 7m44s 5m17s qtodo-manual-run-p46f7-qtodo-build-image True Succeeded 4m55s 4m4s qtodo-manual-run-p46f7-qtodo-clone-repository True Succeeded 7m55s 7m44s ...Identify the pods associated with the tasks in the
layered-zero-trust-hubnamespace:$ oc get pods -n layered-zero-trust-hub NAME READY STATUS RESTARTS AGE qtodo-manual-run-p46f7-qtodo-build-artifact-pod 0/1 Completed 0 10m qtodo-manual-run-p46f7-qtodo-build-image-pod 0/1 Completed 0 7m21s ...Review the pod logs to view the output of a specific step. For example, to view image verification messages:
$ oc logs -n layered-zero-trust-hub qtodo-manual-run-p46f7-qtodo-verify-image-pod

Success: true
Result: SUCCESS
Violations: 0, Warnings: 0, Successes: 3
Component: Unnamed
ImageRef: quay-registry-quay-quay-enterprise.apps.example.com/ztvp/qtodo@sha256:df6506e93a141cfcaeb3b4686b558cddd963410a146b10c3cbd1319122f5f880

Results:
✓ [Success] builtin.attestation.signature_check
...
✓ [Success] builtin.image.signature_check
...
Reviewing integrated services
The supply chain results are visible in the services used during the build process.
Reviewing images in Quay
If you used Quay as the image registry, you can review the built image inside the registry.
Procedure
Obtain the credentials for the Quay web interface:
Quay URL:
$ echo "https://$(oc get route -n quay-enterprise \
    -l quay-component=quay-app-route \
    -o jsonpath='{.items[0].spec.host}')"
Quay username: Use the value specified in
values-hub.yamlorquay-user.Quay password:
$ oc get secret -n layered-zero-trust-hub qtodo-quay-password -o json | jq '.data["password"] | @base64d'
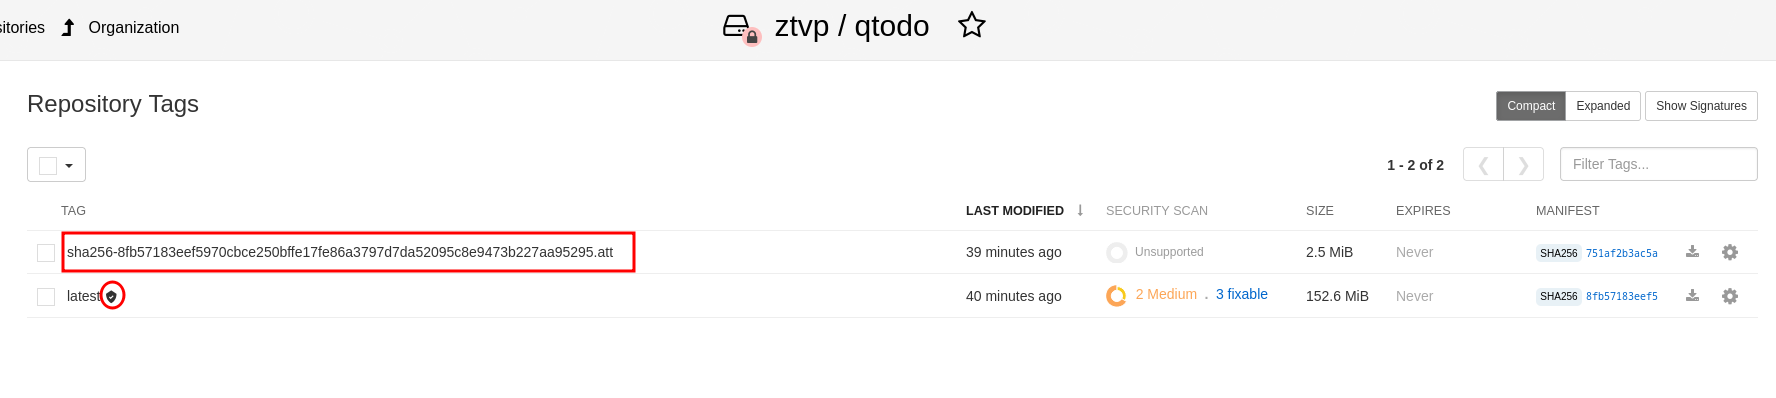
Log in to the Quay web interface.
Select the ztvp/qtodo repository.
In the navigation menu, select Tags.
Verify that the
latesttag is signed and that the.attattestation file is present.
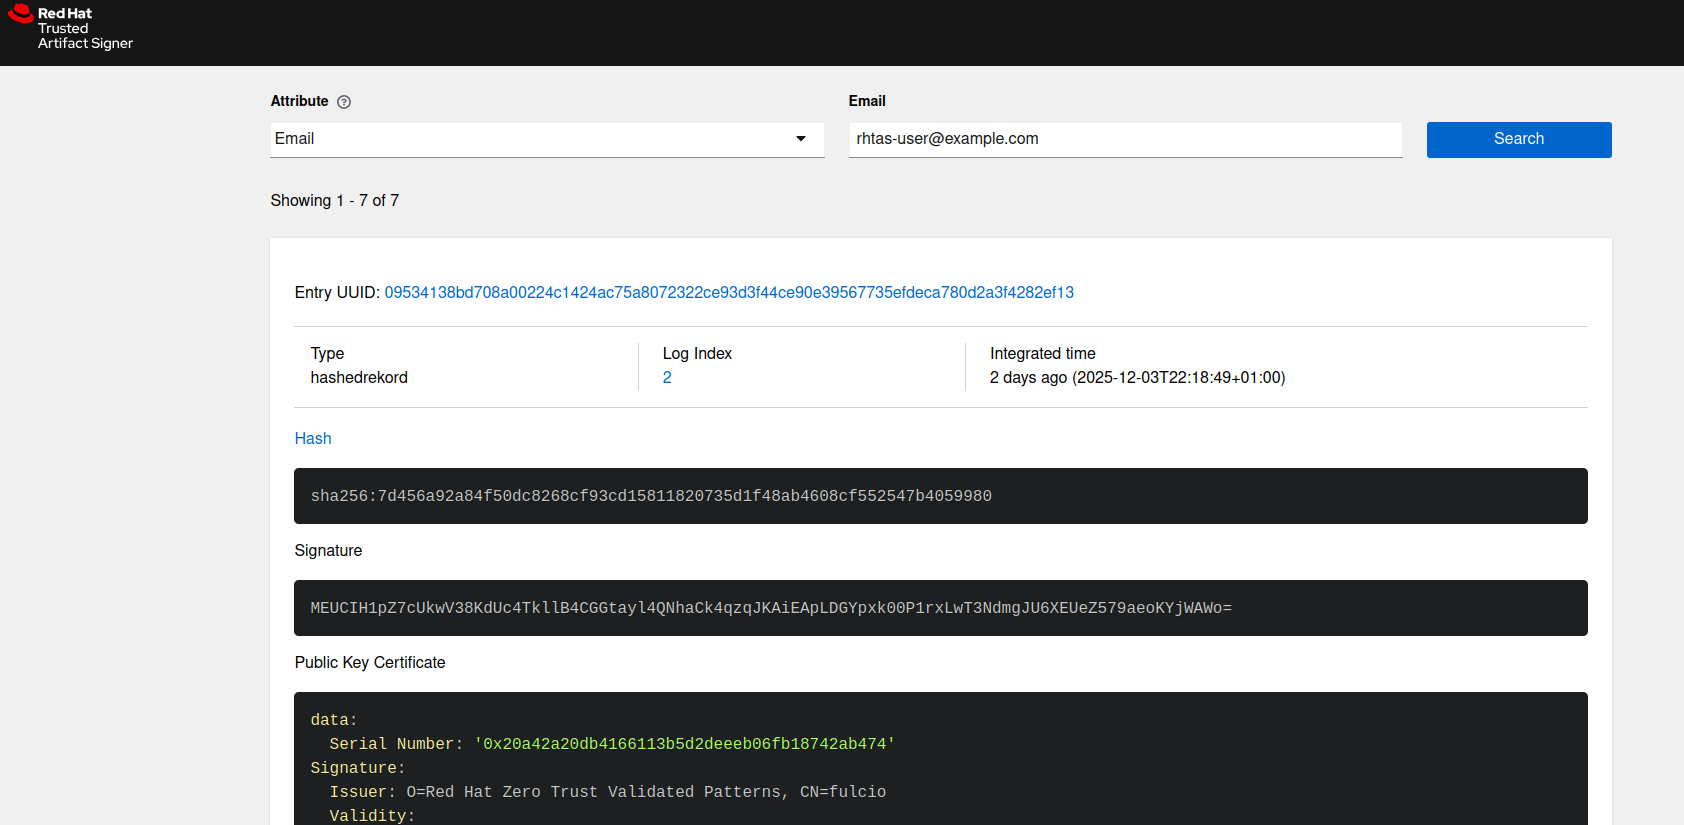
Reviewing Rekor verification records
Use the Rekor search interface to check verification records. Search by email address or record index.
Procedure
Get the URL for the Rekor search interface:
$ echo "https://$(oc get route -n trusted-artifact-signer -l app.kubernetes.io/component=rekor-ui -o jsonpath='{.items[0].spec.host}')"
Reviewing RHTPA results
The RHTPA web UI uses OIDC for user authentication. If you are using Keycloak integrated with the pattern, use the following commands to obtain the credentials.
Procedure
Get the credentials:
RHTPA URL:
$ echo "https://$(oc get route -n trusted-profile-analyzer \
    -l app.kubernetes.io/name=server \
    -o jsonpath='{.items[0].spec.host}')"
RHTPA user:
rhtpa-userRHTPA user password:
$ oc get secret keycloak-users -n keycloak-system -o json \
    | jq '.data["rhtpa-user-password"] | @base64d'
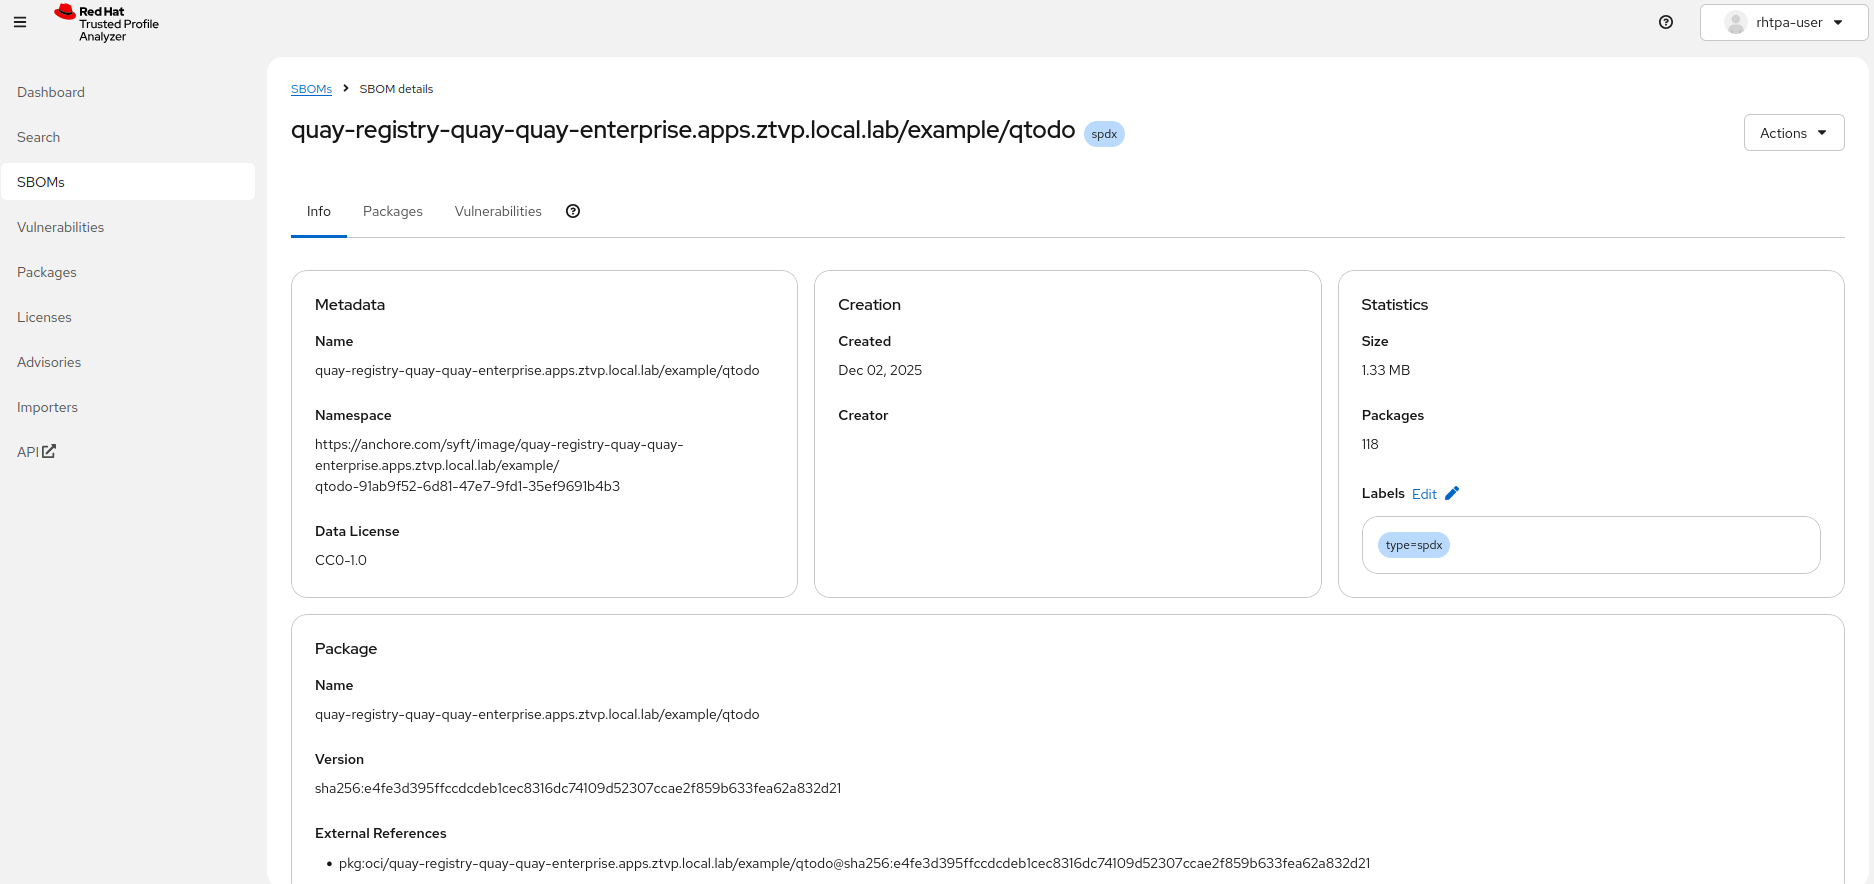
Review the SBOM in the RHTPA web interface:
Log in to the RHTPA web interface using Keycloak credentials.
In the navigation menu, select SBOMs.
Select the container image name from the list of available SBOMs.