$ git clone https://github.com/validatedpatterns-demos/qtodo.gitUse case: Secure supply chain
A key objective of ZTVP is the comprehensive security of both the platform and the applications deployed on it. This use case outlines the process of building, signing, and verifying artifacts and images within the Zero Trust Validated Pattern (ZTVP) using the Red Hat Trusted Artifact Signer (RHTAS) and the Red Hat Trusted Profile Analyzer (RHTPA). Through the implementation of this supply chain, we can establish a chain of trust and integrity for applications.
Cloning the app source code
The qtodo demo application is publicly accessible within its dedicated GitHub repository.
Clone the repository that has the source code.
Procedure
Clone the repository:
Building the app artifact
The application requires Java 17+ and Maven 3.8.x+ to compile. However, you can use containers and the Makefile that is already present in the repository.
Procedure
To build the application in
uber-jarformat, run the following command:$ make buildThe artifact is built in the
target/directory.
Verification
List the contents of the
target/directory to verify the generated JAR file:$ ls -lh target/ total 46M -rw-r--r-- 1 user user 46M Nov 19 13:42 qtodo-1.0.0-runner.jar
Building the image
To create an image that has the JAR file that you built, use the make command.
Procedure
Run the following commands to set details related to the qtodo application and then build the container image:
$ export VERSION="$(make version)"
$ export ARTIFACT="qtodo-${VERSION}-runner.jar"
$ make build-image-binary
Verification
The resulting image is available in the local image store. Verify its presence by listing the images.
$ podman images | grep qtodo
Pushing the image
Before you push the image to the OCI repository, tag the image with its intended destination.
Procedure
Run the following commands to tag the image:
$ export QUAY_HOSTNAME="$(oc get route -n quay-enterprise -l quay-component=quay-app-route -o jsonpath='{.items[0].spec.host}')"

$ export IMAGE="${QUAY_HOSTNAME}/ztvp/qtodo:${VERSION}"

$ podman tag localhost/qtodo:latest "${IMAGE}"
Log in to the Quay registry that is installed on the ZTVP cluster:
# Set the user variable
$ export QUAY_USER=<my_user>

$ podman login -u "${QUAY_USER}" "${QUAY_HOSTNAME}"  # --tls-verify=false
Push the image to the Quay registry:
$ podman push "${IMAGE}" # --tls-verify=false
Signing the JAR
To ensure the security and integrity of the qtodo artifact within the supply chain, sign the artifact file (binary) by using RHTAS.
RHTAS uses the Sigstore open source project standards. It consists of three core services that work together to provide keyless signing, transparency, and verification:
Fulcio(Certificate Authority)Rekor(Transparency Log)TUF(The Update Framework)For more information about these products, see the following documentation topics:
Downloading cosign
Install the cosign binary that RHTAS provides. This binary is accessible within the cli-server pod.
Procedure
Obtain the hostname of the cli-server by using the
occlient which contains the CLI tools provided by RHTAS:$ export CLI_SERVER_URL="https://$(oc get route -n trusted-artifact-signer -l app.kubernetes.io/component=client-server -o jsonpath='{.items[0].spec.host}')"Using disparate versions of
cosignmight lead to incompatibility issues with the RHTAS services. To ensure compatibility, always download thecosignbinary directly from thecli-serverpod of your specific RHTAS deployment.Specify the appropriate operating system and architecture and download the
cosignbinary:# Set your Operating System (linux, darwin, windows) $ export CLI_OS="linux" # Set your architecture (amd64, arm64, ppc64le, s390x) $ export CLI_ARCH="amd64" # Download command $ curl -sSfk "${CLI_SERVER_URL}/clients/${CLI_OS}/cosign-${CLI_ARCH}.gz" | gunzip -c > /usr/local/bin/cosign $ chmod +x /usr/local/bin/cosign
Verification
Verify that the installation was successful by checking the version of
cosign.$ cosign version
Configuring RHTAS TUF root
Configure cosign to use the TUF root of your RHTAS instance before signing any artifacts. This step ensures that cosign interacts with your specific RHTAS deployment rather than the public Sigstore infrastructure.
Procedure
Obtain the URL of the TUF instance:
# Get TUF service hostname
$ export TUF_URL="https://$(oc get route -n trusted-artifact-signer -l app.kubernetes.io/component=tuf -o jsonpath='{.items[0].spec.host}')"
Download the TUF root key:
# Download the TUF root key
$ mkdir ~/.sigstore
$ curl -sSfk "${TUF_URL}/root.json" -o ~/.sigstore/tuf-root.json
Initialize
cosignwith the TUF root:# Create sigstore configuration $ cosign initialize \ --mirror "${TUF_URL}" \ --root ~/.sigstore/tuf-root.json \ --root-checksum "$(sha256sum ~/.sigstore/tuf-root.json | awk '{print $1}')"
OpenID Connect credentials
Signing requires an OpenID Connect (OIDC) identity issuer and the URLs for the Fulcio and Rekor services. This configuration uses Keycloak; however, you can substitute this component based on your specific environment.
The following example illustrates the procedure for obtaining an identification token by using Keycloak.
Procedure
Get the OIDC Issuer URL from Keycloak route:
# Get the OIDC Issuer URL from Keycloak route
$ export OIDC_ISSUER_URL="https://$(oc get route -n keycloak-system -l app=keycloak -o jsonpath='{.items[0].spec.host}')/realms/ztvp"
$ export OIDC_TOKEN_URL="${OIDC_ISSUER_URL}/protocol/openid-connect/token"
Set the user credentials:
# Set user credentials
$ export RHTAS_USER="rhtas-user"
$ export RHTAS_USER_PASSWORD="$(oc get secret -n keycloak-system keycloak-users -o jsonpath='{.data.rhtas-user-password}' | base64 -d)"
$ export RHTAS_CLIENT_ID="trusted-artifact-signer"
Request a new access token:
# Request a new access token
$ export OIDC_TOKEN="$(curl -sk ${OIDC_TOKEN_URL} \
  --header 'Accept: application/json' \
  --data-urlencode 'grant_type=password' \
  --data-urlencode "client_id=${RHTAS_CLIENT_ID}" \
  --data-urlencode "username=${RHTAS_USER}" \
  --data-urlencode "password=${RHTAS_USER_PASSWORD}" \
  --data-urlencode 'scope=openid email profile' \
  | jq -r .access_token)"
OIDC tokens have a limited lifespan and might expire during this procedure. If you encounter authentication errors in subsequent steps, re-run this command to get a fresh token.
Creating a signature bundle
Run the signing command. This command generates a .bundle file that has the signature and the transparency log entry.
Procedure
Obtain the URL of the Fulcio service:
# Get Fulcio service hostname
$ export FULCIO_URL="https://$(oc get route -n trusted-artifact-signer -l app.kubernetes.io/component=fulcio -o jsonpath='{.items[0].spec.host}')"
Obtain the URL Rekor service:
# Get Rekor service hostname
$ export REKOR_URL="https://$(oc get route -n trusted-artifact-signer -l app.kubernetes.io/component=rekor-server -o jsonpath='{.items[0].spec.host}')"
Set the path to the previously created artifact (JAR):
$ export ARTIFACT_PATH="target/qtodo-${VERSION}-runner.jar"Sign the artifact:
# Sign the artifact
$ cosign sign-blob "${ARTIFACT_PATH}" \
  --fulcio-url="${FULCIO_URL}" \
  --rekor-url="${REKOR_URL}" \
  --identity-token "${OIDC_TOKEN}" \
  --oidc-client-id="${RHTAS_CLIENT_ID}" \
  --bundle "${ARTIFACT_PATH}.bundle" \
  --yes
Verification
To verify the signed artifact, you can use the generated bundle and the artifact itself.
Verify the artifact by using the following command:
# Verify the artifact signature
$ cosign verify-blob "${ARTIFACT_PATH}" \
  --rekor-url="${REKOR_URL}" \
  --bundle "${ARTIFACT_PATH}.bundle" \
  --certificate-identity-regexp ".*${RHTAS_USER}.*" \
  --certificate-oidc-issuer-regexp "${OIDC_ISSUER_URL}"
Beyond command-line verification, you can locate the record by using the Rekor search UI in your web browser. You can search records by email address or record index.
You can get the URL for the Rekor Search UI by using the following command:
$ echo https://$(oc get route -n trusted-artifact-signer -l app.kubernetes.io/component=rekor-ui -o jsonpath='{.items[0].spec.host}')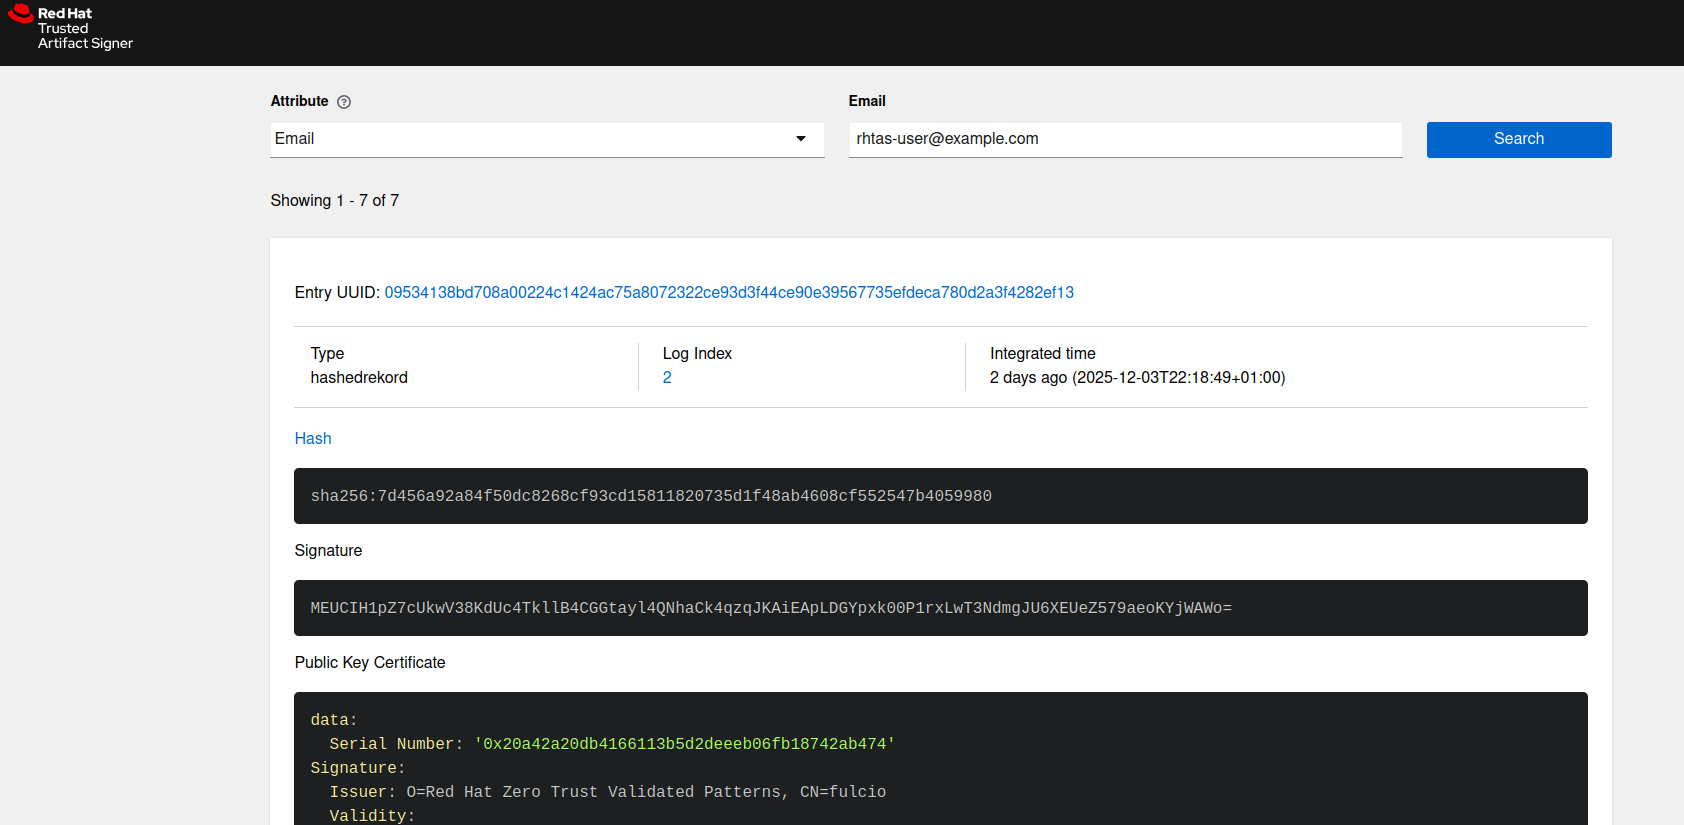
Signing the image
To sign the image, use RHTAS services again. For this step, you must also be logged in to the Quay service as the digital signature is published to the repository.
To reference the image you intend to sign, you must use its digest rather than its tag. Get the digest of the image by using skopeo or by checking the Quay repository.
Procedure
Get the image digest:
# Get the image digest
# Add --tls-verify=false if needed
$ export IMAGE_DIGEST="$(skopeo inspect docker://${IMAGE} --format '{{.Digest}}')"
Set the image reference:
# Set the IMAGE to be signed
$ export IMAGE_REF="${QUAY_HOSTNAME}/ztvp/qtodo@${IMAGE_DIGEST}"
Sign the image:
# Sign the image
$ cosign sign "${IMAGE_REF}" \
  --fulcio-url="${FULCIO_URL}" \
  --rekor-url="${REKOR_URL}" \
  --identity-token="${OIDC_TOKEN}" \
  --oidc-issuer "${OIDC_ISSUER_URL}" \
  --yes
Verification
To verify the image signature, you can use cosign and check the output to see if it matches your identity and OIDC issuer.
Verify the image by using the following command:
# Verify the image signature
$ cosign verify "${IMAGE_REF}" \
  --rekor-url="${REKOR_URL}" \
  --certificate-identity-regexp ".*${RHTAS_USER}.*" \
  --certificate-oidc-issuer-regexp "${OIDC_ISSUER_URL}"
Generating the SBOM file
The next step involves generating a Software Bill Of Materials (SBOM) for the image. This SBOM provides an inventory of the components that constitute the image.
To generate this SBOM document, use an external tool called syft.
Procedure
Install and verify the
syfttool:# Install syft $ curl -sSfL "https://get.anchore.io/syft" | sh -s -- -b /usr/local/bin # Verify installation $ syft versionUse
syftto generate the SBOM file for the image:# Generate the SBOM file $ syft scan registry:"${IMAGE}" -o spdx-json=qtodo-sbom.json
Attaching the SBOM to the image
You must attach the generated SBOM file to the image which enables verification by third parties if required. For this task, use the cosign tool again.
Although direct attachment of the SBOM to the image is feasible, the recommended approach involves encapsulating the SBOM within a signed envelope, thereby generating an attestation. This method ensures the integrity of the SBOM, guaranteeing its provenance and confirming that it has not been subjected to unauthorized modifications.
The process of signing and attaching the SBOM runs directly by using cosign, which operates on the image.
Procedure
Attach the SBOM to the image:
# Attach the SBOM
$ cosign attest \
  --predicate qtodo-sbom.json \
  --type spdxjson \
  --fulcio-url="${FULCIO_URL}" \
  --rekor-url="${REKOR_URL}" \
  --identity-token "${OIDC_TOKEN}" \
  --oidc-client-id="${RHTAS_CLIENT_ID}" \
  --yes \
  "${IMAGE}"
Uploading the SBOM to RHTPA
To analyze the SBOM and detect Common Vulnerabilities and Exposures (CVEs) in the image, use Red Hat Trusted Profile Analyzer (RHTPA).
The RHTPA system provides an API that enables the direct upload of the SBOM by an HTTP request. To use this API, you need a token authorized by the OIDC.
This following commands illustrates the process for obtaining the token when using Keycloak, which serves as the default OIDC for the Zero Trust Validated Pattern (ZTVP).
Procedure
Obtain the client secret for the RHTPA OIDC client:
# Get client secret
$ export RHTPA_CLIENT_SECRET="$(oc get secret rhtpa-oidc-cli-secret -n trusted-profile-analyzer -o jsonpath='{.data.client-secret}' | base64 -d)"
Set the Client ID associated with RHTPA:
# Set clientID
$ export RHTPA_CLIENT_ID="rhtpa-cli"
Obtain a Keycloak token:
# Obtain a Keycloak token
$ export RHTPA_TOKEN=$(curl -sSfk -X POST "${OIDC_TOKEN_URL}" \
  -H 'Accept: application/json' \
  -H 'Content-Type: application/x-www-form-urlencoded' \
  -d 'grant_type=client_credentials' \
  -d "client_id=${RHTPA_CLIENT_ID}" \
  -d "client_secret=${RHTPA_CLIENT_SECRET}" | jq -r .access_token)
Obtain the RHTPA API URL:
# Get the RHTPA API URL
$ export RHTPA_URL="https://$(oc get route -n trusted-profile-analyzer -l app.kubernetes.io/name=server -o jsonpath='{.items[0].spec.host}')"
Upload the SBOM to RHTPA using the API with the Keycloak token:
# Upload the SBOM using curl
$ curl -sk -X POST \
  -H "Authorization: Bearer ${RHTPA_TOKEN}" \
  -H "Content-Type: application/json" \
  --data-binary "@qtodo-sbom.json" \
  "${RHTPA_URL}/api/v2/sbom"
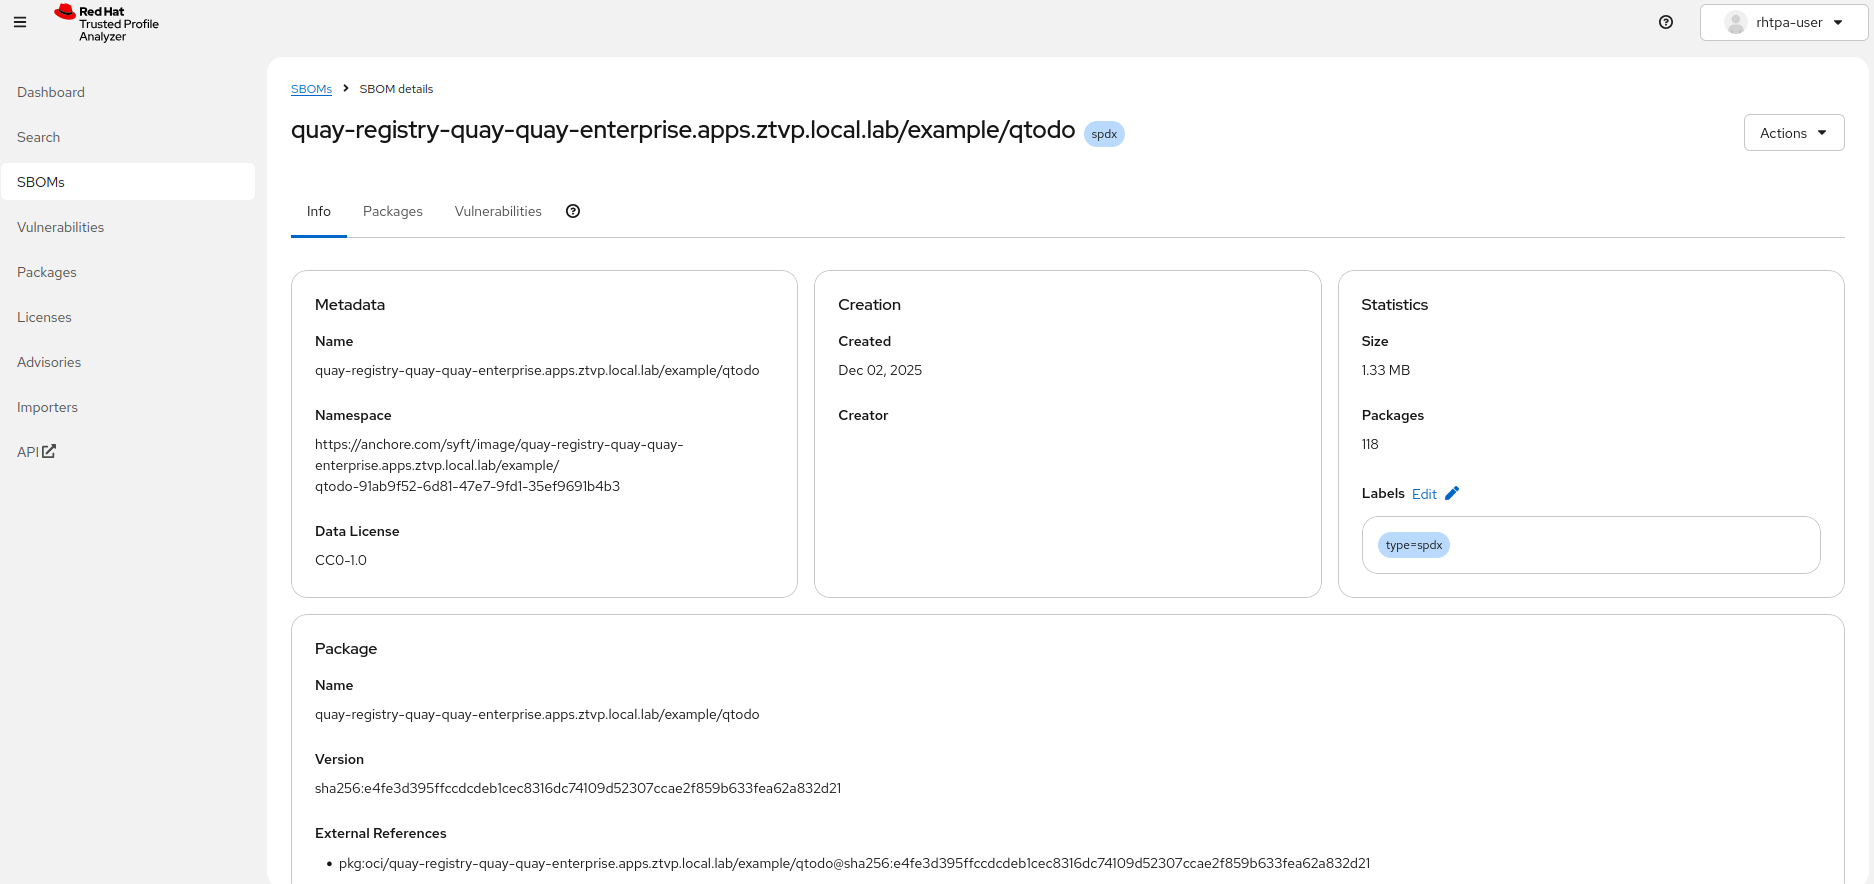
Once the SBOM has been published, it can be viewed within the RHTPA web UI. The URL is same as the value obtained previously for the RHTPA API. Similar to the API, the RHTPA web UI uses OIDC for user authentication. In our specific deployment, you can view the RHTPA web UI by logging in with the credentials associated with the user. Use the following commands to obtain the username and password:
# RHTPA URL
$ echo "${RHTPA_URL}"

# RHTPA user password (the username is rhtpa-user)
$ oc get secret keycloak-users -n keycloak-system \
  -o jsonpath='{.data.rhtpa-user-password}' | \
  base64 -d
To review the newly generated SBOM within the web UI, navigate to the "SBOMs" section via the left-hand menu, and select the entry corresponding to the name of the container image from the list of available SBOMs.
Validating the SBOM
To verify the integrity and provenance of the SBOM file, specifically confirming that its signature originates from a trusted source and was securely generated, use the ec tool. Beyond the verification of attestation and container signatures, Enterprise Contract (ec) offers additional capabilities for monitoring supply chain security. Comprehensive details are available within Red Hat Trusted Artifact Signer Deployment Guide.
You can install the ec tool by directly downloading it from the cli-server pod.
Procedure
Install the
ectool:# Install the ec tool (Example for Linux amd64) $ curl -sSfk "${CLI_SERVER_URL}/clients/linux/ec-amd64.gz" -o - | gunzip -c > /usr/local/bin/ec $ chmod +x /usr/local/bin/ecVerify the installation by checking the version:
$ ec versionValidate the SBOM attached to the image. Because
eccommunicates with the Rekor (RHTAS) service, initialize sigstore before this task.# Validate the SBOM of the image $ ec validate image \ --image "${IMAGE}" \ --certificate-identity-regexp ".*${RHTAS_USER}.*" \ --certificate-oidc-issuer "${OIDC_ISSUER_URL}" \ --rekor-url "${REKOR_URL}" \ --show-successes
Conclusion
This concludes our implementation of a Secure Supply Chain leveraging Red Hat Trusted Artifact Signer (RHTAS) and the Red Hat Trusted Profile Analyzer (RHTPA). We have demonstrated the complete process, which encompasses building an application from source code, generating a container image, cryptographically signing the resulting binaries, and subsequently verifying that these binaries have been signed by an authorized entity. Future work may focus on the automation of this process and its integration into a Continuous Integration/Continuous Delivery (CI/CD) solution.
