$ git clone git@github.com:<your-username>/amx-accelerated-medical-diagnosis.gitDeploying the Intel AMX accelerated Medical Diagnosis pattern
Prerequisites
An OpenShift Container Platform cluster
To create an OpenShift Container Platform cluster, go to the Red Hat Hybrid Cloud console and select Services -> Containers -> Create cluster.
The cluster must have a dynamic
StorageClassto provisionPersistentVolumes. It was tested with ODF (OpenShift Data Foundation) or LVM Storage solutions. CephFS should be set as a default Storage Class - Setup GuideCluster sizing requirements.
OpenShift Container Platform Cluster must have Image Registry - Setup Guide
A GitHub account and a token for it with repositories permissions, to read from and write to your forks.
An S3-capable Storage (OpenShift Data Foundation is recommended) set up in your private cloud for the x-ray images
The Helm binary, see Installing Helm For installation tooling dependencies, see Patterns quick start.
The Intel AMX accelerated Medical Diagnosis pattern does not have a dedicated hub or edge cluster. |
Preparing for deployment
Procedure
Fork the medical-diagnosis repository on GitHub. You must fork the repository because your fork will be updated as part of the GitOps and DevOps processes.
Clone the forked copy of this repository.
Create a local copy of the Helm values file that can safely include credentials.
Do not commit this file. You do not want to push personal credentials to GitHub.
Run the following commands:
$ cp values-secret.yaml.template ~/values-secret-medical-diagnosis.yaml $ vi ~/values-secret-medical-diagnosis.yamlExamplevalues-secret.yamlfileversion "2.0" secrets: # NEVER COMMIT THESE VALUES TO GIT # Database login credentials and configuration - name: xraylab fields: - name: database-user value: xraylab - name: database-host value: xraylabdb - name: database-db value: xraylabdb - name: database-master-user value: xraylab - name: database-password onMissingValue: generate vaultPolicy: validatedPatternDefaultPolicy - name: database-root-password onMissingValue: generate vaultPolicy: validatedPatternDefaultPolicy - name: database-master-password onMissingValue: generate vaultPolicy: validatedPatternDefaultPolicy # Grafana Dashboard admin user/password - name: grafana fields: - name: GF_SECURITY_ADMIN_USER: value: root - name: GF_SECURITY_ADMIN_PASSWORD: onMissingValue: generate vaultPolicy: validatedPatternDefaultPolicyBy default, Vault password policy generates the passwords for you. However, you can create your own passwords.
When defining a custom password for the database users, avoid using the
$special character as it gets interpreted by the shell and will ultimately set the incorrect desired password.To customize the deployment for your cluster, update the
values-global.yamlfile. For a description of each field, see Global configuration reference. Run the following command to create a branch:$ git checkout -b my-branchReplace 'bucketSource' value. User can set any bucket name without special signs (besides '-') and numbers.
   ...omitted
  datacenter:
    cloudProvider: PROVIDE_CLOUDPROVIDER # Not required for on-prem
    storageClassName: "ocs-storagecluster-cephfs" # Default filesystem storage used on on-prem cluster, can be changed by user
    region: PROVIDE_REGION # Not required for on-prem
    clustername: "" # Not required for on-prem, pattern uses on-prem cluster value instead
    domain: "" # Not required for on-prem, pattern uses on-prem cluster value instead

    s3:
      # Values for S3 bucket access
      # bucketSource: "provide s3 bucket name where images are stored"
      bucketSource: "PROVIDE_BUCKET_SOURCE"
      # Bucket base name used for image-generator and image-server applications.
      bucketBaseName: "xray-source"
$ git add values-global.yaml $ git commit values-global.yaml $ git push origin my-branchTo deploy the pattern, you can use the Validated Patterns Operator. If you do use the Operator, skip to validating the environment.
Installing Validated Pattern this way may cause other components dependent on Vault to not start properly.
After Validated pattern is installed using operator from OperatorHub user must type in secrets (from values-secret.yaml) into vault manually.
To preview the changes that will be implemented to the Helm charts, run the following command:
$ ./pattern.sh make showLogin to your cluster by running the following command:
$ oc loginOptional: Set the
KUBECONFIGvariable for thekubeconfigfile path:export KUBECONFIG=~/<path_to_kubeconfig>
Check the values files before deployment
To ensure that you have the required variables to deploy the Medical Diagnosis pattern, run the ./pattern.sh make predeploy command. You can review your values and make updates, if required.
You must review the following values files before deploying the Medical Diagnosis pattern:
| Values File | Description |
|---|---|
values-secret.yaml | Values file that includes the secret parameters required by the pattern |
values-global.yaml | File that contains all the global values used by Helm to deploy the pattern |
Before you run the |
Deploy
To apply the changes to your cluster, run the following command:
$ ./pattern.sh make installIf the installation fails, you can go over the instructions and make updates, if required. To continue the installation, run the following command:
$ ./pattern.sh make updateThis step might take some time, especially for the OpenShift Data Foundation Operator components to install and synchronize. The
./pattern.sh make installcommand provides some progress updates during the installation process. It can take up to twenty minutes. Compare your./pattern.sh make installrun progress with the following video that shows a successful installation.Verify that the Operators have been installed.
To verify, in the OpenShift Container Platform web console, navigate to Operators → Installed Operators page.
Check that the Operator is installed in the
openshift-operatorsnamespace and its status isSucceeded. Ensure that OpenShift Data Foundation is listed in the list of installed Operators.
(Optional) Typing secrets into Vault manually
Log into the Vault using the root token, which can be found by executing the command:
oc -n vault get route vault -ojsonpath='{.spec.host}'Log into the Vault using root token. Root token to vault can be found by executing command:
oc -n imperative get secrets vaultkeys -ojsonpath='{.data.vault_data_json}' | base64 -dAt this point user can type into the Vault secret values specified in 'values-secret.yaml'
Using OpenShift GitOps to check on Application progress
To check the various applications that are being deployed, you can view the progress of the OpenShift GitOps Operator.
Obtain the ArgoCD URLs and passwords.
The URLs and login credentials for ArgoCD change depending on the pattern name and the site names they control. Follow the instructions below to find them, however you choose to deploy the pattern.
Display the fully qualified domain names, and matching login credentials, for all ArgoCD instances:
ARGO_CMD=`oc get secrets -A -o jsonpath='{range .items[*]}{"oc get -n "}{.metadata.namespace}{" routes; oc -n "}{.metadata.namespace}{" extract secrets/"}{.metadata.name}{" --to=-\\n"}{end}' | grep gitops-cluster`
CMD=`echo $ARGO_CMD | sed 's|- oc|-;oc|g'`
eval $CMD
Example outputNAME HOST/PORT PATH SERVICES PORT TERMINATION WILDCARD hub-gitops-server hub-gitops-server-medical-diagnosis-hub.apps.wh-medctr.blueprints.rhecoeng.com hub-gitops-server https passthrough/Redirect None # admin.password xsyYU6eSWtwniEk1X3jL0c2TGfQgVpDH NAME HOST/PORT PATH SERVICES PORT TERMINATION WILDCARD cluster cluster-openshift-gitops.apps.wh-medctr.blueprints.rhecoeng.com cluster 8080 reencrypt/Allow None kam kam-openshift-gitops.apps.wh-medctr.blueprints.rhecoeng.com kam 8443 passthrough/None None openshift-gitops-server openshift-gitops-server-openshift-gitops.apps.wh-medctr.blueprints.rhecoeng.com openshift-gitops-server https passthrough/Redirect None # admin.password FdGgWHsBYkeqOczE3PuRpU1jLn7C2fD6Examine the
medical-diagnosis-hubArgoCD instance. You can track all the applications for the pattern in this instance.Check that all applications are synchronized. There are thirteen different ArgoCD
applicationsthat are deployed as part of this pattern.
Set up object storage
Modified version of a Medical Diagnosis pattern requires to use on-prem object storage. Instead of a AWS S3 (or other cloud equivalent) user can set up the Ceph RGW object storage. To communicate with its API user can utilize aws-cli. The installation manual is available on Amazon website
Set up local S3 object storage only after ODF is properly deployed by validated pattern.
User can extract CEPH_RGW_ENDPOINT by executing the command:
oc -n openshift-storage get route s3-rgw -ojsonpath='{.spec.host}'AWS_ACCESS_KEY_ID and AWS_SECRET_ACCESS_KEY of RGW object store can be found by performing following commands:
oc -n xraylab-1 get secret s3-secret-bck -ojsonpath='{.data.AWS_ACCESS_KEY_ID}' | base64 -d
oc -n xraylab-1 get secret s3-secret-bck -ojsonpath='{.data.AWS_SECRET_ACCESS_KEY}' | base64 -d
These values are required to properly set up object storage, if any of them is not accessible (user get error while trying to retrieve them) that may be indicator that ODF is not working properly. First thing to check is Second thing to do is to go to ArgoCD dashboard, to |
Clone the repository with xray images and push them to the bucket:
git clone https://github.com/red-hat-data-services/jumpstart-library.gitXray images are stored in the following path in the repo: https://github.com/red-hat-data-services/jumpstart-library/tree/main/demo1-xray-pipeline/base_elements/containers/image-init/base_images
Set environment variables. Create and configure the bucket:
export AWS_ACCESS_KEY_ID=$(oc -n xraylab-1 get secret s3-secret-bck -ojsonpath='{.data.AWS_ACCESS_KEY_ID}' | base64 -d)
export AWS_SECRET_ACCESS_KEY=$(oc -n xraylab-1 get secret s3-secret-bck -ojsonpath='{.data.AWS_SECRET_ACCESS_KEY}' | base64 -d)
export CEPH_RGW_ENDPOINT=$(oc -n openshift-storage get route s3-rgw -ojsonpath='{.spec.host}')
export CEPH_BUCKET_NAME="PUT_NAME_OF_YOUR_BUCKET"

cd jumpstart-library/demo1-xray-pipeline/base_elements/containers/image-init
aws --endpoint https://${CEPH_RGW_ENDPOINT} --no-verify-ssl s3api create-bucket --bucket ${CEPH_BUCKET_NAME}
aws --endpoint https://${CEPH_RGW_ENDPOINT} --no-verify-ssl s3 cp base_images/ s3://${CEPH_BUCKET_NAME}/ --recursive
Note: The CEPH_BUCKET_NAME value should be the same as the bucketSource: "PROVIDE_BUCKET_SOURCE" value specified in the values-global.yaml file.
Ceph RGW bucket needs specific bucket policy to be applied. To apply policy execute following commands:
export AWS_ACCESS_KEY_ID=$(oc -n xraylab-1 get secret s3-secret-bck -ojsonpath='{.data.AWS_ACCESS_KEY_ID}' | base64 -d)
export AWS_SECRET_ACCESS_KEY=$(oc -n xraylab-1 get secret s3-secret-bck -ojsonpath='{.data.AWS_SECRET_ACCESS_KEY}' | base64 -d)
export CEPH_RGW_ENDPOINT=$(oc -n openshift-storage get route s3-rgw -ojsonpath='{.spec.host}')
export CEPH_BUCKET_NAME="PUT_NAME_OF_YOUR_BUCKET"

cd amx-accelerated-medical-diagnosis
aws --endpoint https://${CEPH_RGW_ENDPOINT} --no-verify-ssl s3api put-bucket-policy --bucket ${CEPH_BUCKET_NAME} --policy file://./bucket-policy.json
Viewing the Grafana based dashboard
Accept the SSL certificates on the browser for the dashboard. In the OpenShift Container Platform web console, go to the Routes for project
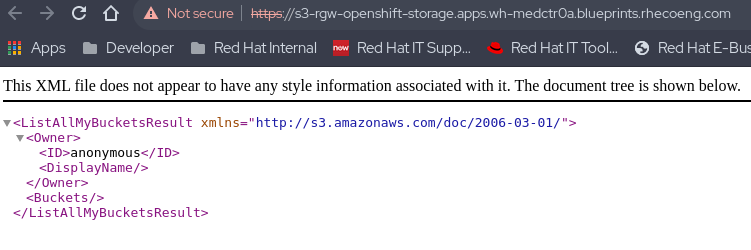
openshift-storage`. Click the URL for thes3-rgw.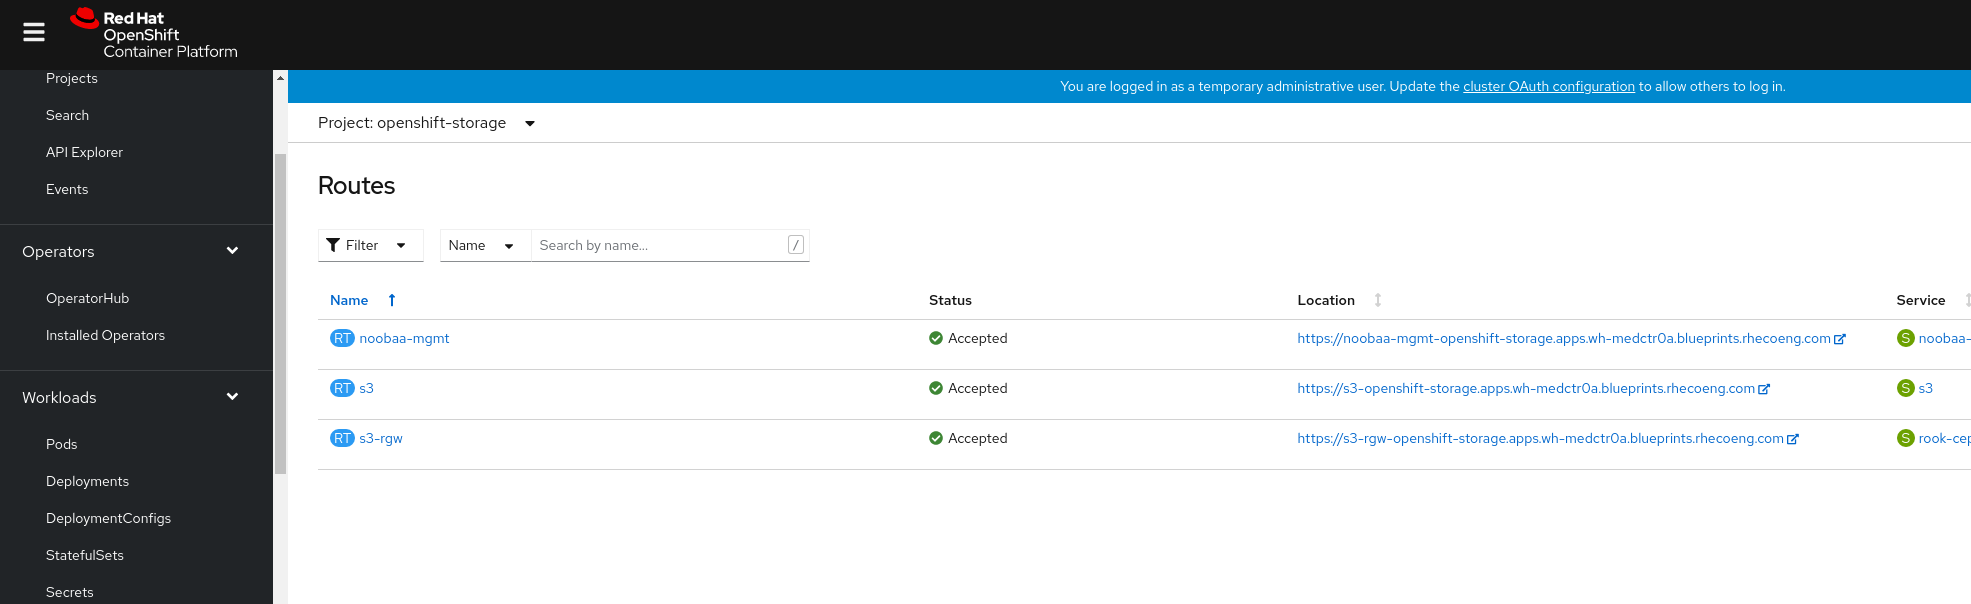
Ensure that you see some XML and not the access denied error message.
While still looking at Routes, change the project to
xraylab-1. Click the URL for theimage-server. Ensure that you do not see an access denied error message. You must to see aHello Worldmessage.
Turn on the image file flow. There are three ways to go about this.
You can go to the command-line (make sure you have KUBECONFIG set, or are logged into the cluster).
$ oc scale deploymentconfig/image-generator --replicas=1 -n xraylab-1Or you can go to the OpenShift UI and change the view from Administrator to Developer and select Topology. From there select the
xraylab-1project.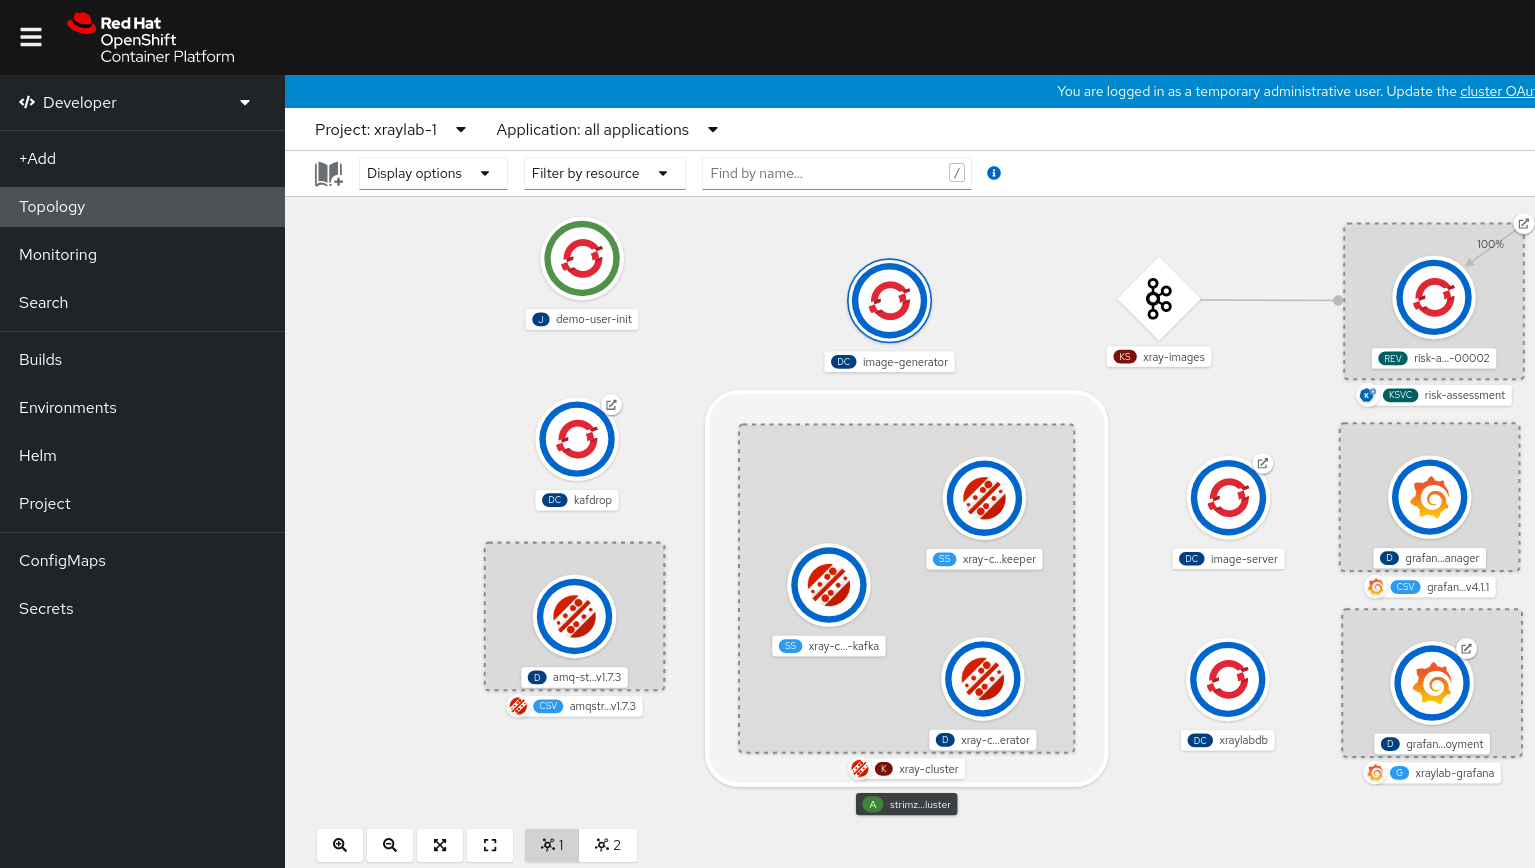
Right-click on the
image-generatorpod icon and selectEdit Pod count.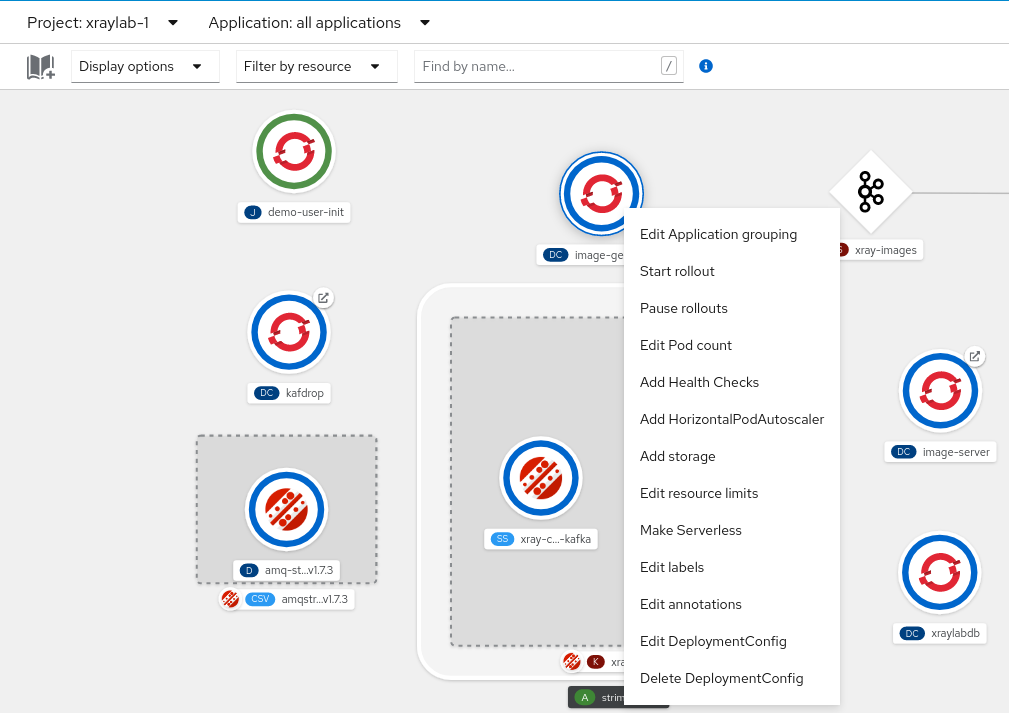
Up the pod count from
0to1and save.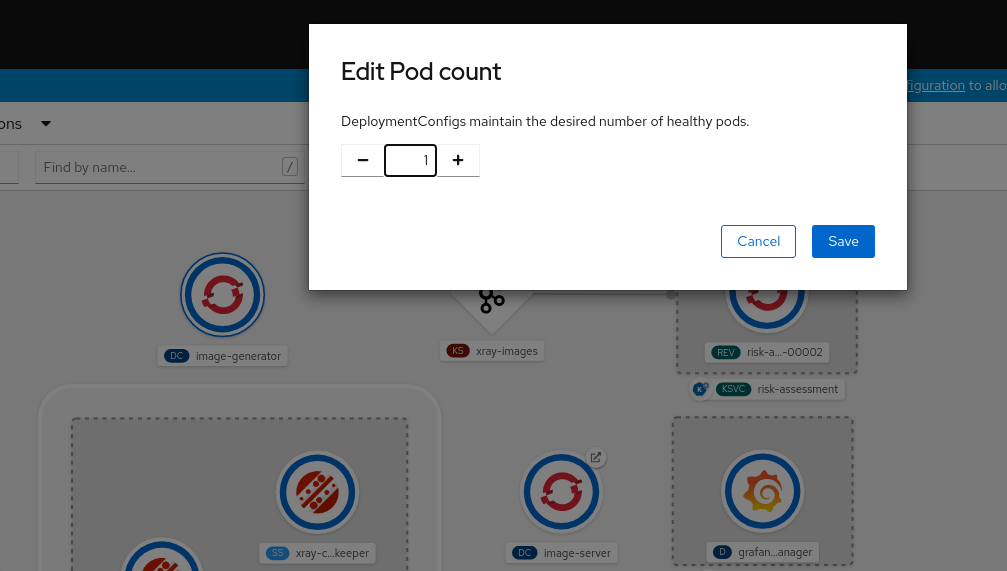
Alternatively, you can have the same outcome on the Administrator console.
Go to the OpenShift UI under Workloads, select Deploymentconfigs for Project
xraylab-1. Clickimage-generatorand increase the pod count to 1.
OpenShift GitOps view should be similar to the following:
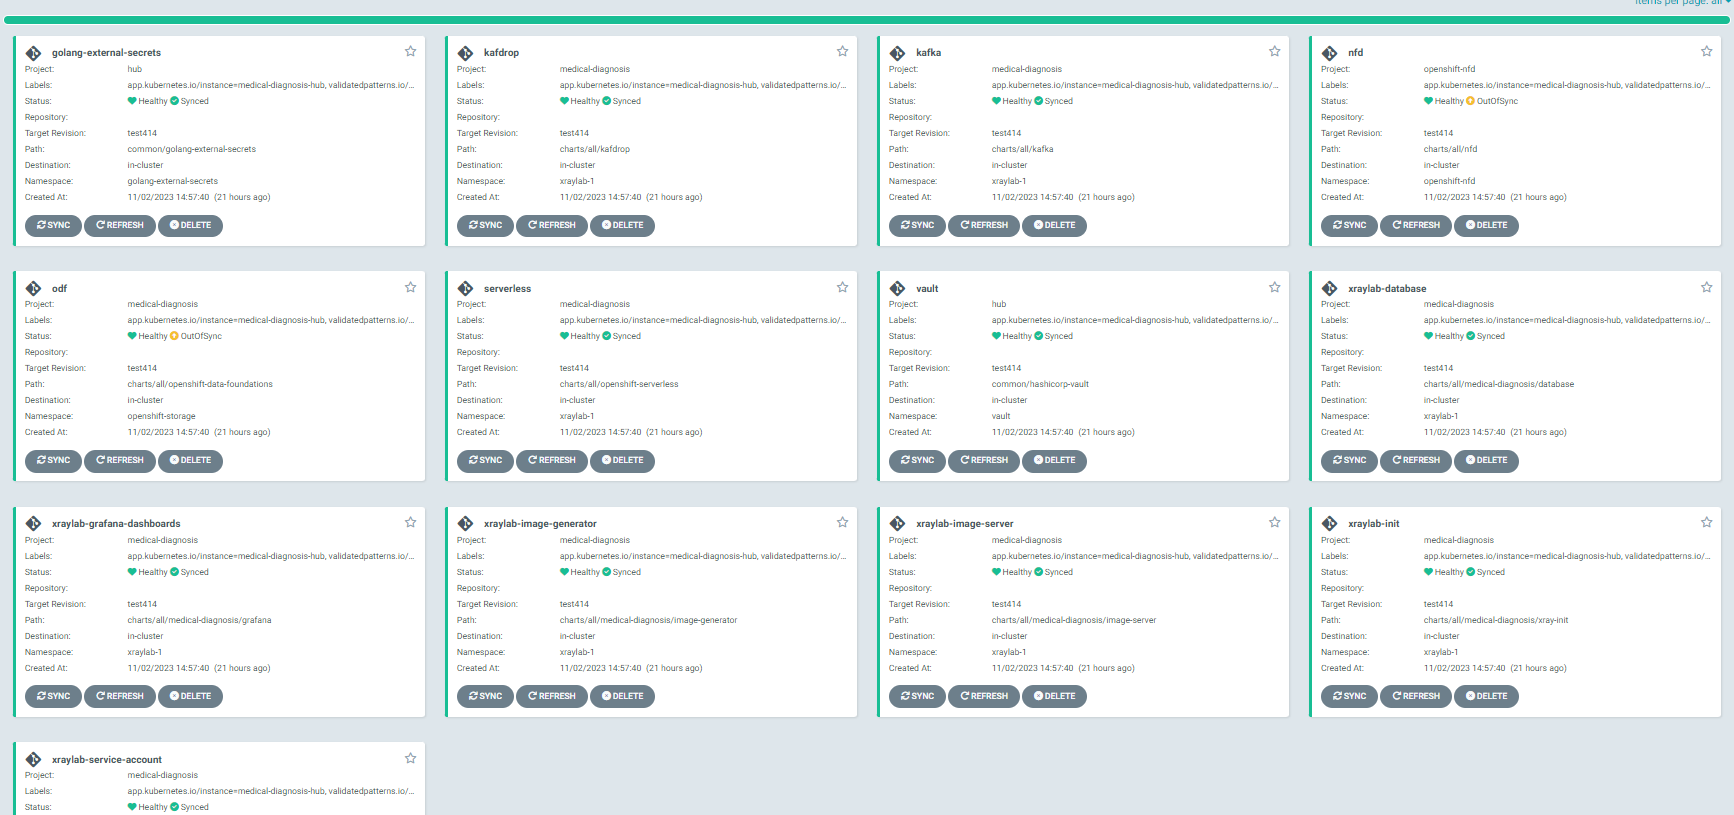
All applications should be healthy for the pattern to work correctly, even if some applications may be OutOfSync. In some cases, ODF (OpenShift Data Foundation) may have an OutOfSync status, but this usually does not impact functionality. If any application is in an 'unhealthy' state, the common solution is to sync the application. For other issues, please refer to https://validatedpatterns.io/patterns/medical-diagnosis-amx/troubleshooting/.
Making some changes on the dashboard
You can change some of the parameters and watch how the changes effect the dashboard.
You can increase or decrease the number of image generators.
$ oc scale deploymentconfig/image-generator --replicas=2Check the dashboard.
$ oc scale deploymentconfig/image-generator --replicas=0Watch the dashboard stop processing images.
You can also simulate the change of the AI model version - as it’s only an environment variable in the Serverless Service configuration.
$ oc patch service.serving.knative.dev/risk-assessment --type=json -p '[{"op":"replace","path":"/spec/template/metadata/annotations/revisionTimestamp","value":"'"$(date +%F_%T)"'"},{"op":"replace","path":"/spec/template/spec/containers/0/env/0/value","value":"v2"}]'This changes the model version value, and the
revisionTimestampin the annotations, which triggers a redeployment of the service.
