Socket Configuration -> Memory Configuration -> Memory Map -> 1LM
Socket Configuration -> Processor Configuration -> Memory Encryption (TME) -> Enabled
Socket Configuration -> Processor Configuration -> Total Memory Encryption (TME) Bypass -> Disabled
Socket Configuration -> Processor Configuration -> Total Memory Encryption Multi-Tenant(TME-MT) -> Enabled
Socket Configuration -> Processor Configuration -> SW Guard Extensions (SGX) -> Enabled
Socket Configuration -> Processor Configuration -> PRM Size for SGX -> MAX or whatever size neededDeploying the Intel SGX protected Vault for Multicloud GitOps pattern
Prerequisites
An OpenShift cluster
To create an OpenShift cluster, go to the Red Hat Hybrid Cloud console and select Services -> Containers -> Create cluster.
The cluster must have a dynamic
StorageClassto provisionPersistentVolumes. It was tested with ODF (OpenShift Data Foundation) or LVM Storage solutions. Remember, to mark chosen storage class as default in OpenShift to automatically pick up by the pattern.Cluster sizing requirements.
The cluster has got at least one worker machine with Intel SGX enabled in BIOS.
Optional: A second OpenShift cluster for multicloud demonstration.
The use of this pattern depends on having at least one running Red Hat OpenShift cluster. However, consider creating a cluster for deploying the GitOps management hub assets and a separate cluster for the managed cluster.
If you do not have a running Red Hat OpenShift cluster, you can start one on a public or private cloud by using Red Hat Hybrid Cloud Console.
Procedure
Enable Intel SGX in BIOS. Depending on your platform, the enablement of Intel SGX might vary. Below are steps for enablement on "Quanta Cloud Technology" D54Q-2U platform based on 5th Generation Intel Xeon:
<SGX_MEMORY_SIZE>is SGX reserved memory, make sure that at least 1GB of RAM is allocated. In the sample settings, a higher value was allocated but this needs to be adjusted to your platform. If you have a different platform, refer to your motherboard or server documentation for Intel SGX enablement instructions.Fork the sgx-multicloud-gitops-vault repository on GitHub.
Clone the forked copy of this repository.
git clone git@github.com:your-username/sgx-multicloud-gitops-vault.gitCreate a local copy of the secret values file that can safely include credentials for the config-demo application and edit it if you want to customize the secret. If not, the framework generates a random password.
cp values-secret.yaml.template ~/values-secret-multicloud-gitops.yamlDo not commit this file. You do not want to push personal credentials to GitHub.
Optional: Customize the deployment for your cluster by editing
values-global.yamlandvalues-hub.yaml. For a description of each field, see Global configuration reference. To do this, run the following commands:git checkout -b my-branchEdit the file, then commit and push:
git add values-global.yaml
git commit -m "Customize values-global for my cluster"
(Optional) The SGX-protected Vault container image is available as a pre-built image and currently, the pattern is configured to use as is. When there is a need to build it on your own and protect it with SGX, then follow the description below.
Deploy the pattern by running
./pattern.sh make installor by using the Validated Patterns Operator - both methods are described below.
(Optional) Prepare Vault docker image and convert to SGX
Pre-built protected Vault image is available to pull from quay.io/hybridcloudpatterns/sgx-protected-vault. If a user would like to build such an image on their own, there are step-by-step instructions below.
Prerequisites:
Gramine Shielded Containers application requires a machine with the same OS as the input image to create an SGX converted image. In this case, it would be Red Hat Enterprise Linux 8.8. This machine does not have to have the SGX feature enabled because it will be used for conversion purposes only.
RedHat portal account. This is necessary to pull the input Vault container image.
Container registry account available to store SGX-protected Vault image. Such a registry has to be externally available; so that the OpenShift cluster could access it. Also, the registry can be public, so that the OpenShift cluster can pull the image without extra credentials. Otherwise storing container registry credentials has to be implemented.
Procedure
Create a modified Vault docker file which will be input for the SGX conversion process:
First, create a new directory and change it:mkdir vaultcd vaultCreate the
Dockerfilewith the below content:FROM registry.connect.redhat.com/hashicorp/vault:1.15.3-ubi ENTRYPOINT ["vault", "server", "-config=/vault/config/extraconfig-from-values.hcl"]Login to the RedHat container image repository using docker:
docker login registry.connect.redhat.comThe user will be asked to enter credentials for the RedHat account. Start building process:
docker build -t vault-without-sgx .Install Gramine Shielded Containers prerequisites according to GSC documentation
Clone GSC repo:
git clone https://github.com/gramineproject/gsc.gitChange directory to newly created GSC repository:
cd gscCopy config file from sample template provided with GSC:
cp config.yaml.template config.yamlThis config file can be adjusted as needed.+ Sample config below:
# Specify the OS distro that is used to build Gramine, i.e., the distro from where the Gramine build
# gets all tools and dependencies from. This distro should match the distro underlying the
# application's Docker image; otherwise the results may be unpredictable (if you specify `"auto"`,
# which is recommended, you don't need to worry about the mismatch).
#
# Currently supported distros are:
# - ubuntu:20.04, ubuntu:21.04, ubuntu:22.04, ubuntu:23.04
# - debian:10, debian:11, debian:12
# - centos:8
# - redhat/ubi8:8.8
# - redhat/ubi8-minimal:8.8

# If Distro is set to "auto", GSC detects the distro automatically by examining the supplied
# Docker image. Alternatively, Distro can be set to one of the supported distros mentioned above.
Distro: "auto"

# If the image has a specific registry, define it here.
# Empty by default; example value: "registry.access.redhat.com/ubi8".
Registry: ""

# If you're using your own fork and branch of Gramine, specify the GitHub link and the branch name
# below; typically, you want to keep the default values though.
#
# It is also possible to specify the prebuilt Gramine Docker image (that was built previously via
# the `gsc build-gramine` command). For this, remove Repository and Branch and instead write:
#   Image:      "<prebuilt Gramine Docker image>"
#
# GSC releases are guaranteed to work with corresponding Gramine releases (and GSC `master`
# branch is guaranteed to work with current Gramine `master` branch).
Gramine:
    Repository: "https://github.com/gramineproject/gramine.git"
    Branch:     "master"

# Specify the Intel SGX driver installed on your machine (more specifically, on the machine where
# the graminized Docker container will run); there are several variants of the SGX driver:
#
#   - upstream (in-kernel) driver: use empty values like below
#         Repository: ""
#         Branch:     ""
#
#   - DCAP out-of-tree driver: same as above, use empty values
#         Repository: ""
#         Branch:     ""
#
#   - legacy out-of-tree driver: use something like the below values, but adjust the branch name
#         Repository: "https://github.com/01org/linux-sgx-driver.git"
#         Branch:     "sgx_driver_1.9"
#
SGXDriver:
    Repository: ""
    Branch:     ""
Create
vault.manifestfile which contains the conversion configuration:sgx.enclave_size = "2G" sgx.max_threads = 512 sgx.allowed_files = [ "file:/vault/", ] sgx.trusted_files = [ "file:/home/vault/", "file:/etc/security/pam_env.conf", "file:/etc/security/limits.conf", "file:/var/log/lastlog", ] loader.uid = 100 loader.gid = 107 fs.mounts = [ { path = "/vault/data", uri = "file:/vault/data", type = "chroot" }, ] loader.env.HOME = { passthrough = true } loader.env.HOST_IP = { passthrough = true } loader.env.HOSTNAME = { passthrough = true } loader.env.POD_IP = { passthrough = true } loader.env.SKIP_CHOWN = { passthrough = true } loader.env.SKIP_SETCAP = { passthrough = true } loader.env.VAULT_ADDR = { passthrough = true } loader.env.VAULT_API_ADDR = { passthrough = true } loader.env.VAULT_CACERT = { passthrough = true } loader.env.VAULT_CLUSTER_ADDR = { passthrough = true } loader.env.VAULT_K8S_NAMESPACE = { passthrough = true } loader.env.VAULT_K8S_POD_NAME = { passthrough = true }Generate the signing key:
openssl genrsa -3 -out enclave-key.pem 3072Build a protected image using the
gsccommand:./gsc build vault-without-sgx vault.manifestSign the graminized docker image:
./gsc sign-image vault-without-sgx enclave-key.pem(Optional) Log in to an image registry server (if the registry requires it):
docker login -u=<USER_NAME> docker.io<USER_NAME>is the name of a user, which will be used to log in to the image registry serverTag protected container image with appropriate tag:
docker tag gsc-vault-without-sgx <DESTINATION_IMAGE_NAME><DESTINATION_IMAGE_NAME>is the name of the image in a registryPush protected container image to a registry:
docker push <DESTINATION_IMAGE_NAME>replace
<DESTINATION_IMAGE_NAME>with proper name
Deploying the cluster by using the pattern.sh file
To deploy the cluster by using the pattern.sh file, complete the following steps:
Log in to your cluster by running the following command:
oc loginOptional: Set the
KUBECONFIGvariable for thekubeconfigfile path:export KUBECONFIG=~/<path_to_kubeconfig>Deploy the pattern to your cluster. Run the following command:
./pattern.sh make install
Verify that the Operators have been installed.
To verify, in the OpenShift Container Platform web console, navigate to Operators → Installed Operators page.
Check that the following Operators are installed with
Succeededstatus (Figure 1):Advanced Cluster Management for Kubernetes
Intel Device Plugins Operator
multicluster engine for Kubernetes
Node Feature Discovery Operator
Red Hat Openshift GitOps
Validated Patterns Operator
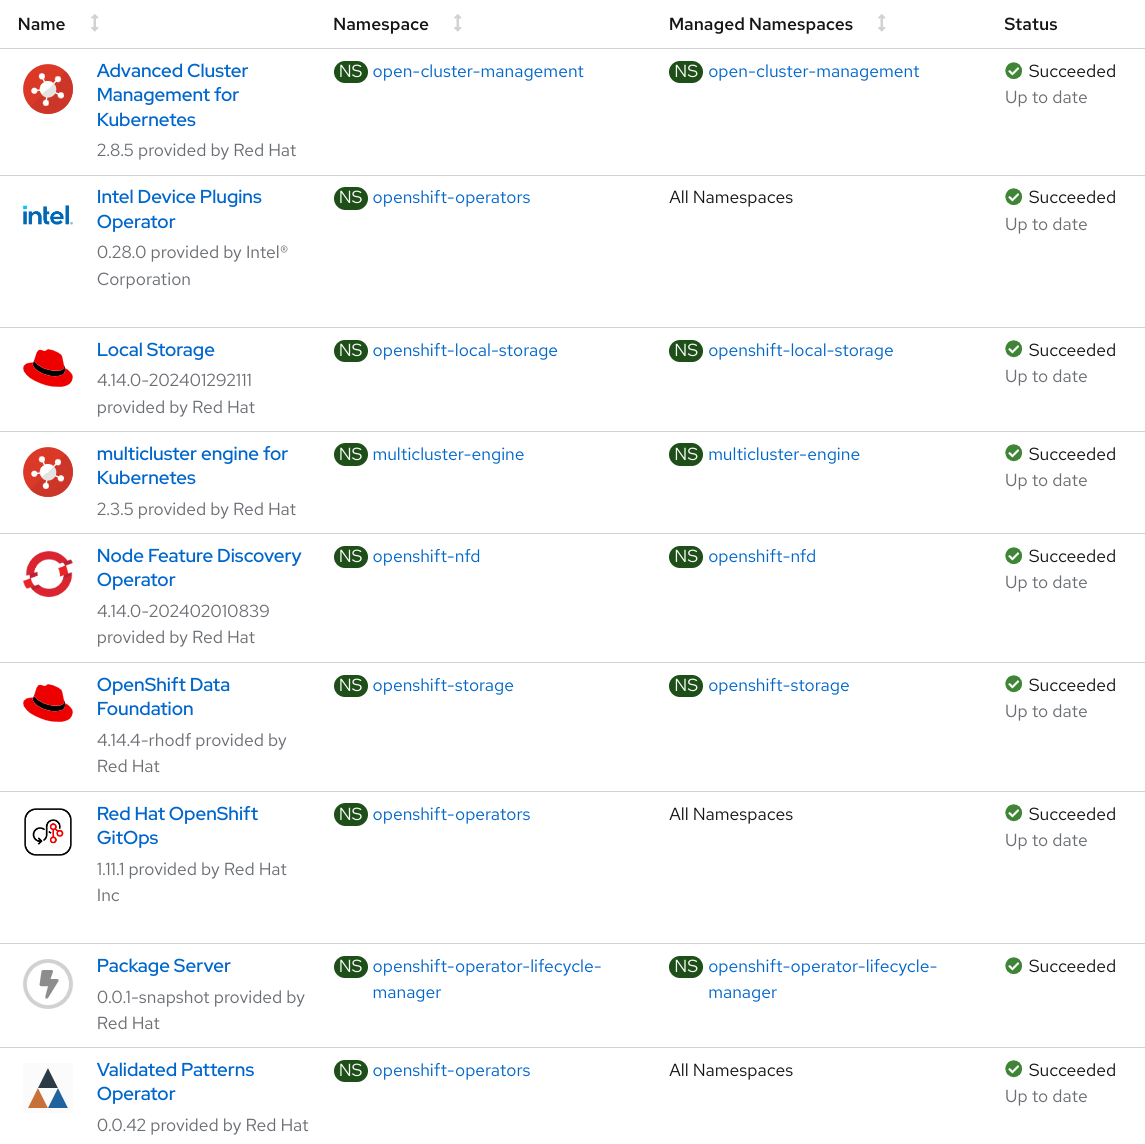 Figure 1. List of Installed Operators for Multicloud GitOps Validated Pattern with SGX
Deploying the cluster by using the Validated Patterns Operator
To install the Validated Patterns Operator:
Log in to the Openshift Container Platform web console and select Operators > OperatorHub.
Search for Validated Patterns Operator, open it and click Install.
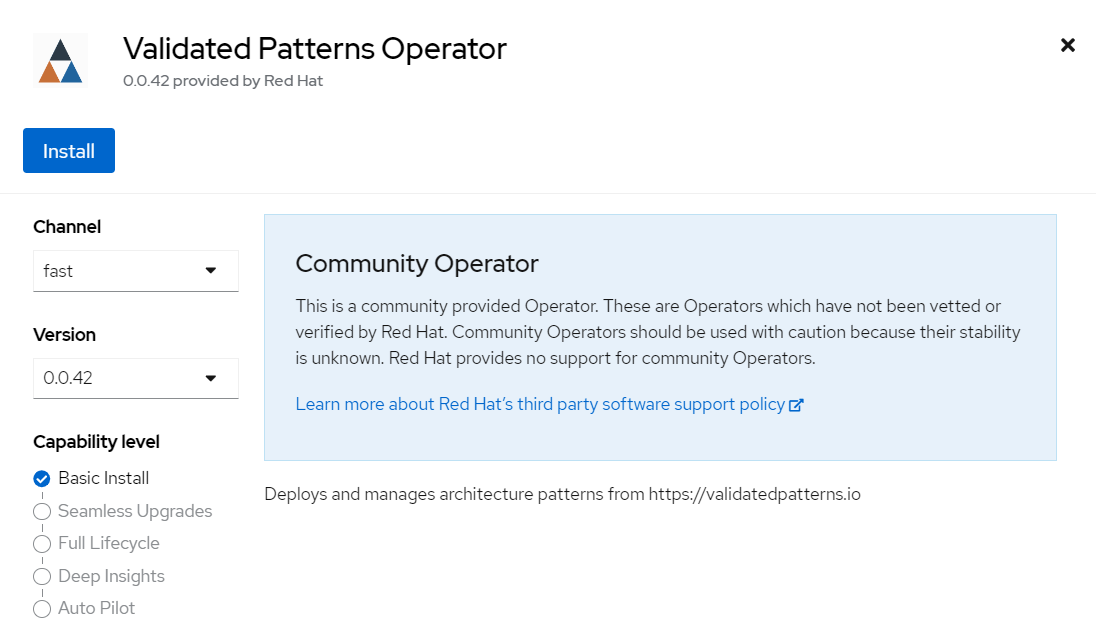 Figure 2. Install Validated Patterns Operator
Choose default settings for the installation mode, namespaces and update strategy and confirm it by clicking Install.
Select Operators > Installed Operators.
Ensure that Validated Patterns Operator is listed in the
openshift-operatorsproject with a statusSucceeded.
After a successful installation, open the Validated Patterns Operator page. Next, go to the Pattern tab and click Create Pattern.
Set the Name field to
multicloud-gitops-sgx, and the Cluster Group Name tohub. Values must be the same as in the values-global.yaml file (Figure 3).As a Git Config > Target Repo value, paste the link to your fork. Under Git Config > Target Revision write the name of your branch (Figure 3).
Click the Create button to create the pattern.
 Figure 3. Create Pattern Form
Verify that the rest of Operators have been installed:
To verify, in the OpenShift Container Platform web console, navigate to Operators → Installed Operators page.
Check that the following Operators are installed with
Succeededstatus (Figure 1):Advanced Cluster Management for Kubernetes
Intel Device Plugins Operator
multicluster engine for Kubernetes
Node Feature Discovery Operator
Red Hat Openshift GitOps
Add a secret for config-demo application (from values-secret-multicloud-gitops.yaml) to Vault manually:
Go to the Vault service route. URL can be found:
by running the command:
oc -n vault get route vault -ojsonpath='{.spec.host}'in Openshift Container Platform web console under Networking > Routes for
vaultproject.
Log into the Vault using the root token. Root token can be found by executing the command:
oc -n imperative get secrets vaultkeys -ojsonpath='{.data.vault_data_json}' | base64 -dAfter login go to
secretcatalog click Create secret and fill in all the fields manually (Figure 2):Path for this secret is
global/config-demo(from values.yaml file forconfig-democharts)Under Secret data key is
secret(from values-secret-multicloud-gitops.yaml file) and in the next field put its value.Click Add and then Save.
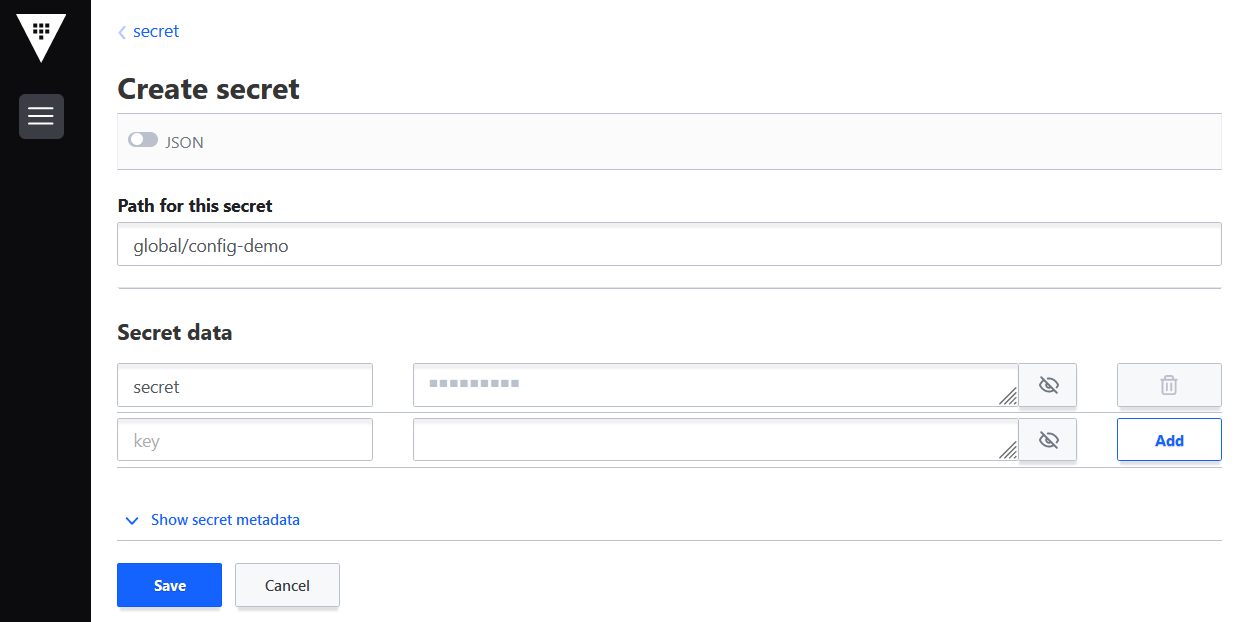 Figure 4. Create secret
Verification
Go to the Hub ArgoCD and verify that all applications are synchronized. The URL can be found in Openshift Container Platform web console under Networking > Routes for the project vault or use the command:
oc -n vault get route vault -ojsonpath='{.spec.host}'All applications should be Healthy and Synced:
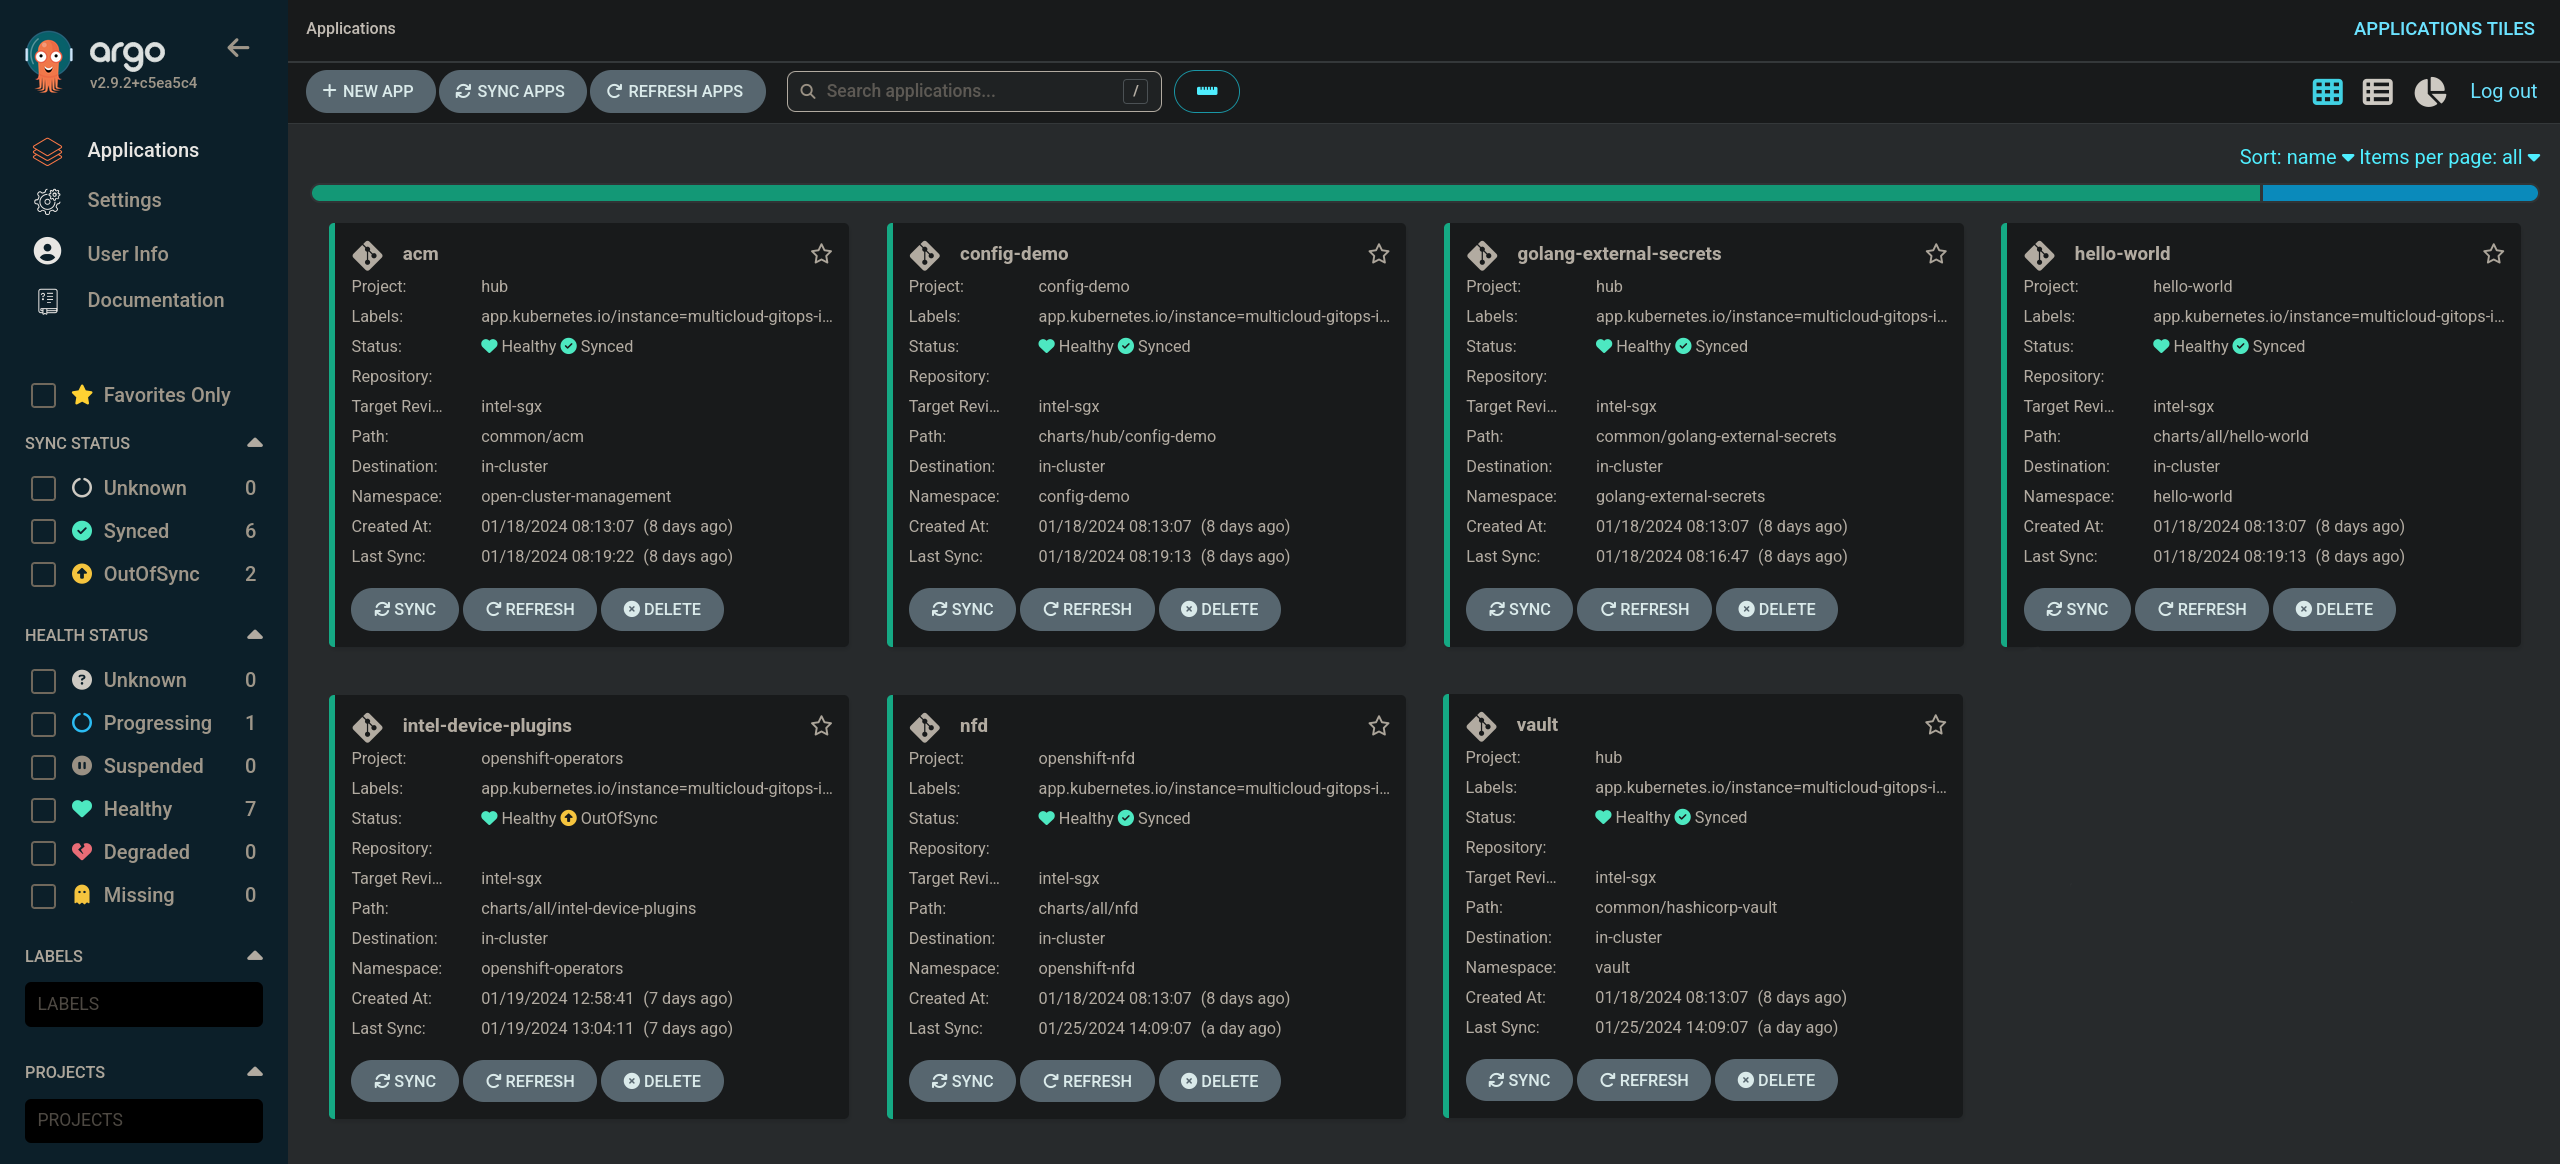
Figure 5. ArgoCD panel with
sgx-appCheck the logs of a pod vault-0 to verify if it contains Gramine header. In the OpenShift Container Platform web console, navigate to Workloads > Pods. Change the project to vault and open the Logs tab in the pod details. The appearance of Gramine is starting header confirms that Intel SGX is used.
Next steps
After the management hub is set up and works correctly, attach one or more managed clusters to the architecture.
For instructions on deploying the edge, refer to Attach a managed cluster (edge) to the management hub.
