$ git clone git@github.com:your-username/ramendr-starter-kit.gitDeploying the RamenDR Starter Kit Pattern
Prerequisites
An OpenShift cluster
To create an OpenShift cluster, go to the Red Hat Hybrid Cloud console.
Select OpenShift -> Red Hat OpenShift Container Platform -> Create cluster.
A GitHub account with a personal access token that has repository read and write permissions.
The Helm binary, for instructions, see Installing Helm
Additional installation tool dependencies. For details, see Patterns quick start.
It is desirable to have a cluster for deploying the GitOps management hub assets and a separate cluster(s) for the managed cluster(s).
Preparing for deployment
Procedure
Fork the ramendr-starter-kit repository on GitHub. You must fork the repository because your fork is updated as part of the GitOps and DevOps processes.
Clone the forked copy of this repository.
Go to your repository: Ensure you are in the root directory of your Git repository by using:
$ cd /path/to/your/repositoryRun the following command to set the upstream repository:
$ git remote add -f upstream git@github.com:validatedpatterns/ramendr-starter-kit.gitVerify the setup of your remote repositories by running the following command:
$ git remote -vExample outputorigin git@github.com:kquinn1204/ramendr-starter-kit.git (fetch) origin git@github.com:kquinn1204/ramendr-starter-kit.git (push) upstream git@github.com:validatedpatterns/ramendr-starter-kit.git (fetch) upstream git@github.com:validatedpatterns/ramendr-starter-kit.git (push)Decide which install variant to use and set
main.variantinvalues-global.yamlbefore install. The default isodf. For variant purposes and verification differences, see Install variants on the pattern overview page.main: variant: odfMake a local copy of secrets template outside of your repository to hold credentials for the pattern.
Do not add, commit, or push this file to your repository. Doing so may expose personal credentials to GitHub.
Run the following commands:
$ cp values-secret.yaml.template ~/values-secret.yamlPopulate this file with secrets, or credentials, that are needed to deploy the pattern successfully:
$ vi ~/values-secret.yamlEdit the
vm-sshsection to include the username, private key, and public key. To ensure the seamless flow of the pattern, the value associated with theprivatekeyandpublickeyhas been updated withpath. For example:- name: vm-ssh vaultPrefixes: - global fields: - name: username value: 'cloud-user' - name: privatekey path: '/path/to/private-ssh-key' - name: publickey path: '/path/to/public-ssh-key'Paste the path to your locally stored private and public keys. If you do not have a key pair, generate one using
ssh-keygen.Edit the
cloud-initsection to include theuserDatablock to use with cloud-init. For example:- name: cloud-init vaultPrefixes: - global fields: - name: userData value: |- #cloud-config user: 'cloud-user' password: 'cloud-user' chpasswd: { expire: False }Edit the
awssection to refer to the file containing your AWS credentials:- name: aws fields: - name: aws_access_key_id ini_file: ~/.aws/credentials ini_key: aws_access_key_id - name: aws_secret_access_key ini_file: ~/.aws/credentials ini_key: aws_secret_access_key - name: baseDomain value: aws.example.com - name: pullSecret path: ~/pull_secret.json - name: ssh-privatekey path: ~/.ssh/privatekey - name: ssh-publickey path: ~/.ssh/publickeyEdit the
openshiftPullSecretsection to refer to the file containing your OpenShift pull secret:- name: openshiftPullSecret fields: - name: .dockerconfigjson path: ~/pull_secret.jsonIf you selected the
drpartner-s4variant, add the two Vault secrets required for hubvp-s4-storage. Paths must match the chart overrides invariants/drpartner-s4/values-drpartner-s4.yaml(s4UICredentials.vaultKeyands4APICredentials.vaultKey). Thedrpartner-minimalvariant does not deployvp-s4-storageand does not need these secrets.- name: s4-ui-credentials vaultPrefixes: - global fields: - name: UI_USERNAME value: s4admin onMissingValue: error - name: UI_PASSWORD onMissingValue: generate override: true vaultPolicy: advancedPolicy - name: s4-api-credentials vaultPrefixes: - global fields: - name: AWS_ACCESS_KEY_ID value: s4admin onMissingValue: error - name: AWS_SECRET_ACCESS_KEY onMissingValue: generate override: true vaultPolicy: advancedPolicyExternal Secrets merges both Vault entries into Kubernetes Secret
s4-credentialsin thevp-s4-storagenamespace. Defaults invalues-secret.yaml.templateuses4adminfor the UI user and access key ID; the password and secret key can be generated whenonMissingValue: generateandvaultPolicies.advancedPolicyare set in your secrets file.Add kubeconfig secrets for each regional DR cluster. See Using bring your own cluster (BYOC). If you instead plan to disable BYOC in favor of Hive-provisioned managed clusters, you can skip this step.
  - name: ocp-primary_cluster_kubeconfig
    fields:
      - name: kubeconfig
        path: /path/to/ocp-primary/kubeconfig

  - name: ocp-secondary_cluster_kubeconfig
    fields:
      - name: kubeconfig
        path: /path/to/ocp-secondary/kubeconfig
Create and switch to a new branch named
my-branch, by running the following command:$ git checkout -b my-branchThe pattern will infer the baseDomain of your cluster based on the clusterDomain which is tracked by the pattern operator. Previously, this required the pattern to be forked to be useful - but this is no longer the case. You may still wish to change other settings in the RDR chart’s values file, such as
aws.regionsettings. This file is at overrides/values-cluster-names.yaml. If you do make customizations to this or other files, it is necessary to fork the pattern so that the changes will be seen by ArgoCD. If you made any changes to this or any other files tracked by git, git add them and then commit the changes by running the following command:$ git commit -m "any updates"Push the changes to your forked repository:
$ git push origin my-branch
The preferred way to install this pattern is by using the ./pattern.sh script. By default, the pattern assumes you already have two regional DR clusters and have referenced their kubeconfigs in the secrets. Use BYOC and ./pattern.sh make install-byoc.
If instead, you prefer for the pattern to launch the clusters for you, you can set byoc: false in
overrides/values-cluster-names.yaml
and allow Red Hat Advanced Cluster Management (RHACM) Hive to provision the primary and secondary managed clusters on AWS, and use ./pattern.sh make install instead of ./pattern.sh make install-byoc.
Using bring your own cluster (BYOC)
BYOC (bring your own cluster) lets you use existing OpenShift clusters as the regional DR pair (ocp-primary and ocp-secondary) instead of waiting for Hive to provision new managed clusters on AWS. This option is on by default for all variants. Alternatively, you can disable BYOC and have the pattern launch the two spoke clusters for you.
When to use BYOC
Use BYOC when:
You already operate two OpenShift clusters that will serve as the primary and secondary DR sites.
You want to avoid Hive cluster provisioning time and AWS cluster creation costs for the managed pair.
You are validating partner CSI plumbing on clusters you provisioned outside the pattern.
You are installing on a platform other than AWS
The Hive provisioning path is a better option when you want the pattern to create and lifecycle-manage the managed clusters for you.
BYOC cluster requirements
Before install, the install-byoc target runs ansible/playbooks/validate_byoc.yml against the kubeconfigs in your secrets file. Clusters must meet these checks:
Reachability — Hub and both regional clusters are reachable from the install environment.
OpenShift Container Platform version — Hub is OpenShift Container Platform 4.18 or later. Primary and secondary must match the hub minor version (same minor is required for RamenDR and OpenShift Data Foundation).
Non-overlapping networks — Pod and service CIDRs must not overlap between the hub, primary, and secondary clusters.
You are responsible for making sure that the managed clusters are suitable for running Virtual Machines. The Hive
provisioner will use m5.metal instances on AWS. Different clouds and bare metal have different requirements which
are hard to generalize, so the playbook does not. (Previous versions would look for "metal" instance types but that
only works on AWS.)
Configuring BYOC
Provision and register your regional DR clusters with Red Hat Advanced Cluster Management (RHACM). Managed cluster names must match the names in
overrides/values-cluster-names.yaml (default: ocp-primary and ocp-secondary).
Align
clusterOverrides with your cluster names, versions, and regions:+
byoc: true

clusterOverrides:
  primary:
    name: ocp-primary
    version: 4.22.1
  secondary:
    name: ocp-secondary
    version: 4.22.1
Deploying the pattern by using the pattern.sh file
Commit and push any
clusterOverrides changes to your fork so Argo CD sees them during install.To deploy the pattern by using the pattern.sh file, complete the following steps:
Log in to your cluster by following this procedure:
Obtain an API token by visiting https://oauth-openshift.apps.<your-cluster>.<domain>/oauth/token/request.
Log in to the cluster by running the following command:
$ oc login --token=<retrieved-token> --server=https://api.<your-cluster>.<domain>:6443Or log in by running the following command:
$ export KUBECONFIG=~/<path_to_kubeconfig>
Deploy the pattern to your hub cluster.
For the default BYOC path, after adding regional cluster kubeconfigs to your secrets file, run:
$ ./pattern.sh make install-byocFor Hive provisioning, simply run:
$ ./pattern.sh make installThe
install-byoctarget loads secrets (when configured), runs the BYOC validation playbook, then installs the pattern the same way asinstall.
Verification
Verify that the Operators have been installed on the hub cluster. Navigate to Operators → Installed Operators page in the OpenShift Container Platform web console on the Hub cluster (in the "local-cluster" view),
 Figure 1. RamenDR Hub Operators
Verify that the primary and secondary managed clusters are available in Red Hat Advanced Cluster Management (RHACM). For the default BYOC path, clusters should already be registered before install completes. For the Hive path, cluster creation can take close to an hour on AWS. On the hub cluster, navigate to All Clusters in the OpenShift Container Platform web console:
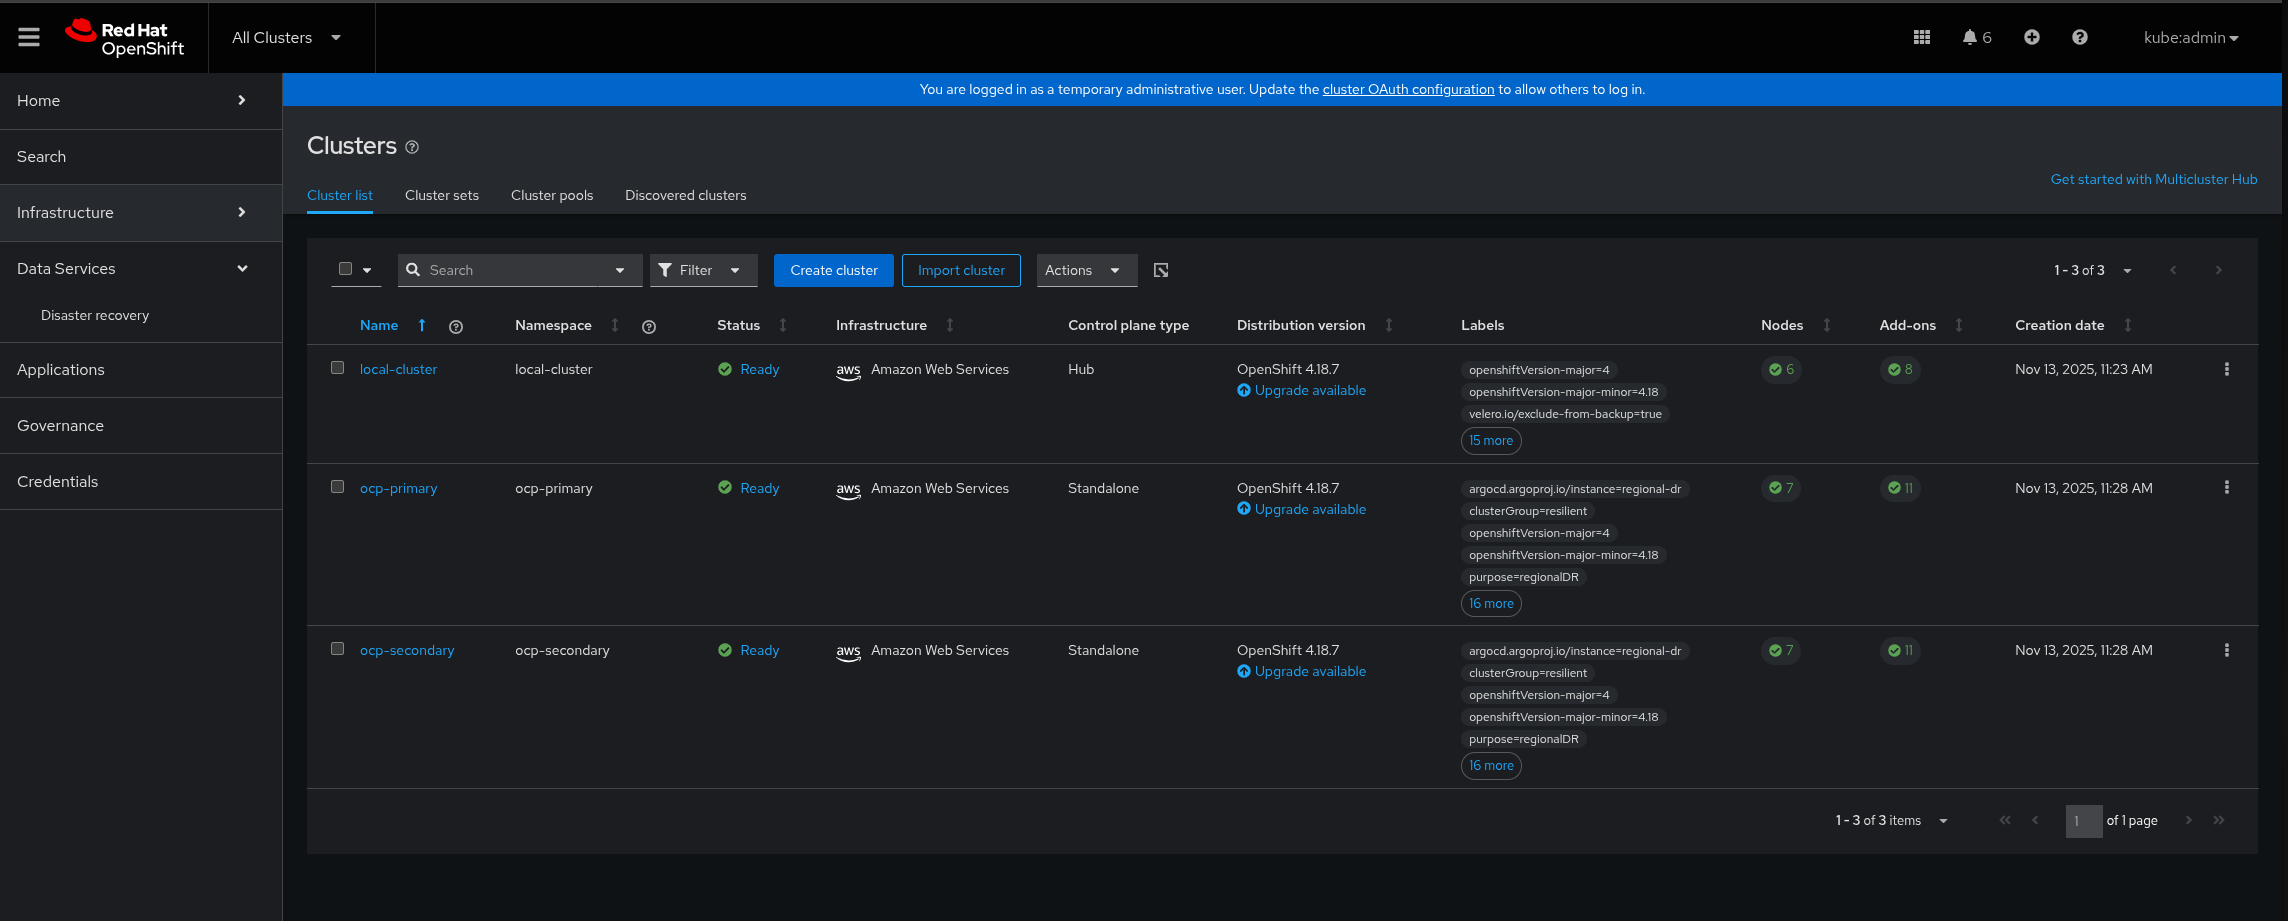 Figure 2. RamenDR Clusters
Wait some time for everything to deploy to all the clusters. It might take up to another hour from when the managed clusters finish building. You can track the progress through the
Hub ArgoCDUI from the nines menu, especially the "opp-policy" and the "regional-dr" applications. Most of the critical resources are in the regional-dr application (at present, the opp-policy app may show missing/out-of-sync, and the regional-dr app may show OutOfSync - even when both are healthy. We are working on a fix, track bug progress here):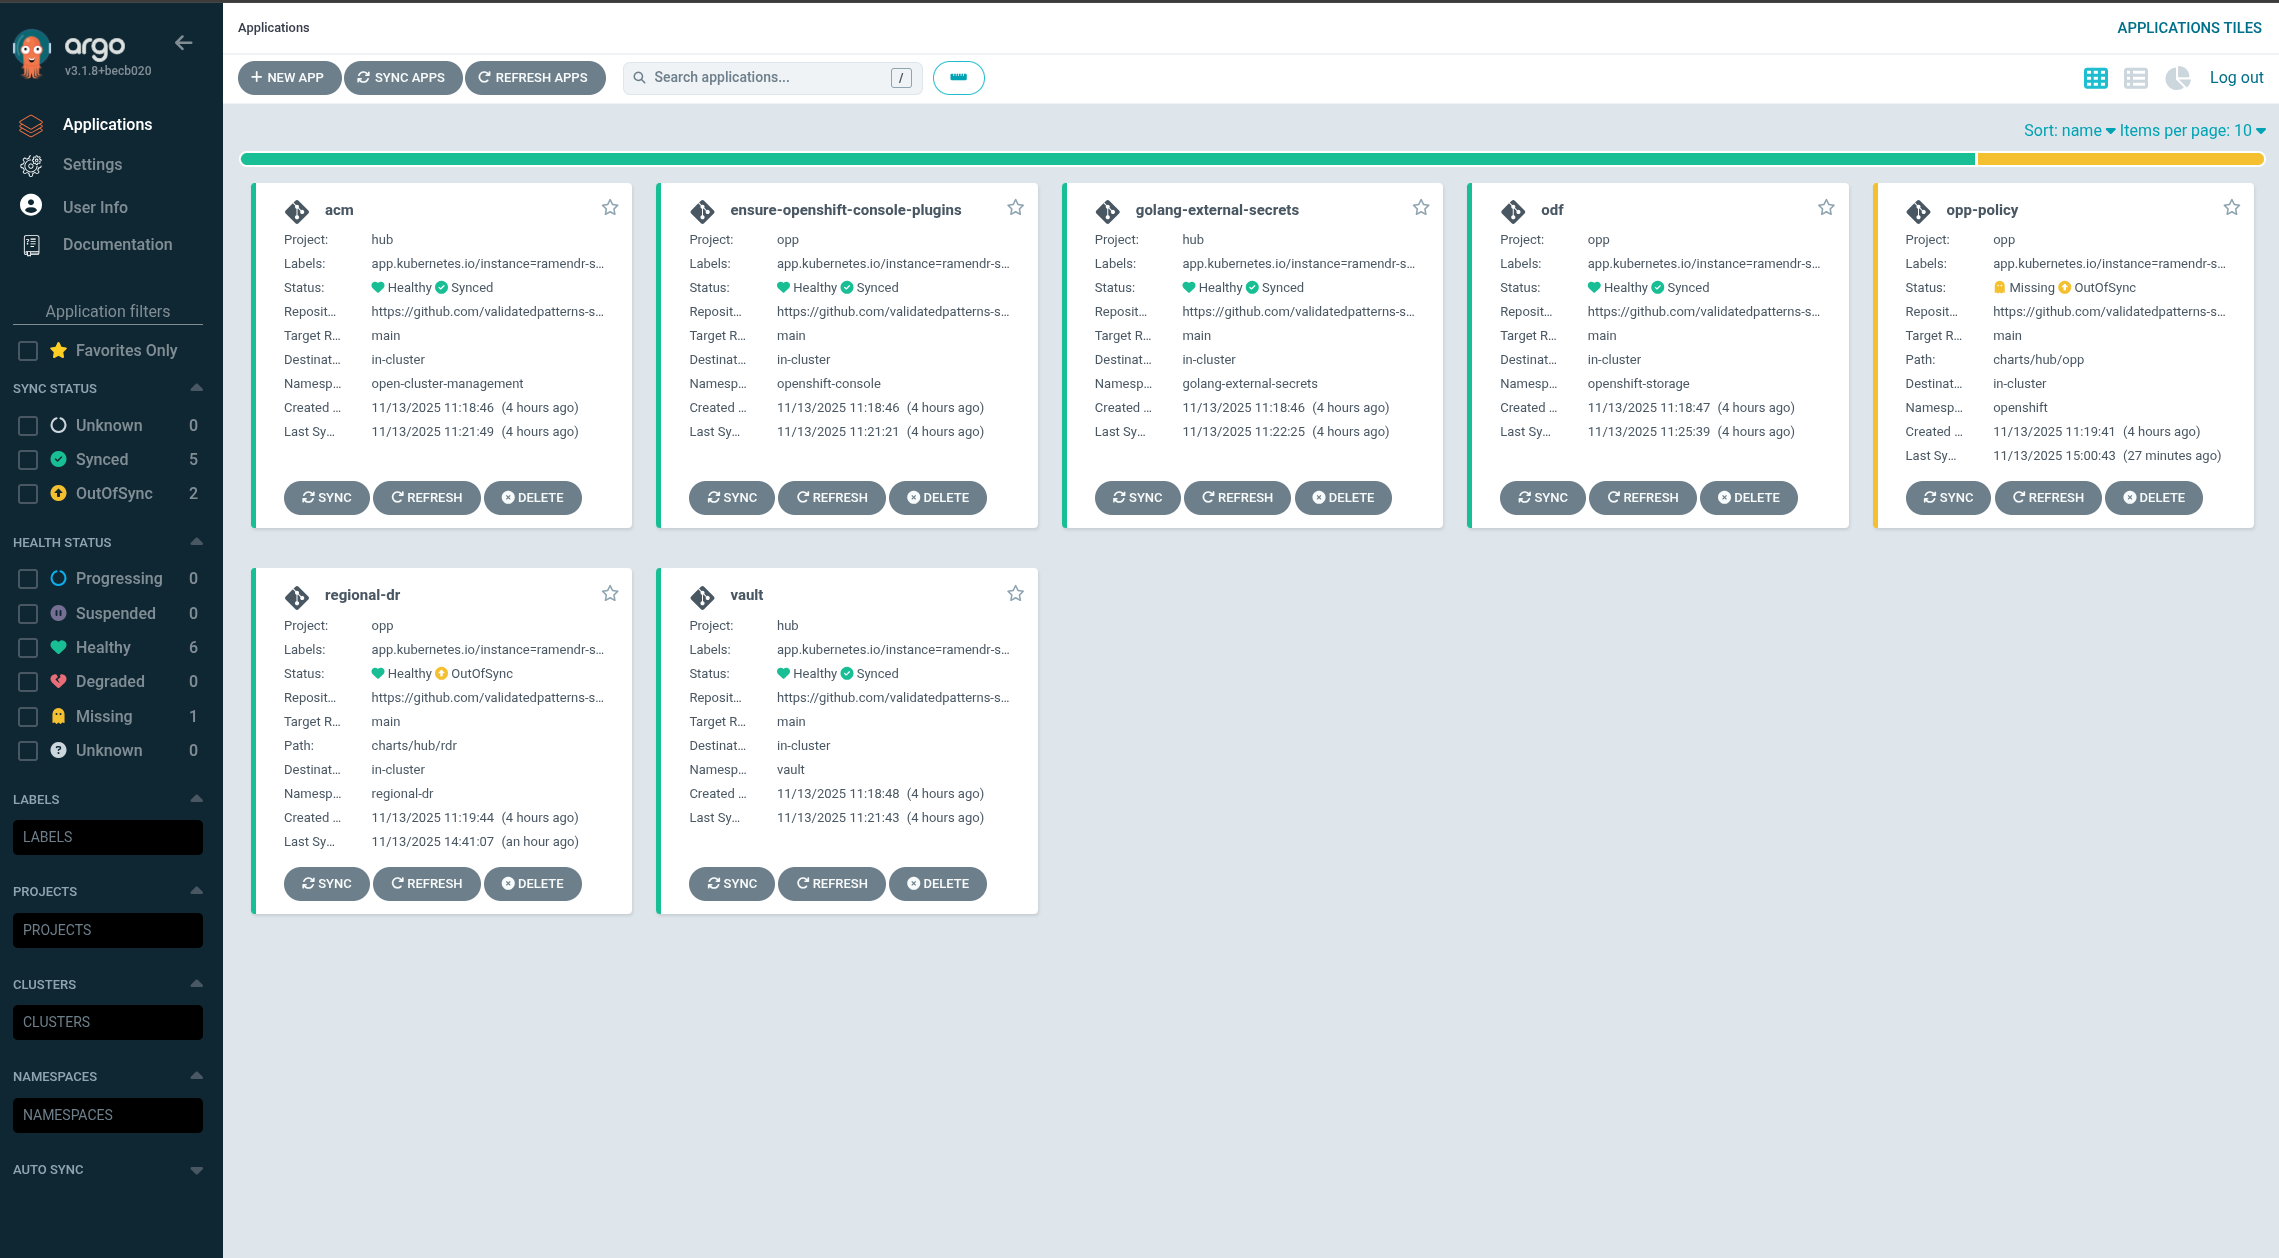 Figure 3. RamenDR Starter Kit Applications
For the
odfvariant (default), the Virtual Machines will be deployed and the Disaster Recovery Placement Control (DRPC) will show that resources are now protected. This screen can be reached via All Clusters → Data Services → Disaster Recovery → Protected Applications on the hub cluster. Normally it will be faster to synchronize Kubernetes objects than Application volumes. When these indicators both show Healthy it is safe to trigger a failover: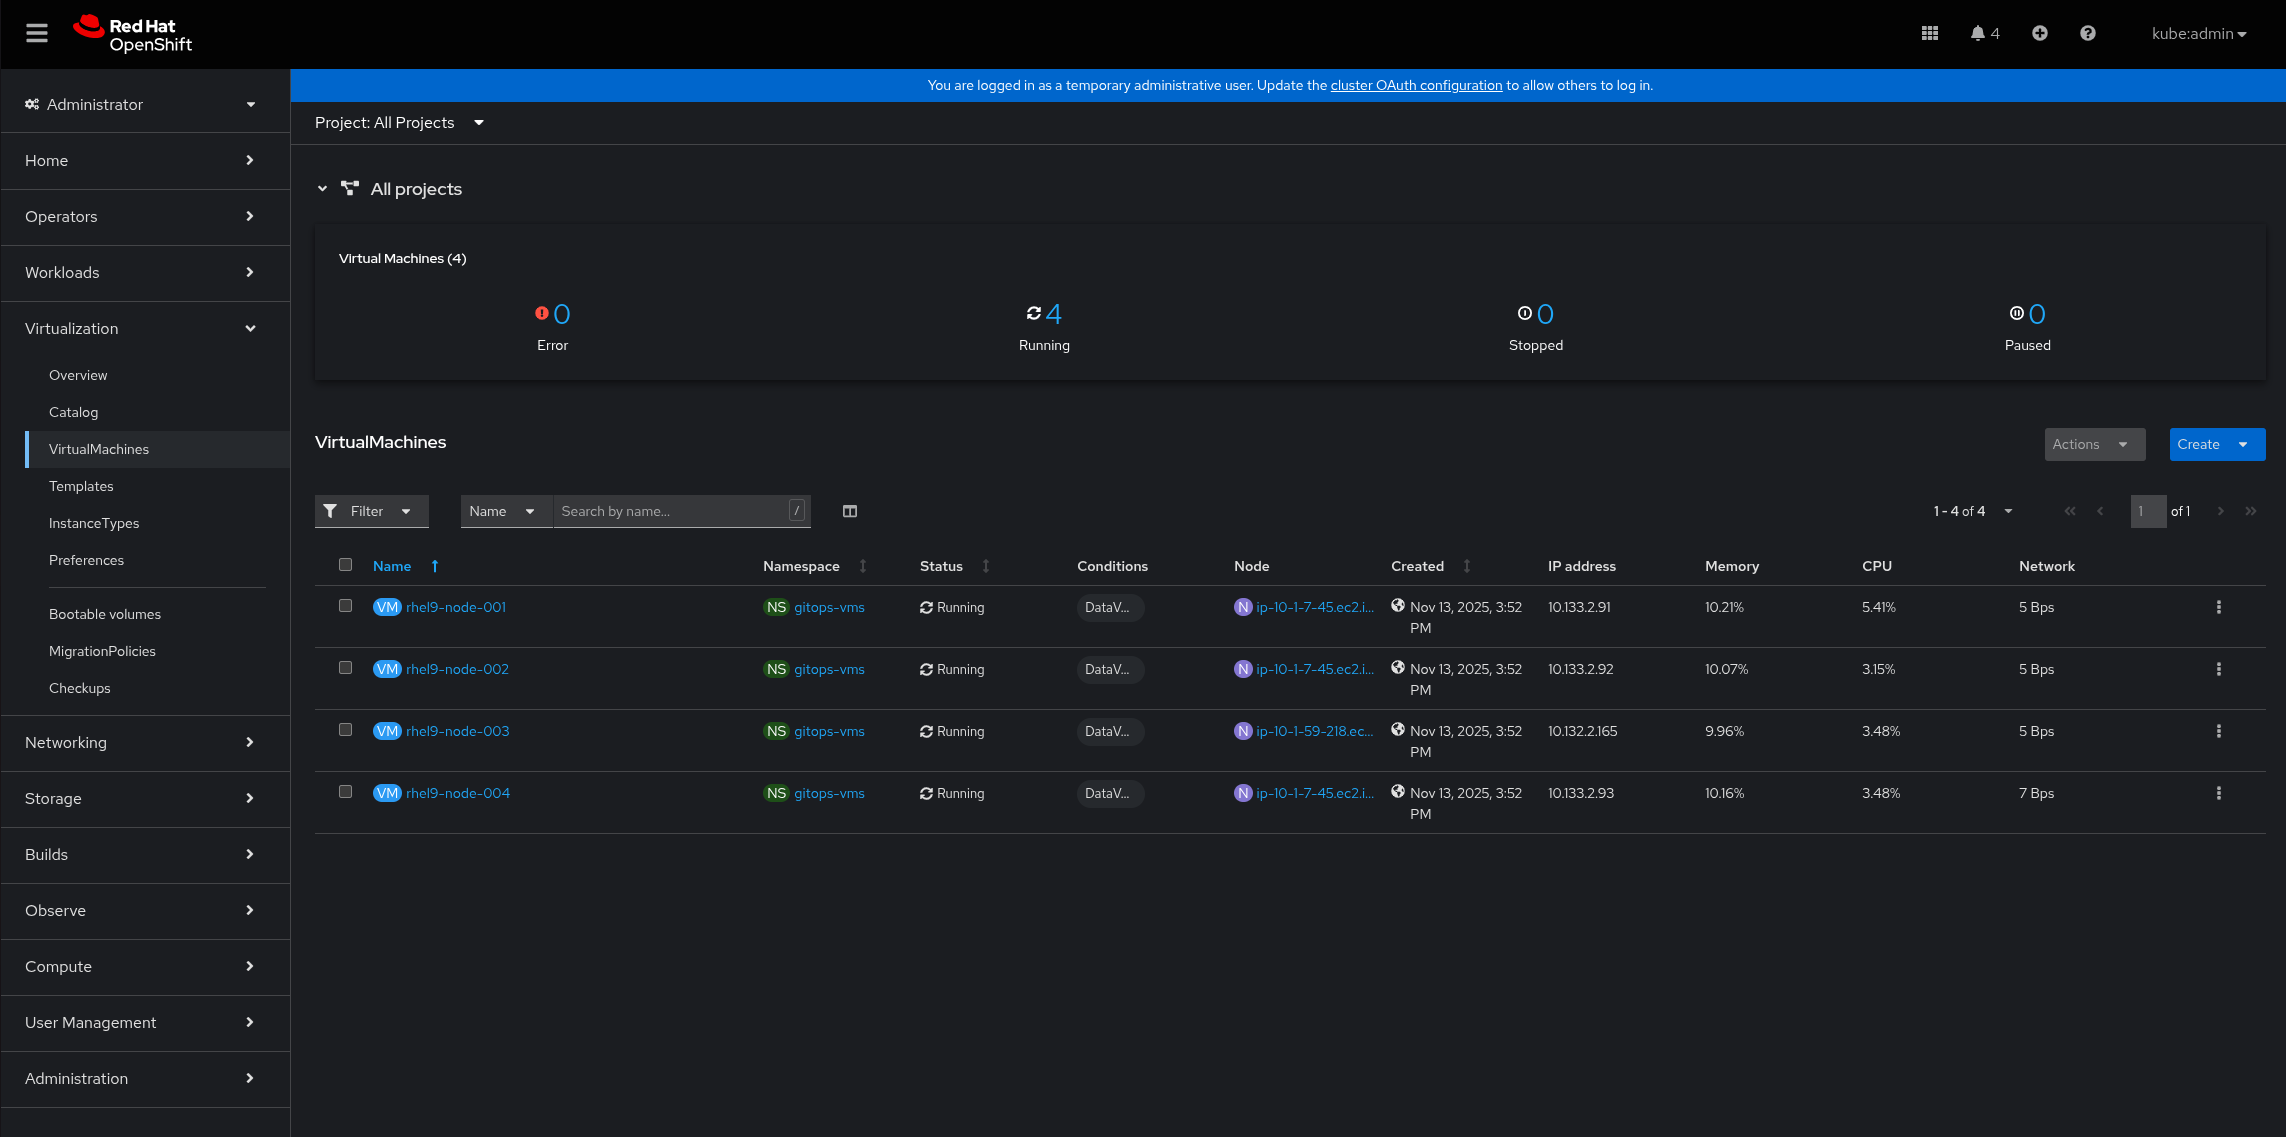 Figure 4. RamenDR Starter Kit Applications
For the
odfvariant, you might want to see the VMs themselves running. They will be on the primary cluster in the Virtualization → VirtualMachines area. The pattern configures 4 RHEL9 VMs by default: Figure 5. RamenDR Starter Kit Trigger Failover, part 1
For the
odfvariant, clicking the Failover option will bring up a modal dialog that indicates where the failover will move the workload, and when the last known good state of the workload is. Click the Initiate button to begin the failover: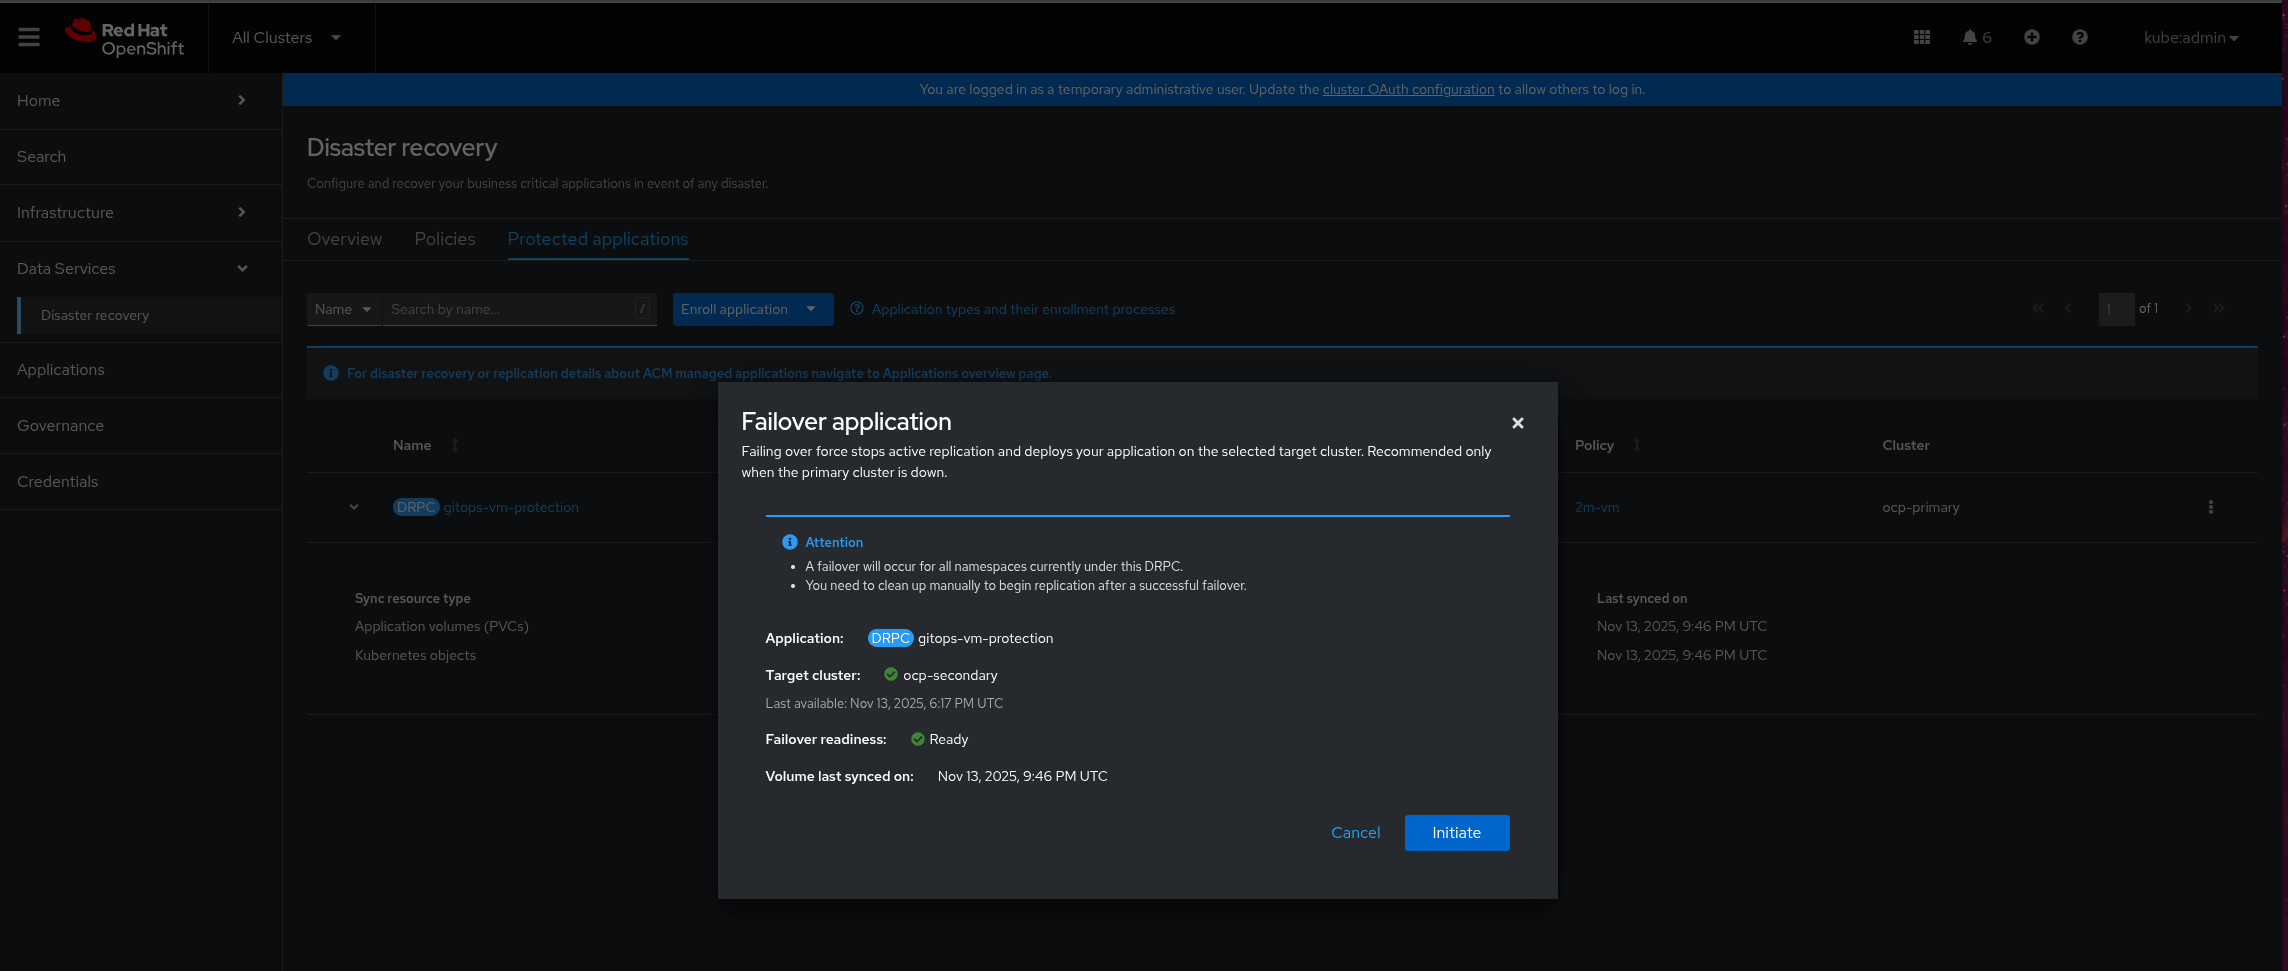 Figure 6. RamenDR Starter Kit Trigger Failover, part 2
For the
odfvariant, while the failover is happening, you can watch the progress of it in the activity area. When it is done, it will say (with a discovered application) that it is necessary to clean up application resources to allow replication to start in the other direction. Notice that the primary cluster should have changed: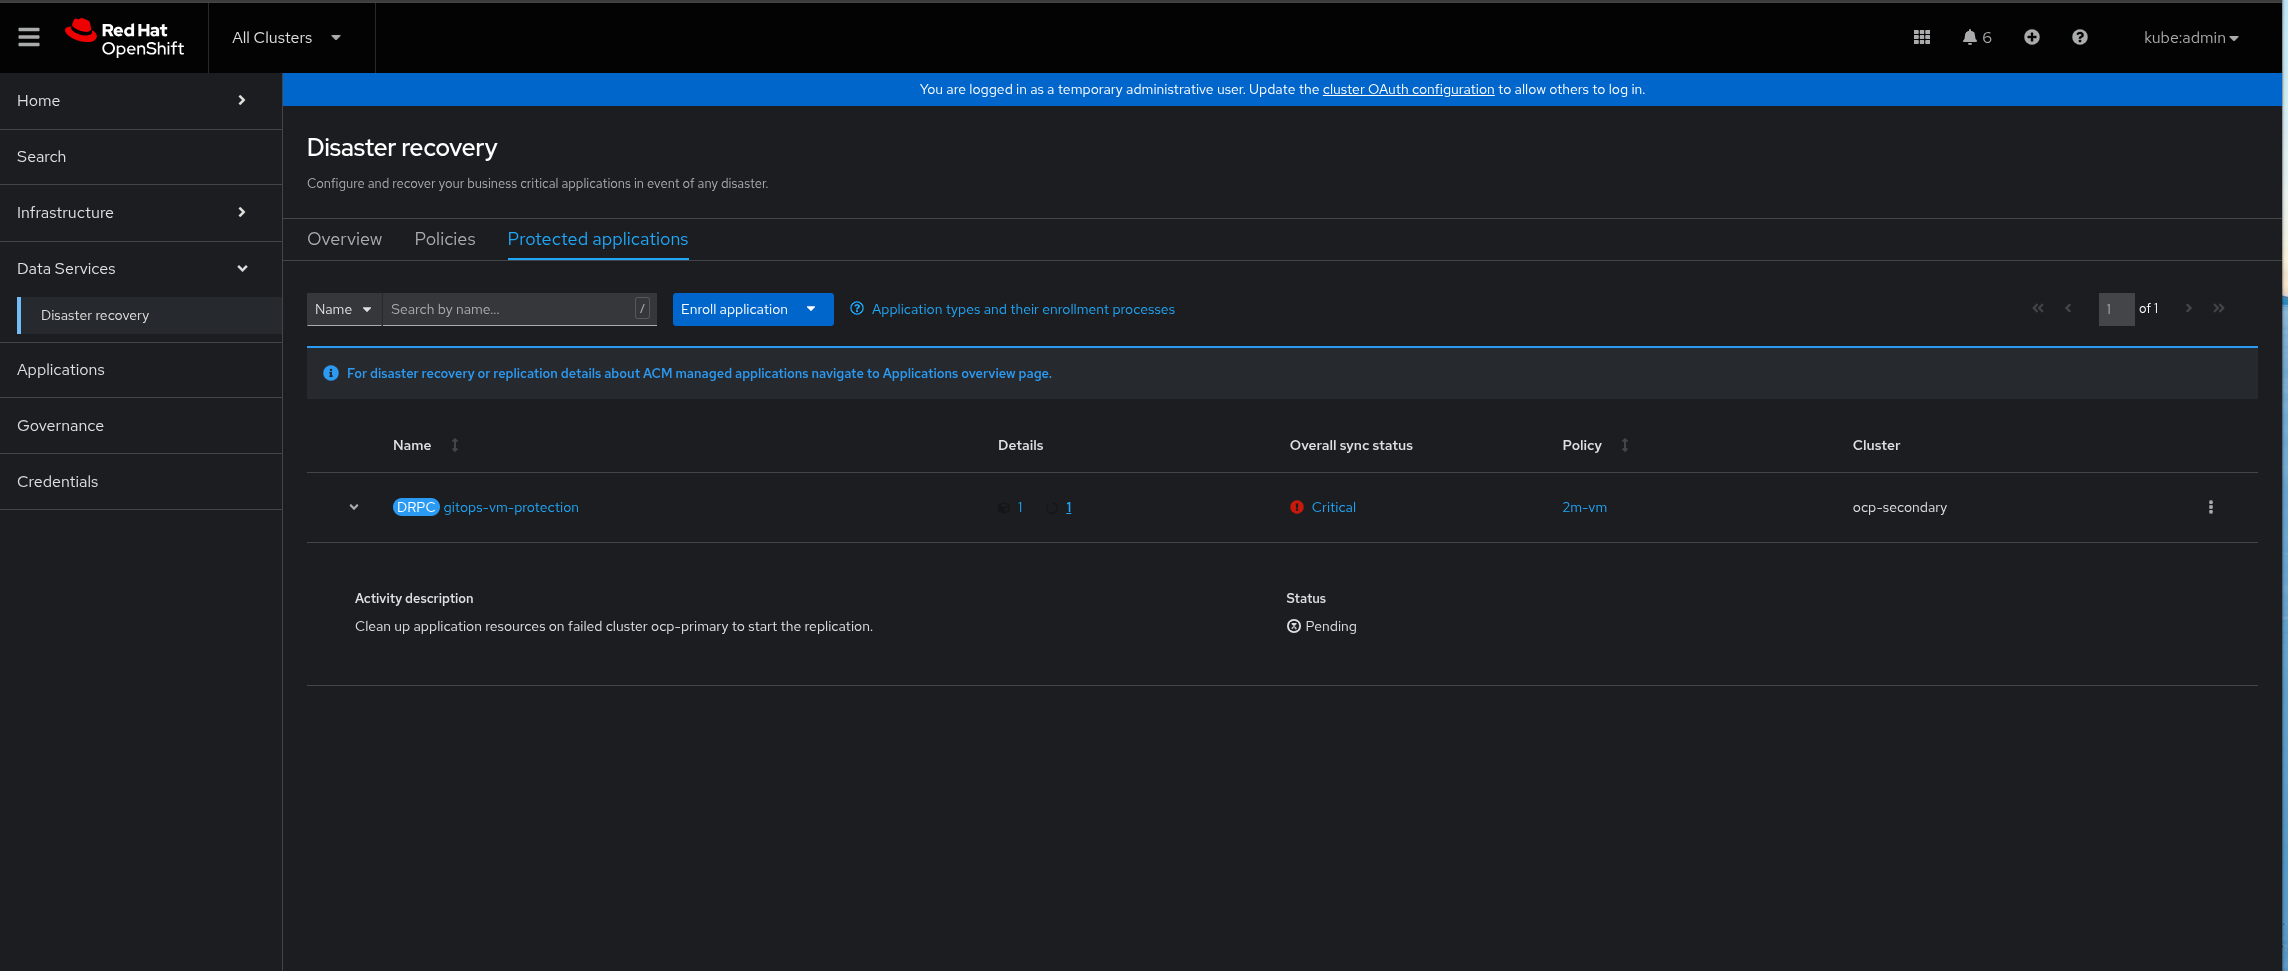 Figure 7. RamenDR Starter Kit Failover Cleanup
For the
odfvariant, the pattern provides a script to do this cleanup. Invoke it with your Hub cluster KUBECONFIG set and run./pattern.sh scripts/cleanup-gitops-vms-non-primary.sh: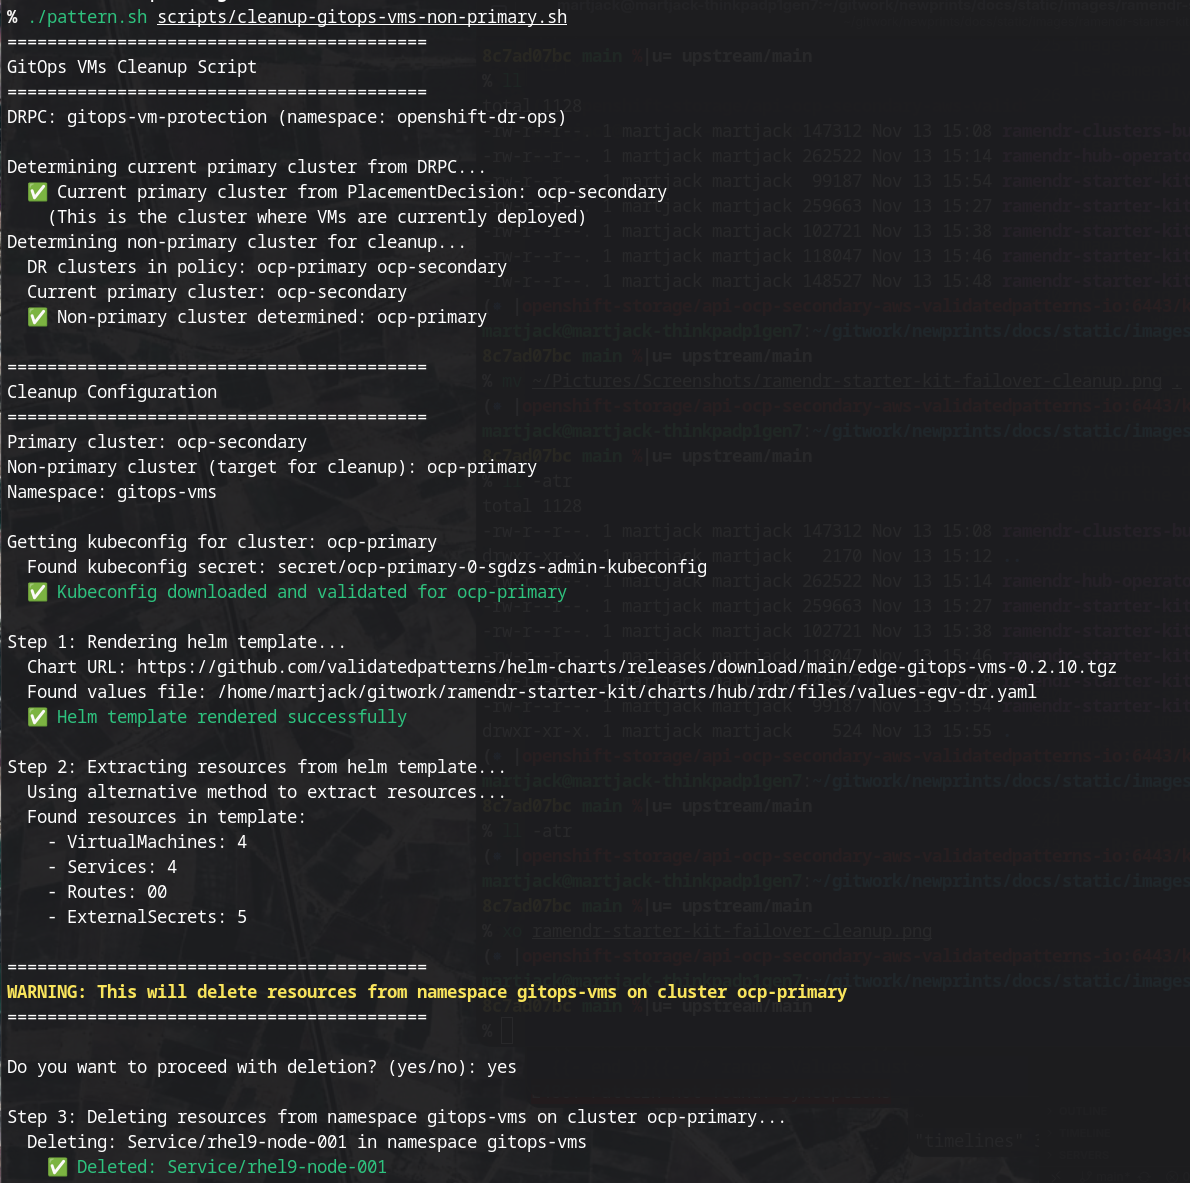 Figure 8. RamenDR Starter Kit Failover Cleanup
For the
odfvariant, after a few minutes, the resources should show healthy and protected again (the PVCs take a few minutes to synchronize):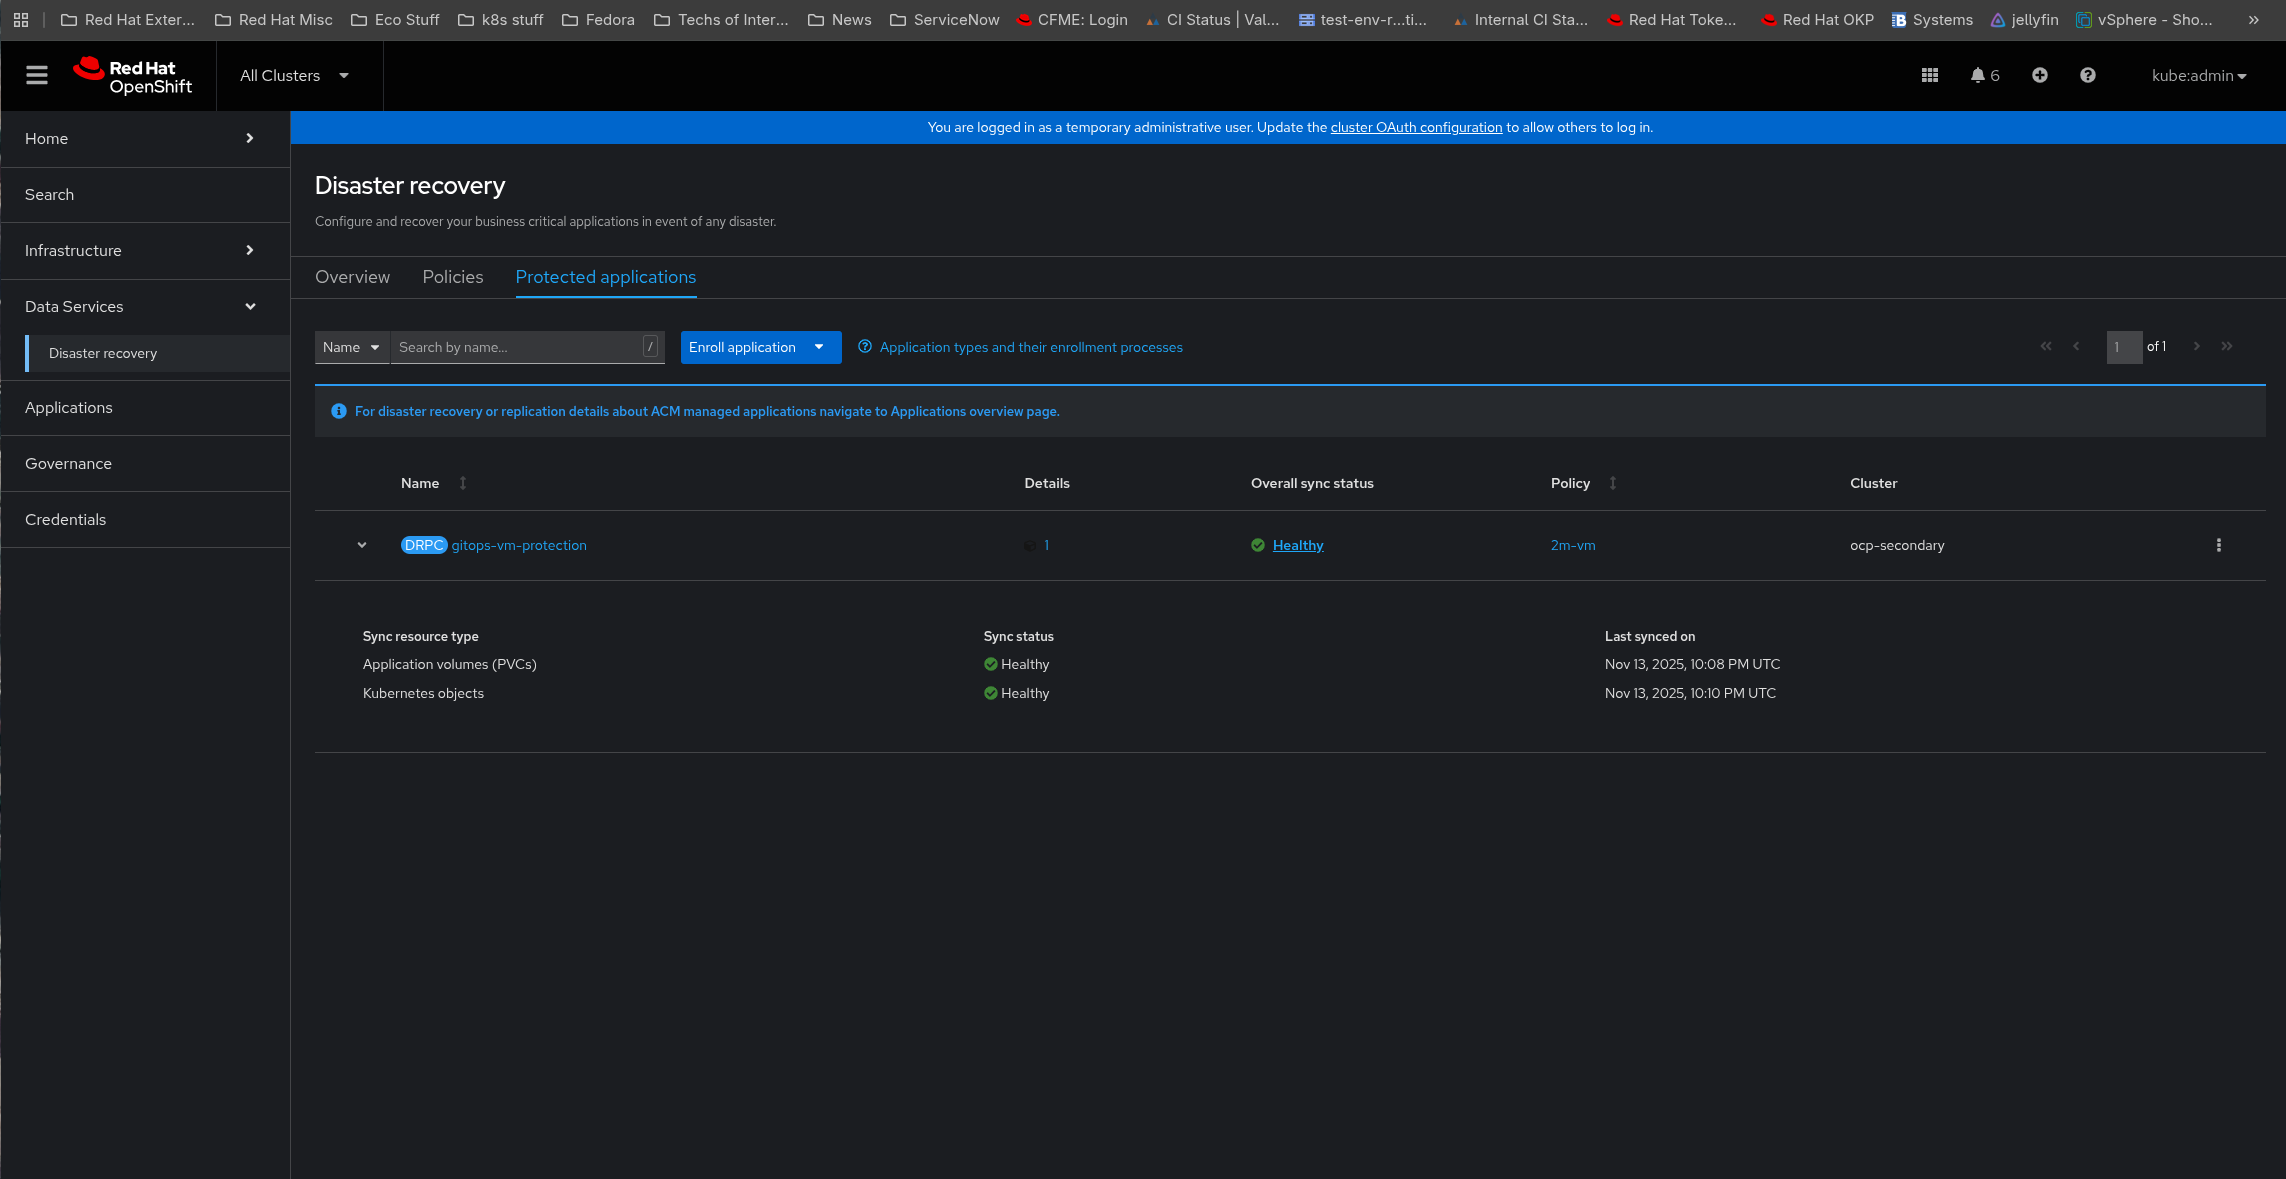 Figure 9. RamenDR Starter Kit Reprotected
Verifying partner variants
After sync, expect the following differences for the partner install variants.
drpartner-s4
Hub operators include Multicluster Orchestrator (Ramen), OpenShift Virtualization, and OADP. Submariner is disabled in
opp-policy.Hub
vp-s4-storageis present and creates buckets vias4Role.buckets.No ODF StorageSystem, MirrorPeer, or
odf-drapplication.The
regional-drapplication runs withramen.infrastructureEnabled: true. It creates DRClusters, a single2m-novmDRPolicy (no2m-vm), and upserts hubs3StoreProfileswithensureBuckets: false. It does not deploy DRPC or VMs.The
opp-policyapplication injectscaCertificateson S3 profiles only.
drpartner-minimal
Same partner operators and plumbing as
drpartner-s4, but withoutvp-s4-storageor Submariner (submariner.enabled: falseinopp-policy).The
regional-drapplication runs with bothramen.resourcesEnabledandramen.infrastructureEnabledset tofalse. No DRPolicy, DRClusters, S3 profile work, or DRPC/VM workloads are deployed.
