$ oc get storageclass -o custom-columns=NAME:.metadata.name,PROVISIONER:.provisioner,DEFAULT:.metadata.annotations."storageclass\.kubernetes\.io/is-default-class"Deploying the retail pattern
Prerequisites
An OpenShift cluster
To create an OpenShift cluster, go to the Red Hat Hybrid Cloud console.
Select OpenShift -> Red Hat OpenShift Container Platform -> Create cluster.
The cluster must have a dynamic
StorageClassto provisionPersistentVolumes. Verify that a dynamic StorageClass exists before creating one by running the following command:Example outputNAME PROVISIONER DEFAULT gp2-csi ebs.csi.aws.com <none> gp3-csi ebs.csi.aws.com trueFor more information about creating a dynamic
StorageClass, see the Dynamic provisioning documentation.
Optional: A second OpenShift cluster for multicloud demonstration.
Optional: A quay account that can update images; this is if you want to use the pipelines to customize the applications.
Optional: A quay account with the following repositories set as public, and which you can write to:
quay.io/your-quay-username/quarkuscoffeeshop-barista
quay.io/your-quay-username/quarkuscoffeeshop-counter
quay.io/your-quay-username/quarkuscoffeeshop-inventory
quay.io/your-quay-username/quarkuscoffeeshop-web
quay.io/your-quay-username/quarkuscoffeeshop-customerloyalty
quay.io/your-quay-username/quarkuscoffeeshop-kitchen
quay.io/your-quay-username/quarkuscoffeeshop-majestic-monolith
quay.io/your-quay-username/quarkuscoffeeshop-monolith
These repos contain the demo’s microservices. The public repos (
quay.io/hybridcloudpatterns/*) provide pre-built images used by default, allowing the demo to run without rebuilding the apps. Creating your own quay copies offers transparency and lets you reproduce results or customize the apps.
The use of this pattern depends on having at least one running Red Hat OpenShift cluster. However, consider creating a cluster for deploying the GitOps management hub assets and a separate cluster for the managed cluster.
If you do not have a running Red Hat OpenShift cluster, you can start one on a public or private cloud by using Red Hat Hybrid Cloud Console.
Procedure
Fork the retail repository on GitHub.
Clone the forked copy of this repository.
$ git clone git@github.com:your-username/retail.gitCreate a local copy of the secret values file that can safely include credentials. Run the following commands:
$ cp values-secret.yaml.template ~/values-secret.yamlEdit
values-secret.yamlpopulating with your quayusernameandpassword.# NEVER COMMIT THESE VALUES TO GIT version: "2.0" secrets: # These are credentials to allow you to push to your image registry (quay.io) for application images - name: imageregistry fields: # eg. Quay -> Robot Accounts -> Robot Login - name: username value: "my-quay-username" - name: password value: "my-quay-password"Do not commit this file. You do not want to push personal credentials to GitHub.
Customize the deployment for your cluster by following these steps:
Create a new branch named my-branch and switch to it by running the following command:
$ git switch -c my-branchOptional: Edit the
values-global.yamlfile to customize the deployment for your cluster. For a description of each field, see Global configuration reference.The defaults should suffice if you want to see the apps running. The values that you might change are under the
imageregistry, if you copied the images to your own quay account and hostname. You can also change thegitsettings ofaccount,emailandhostnameto reflect your own account settings.If you plan to customize the build of the applications themselves, there are
revisionandimageTagsettings for each of them.If you made changes, stage and commit them by running the following commands:
$ git add values-global.yaml
$ git commit -m "Customize values-global for my cluster"
Push the changes to the
values-global.yamlfile by running the following command:$ git push origin my-branch
Deploy the pattern by running
./pattern.sh make installor by using the Validated Patterns Operator.
Deploying the pattern by using the pattern.sh script
To deploy the pattern by using the pattern.sh script, complete the following steps:
Log in to your cluster by running the following:
Obtain an API token by visiting https://oauth-openshift.apps.<your-cluster>.<domain>/oauth/token/request
Log in with this retrieved token by running the following command:
$ oc login --token=<retrieved-token> --server=https://api.<your-cluster>.<domain>:6443
Alternatively log in by running the following command:
$ export KUBECONFIG=~/<path_to_kubeconfig>Deploy the pattern to your cluster by running the following command:
$ ./pattern.sh make install
Verify the retail pattern installation
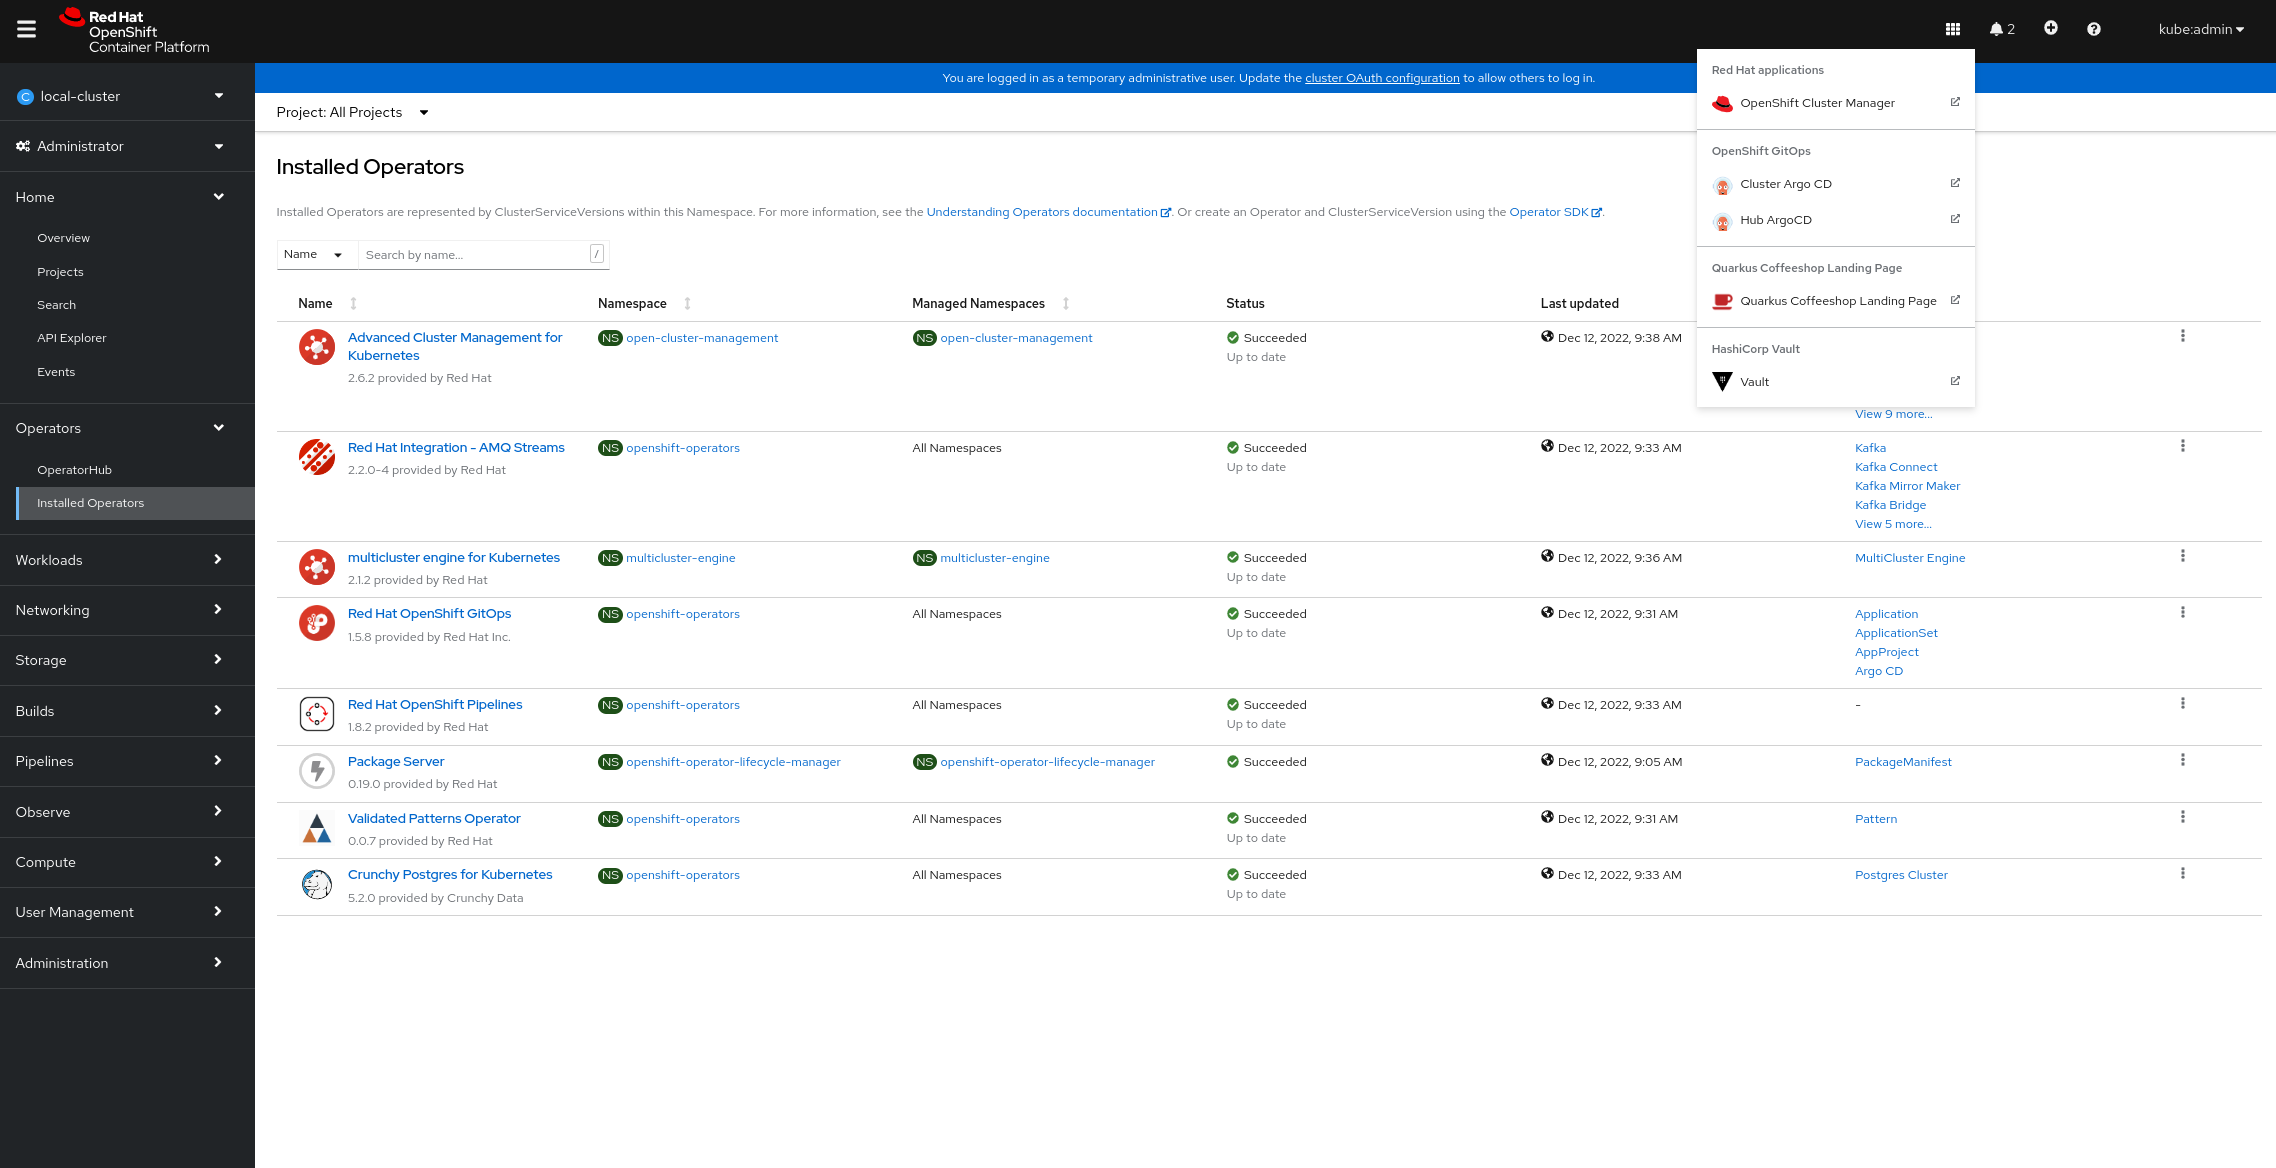
Verify that the Operators have been installed.
To verify, in the OpenShift Container Platform web console, navigate to Operators → Installed Operators page.
Set your project to
All Projectsand verify the operators are installed and have a status ofSucceeded.
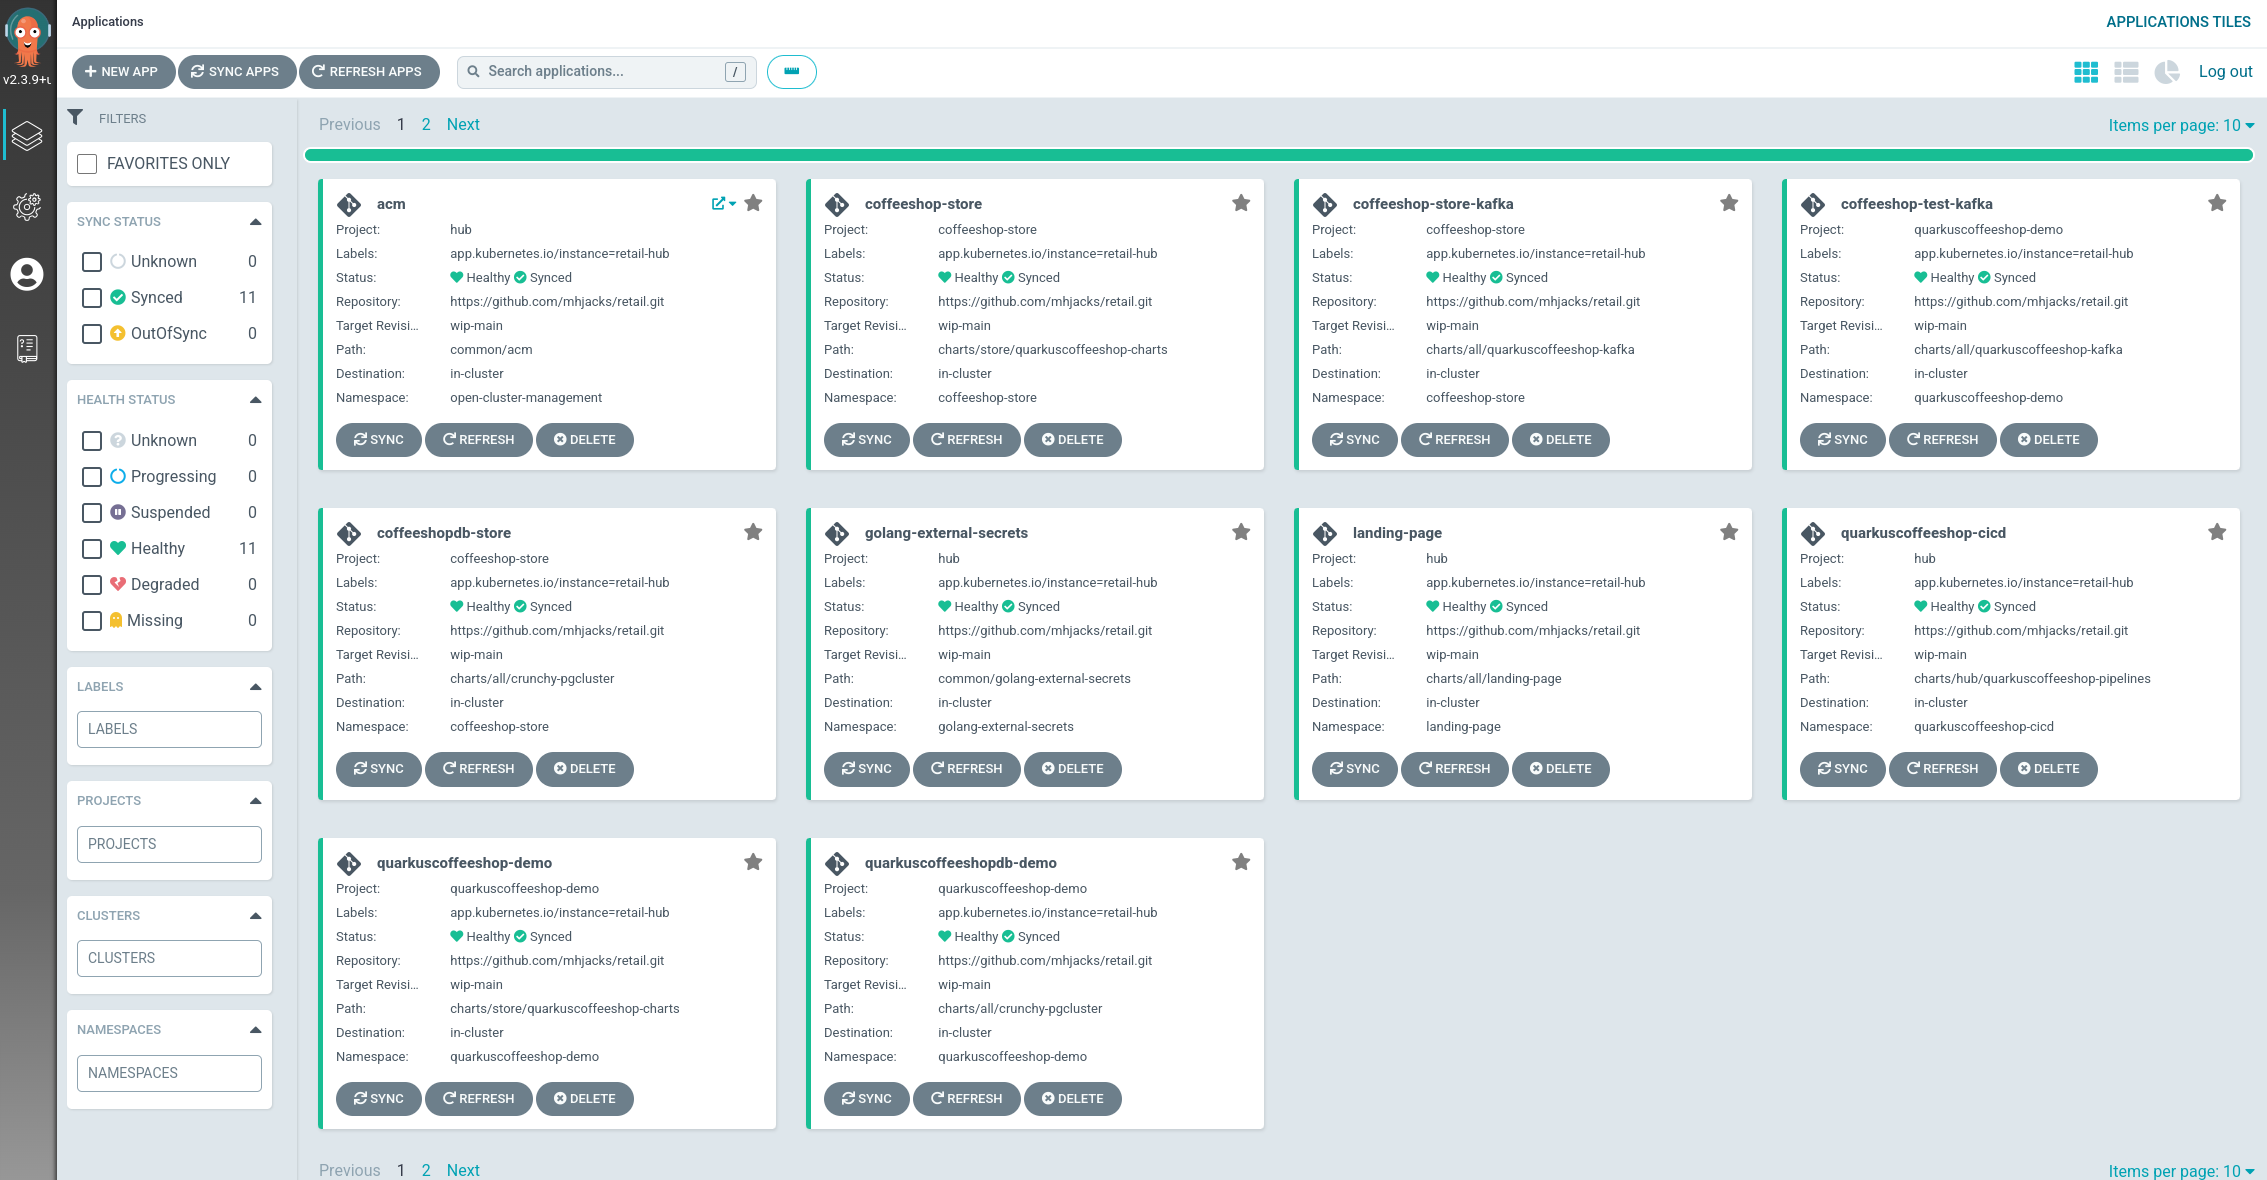
Track the progress through the Hub ArgoCD UI from the nines menu:
Ensure that the Hub ArgoCD instance shows all of its apps in Healthy and Synced status once all of the images have been built:
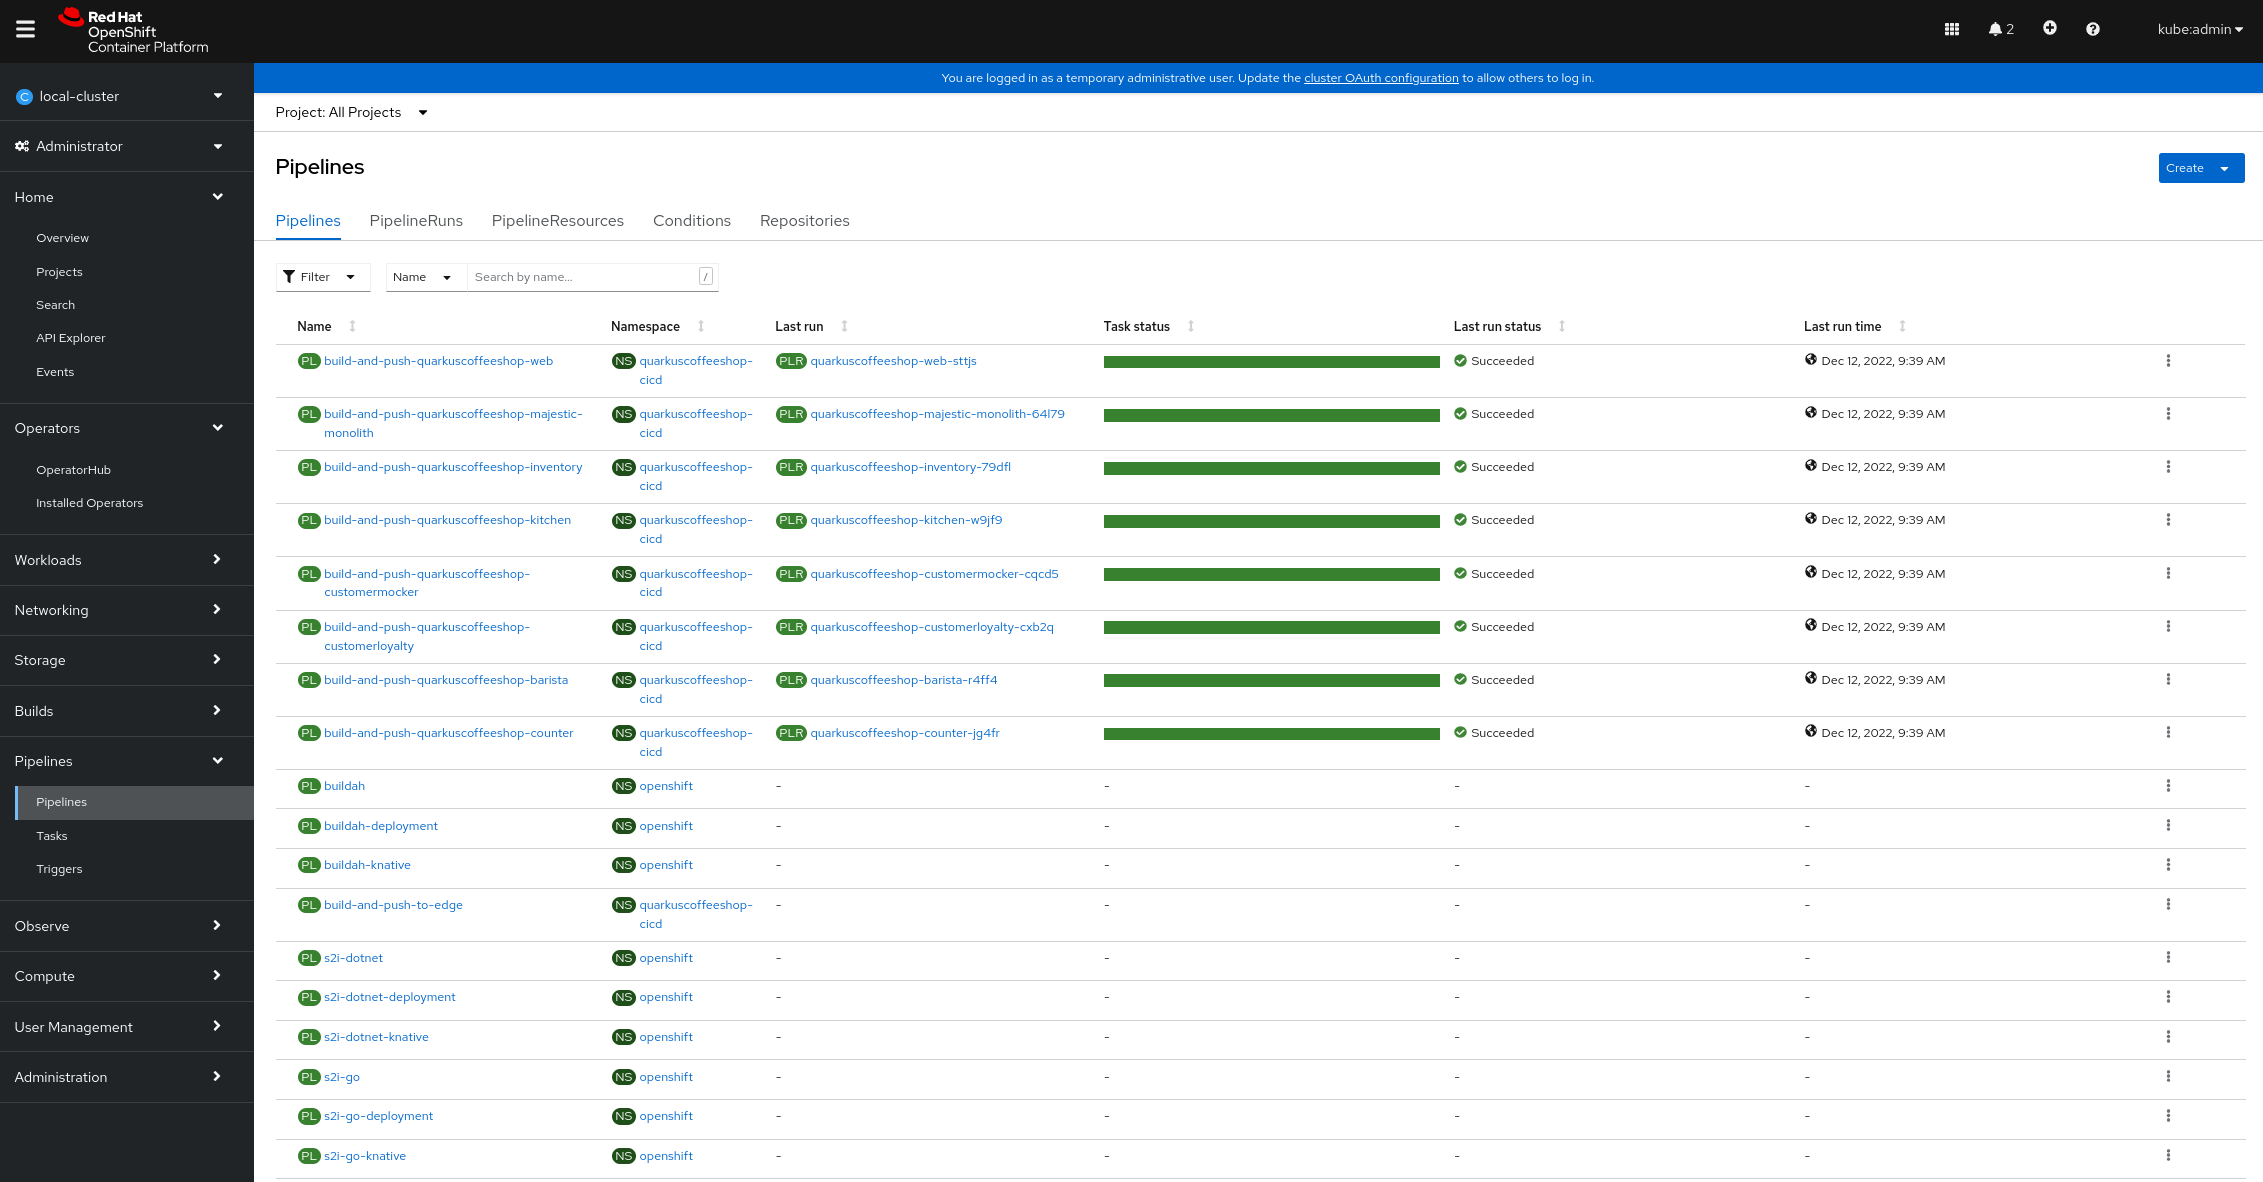
Check on the pipelines, if you chose to run them. They should all complete successfully:
Go to the Quarkus Coffeeshop Landing Page where you are presented with the applications in the pattern:

Click the Store Web Page to open the Quarkus Coffeeshop Demo:

Click the TEST Store Web Page to open a separate copy of the same demo.
Clicking the respective Kafdrop links to go to a Kafdrop instance that allows inspection of each of the respective environments.

